
Metal finishing is the critical step in preparing metal for painting. It occurs between the bumping stage, where metal is hammered, pried, pushed, or pulled into shape, and the filling stage, where very small defects in metal finished surfaces are filled, just before panels are painted. By its nature, metal finishing is finer work than bumping, yet offers more latitude for correction than the filling stage that follows it. In metal finishing, you can still modify surfaces by moving them and shaving metal off them, to make small dimensional and curvature changes.

AUTOMOTIVE BODYWORK & RUST REPAIR
For a comprehensive guide on this entire subject you can visit this link:
SHARE THIS ARTICLE: Please feel free to share this article on Facebook, in forums, or with any clubs you participate in. Copy and paste this link to share: http://www.cartechbooks.com/techtips/automotive-bodywork-metal-finishing-guide/
For those reasons, I think that metal finishing is the most critical stage of this work. It may lack the visually dramatic outcomes of bumping, but when it is done well, it is the part of metal work that produces much of the wow factor in great autobody repairs and fabrications.
One copasetic aspect of metal finishing is that the tools used to accomplish it are refreshingly few, simple, and relatively inexpensive. Of course, there is an offsetting downside to that proposition: You have to use those tools correctly to get good results, and that is not always easy. This chapter focuses on the correct use of metal finishing tools body files, pick hammers, and disc sanders to achieve great results.
In the metal finishing stage of body work, final panel contour adjustments are made and most surface defects are removed. Making a final correction to the contour of a sectioned door is shown here. Note that Blaine is working with his sightline aligned with the panel’s surface.

Indicating, Feeling and Other Human Tools to Determine Panel Surfaces
If you need to change the contour of a panel, it should be done before metal finishing operations begin. But if you need to make sure that a contour is perfectly consistent in very small dimensions, and that it is contained in a nearly perfect surface, metal finishing is where you get these results.
Any crown or combination of crowns in a panel must flow smoothly—by itself, or as one crown into another. If the requirements of practical matters, like covering up vehicle mechanisms, or opening doors, requires a panel surface to be discontinuous in crown, well, that is why stylists employ creases, character lines, and the other discontinuous or angular ploys and styling components of their trade. Some-times, I suppose, they do these things just for fun. What autobody panels do not have is irregular and illogical interruptions to the flow of crowns, unless such features are consistent and repeated, as can be the case with character lines of various configurations (for example, 1960s phony louvers in some Chrysler products’ rear fender flanks).
It is this feature, the smoothness of crowns and combination crowns, that metal finishing must preserve. It also must level minor surface deviations, in the form of small bumps and depressions. Metal finishing is the last appeal in the matter of panel crown continuity. It is also very close to the last appeal in the matter of panel smoothness.
Unlike bumping, where you can sense surfaces visually, and by feeling them, metal finishing works at a finer level. It works at the edge of the ability of the human sense of touch to sense deviations, and beyond the capabilities of unaided visual inspection of unpainted metal surfaces to define consistency. The solution to exceeding those human limits is to find deviations with files and disc sanders. Once these are located, metal finishing procedures work to correct them. In the case of low spots, the deviations are raised with hammers, usually pick hammers, and leveled with more filing or disc sanding. If the deviations are bumps (projections), they are filed or sanded to level.
These two tools illustrate the difference between bumping and metal finishing. The pneumatic body hammer (top left) has a 1-inch stroke, for moving metal and removing ridges. The pneumatic percussion hammer (bottom right) can pick light metal a few thousandths of an inch in metal finishing work.

Body files come in many sizes, shapes, tooth counts, and configurations. These are unusual, special-purposes files. None of them are currently available, but they do show up at swap meets and auctions. There are situations where they work much better than flat files.

The coarse file (top) has a 6-per-inch tooth count, while the fine file (bottom) sports an amazing 16 teeth per inch. Most body files are in the 8-tooth-per-inch range, ideal for most jobs. Finer files than that are for very fine finishing jobs and for working on aluminum panels.

These are the basic file holders that I use. They offer comfortable gripping surfaces and can be rocked, toe to heal, naturally. The flexible holder (bottom) offers adjustable contour, from mild concave to mild convex, and is the most usable holder for general work.

Pick hammering takes skill and practice. Some inventions purport to make it easier. These pneumatic picks are placed against low spots and triggered with foot valves. True, you don’t have to hit an invisible spot from afar with them, but they are difficult to locate and hard to control.

These are very fine adjustments, involving as little as 1 or 2 thousandths of an inch. In a 20-, 21-, or 22-gauge panel, there is not much thickness to file or sand off, without rendering that area of the panel dangerously thin. The point is: You must have a panel correct and level before metal finishing is a reasonable approach to achieving final contours and smoothness.
The first metal finishing tool that you should learn to use is the 14-inch body file. It is a masterpiece of functional tool design, evolved to perfection over many years of development. Used correctly and in moderation, it can do wonderful things for you. Foremost among these things is filing off high spots and revealing low spots in panels. It does this by slightly cut-ting away surface metal above low spots, and leaving them visually obvious as slight voids in an otherwise continuous, filed, shiny surface.
Once low spots are located, they can be raised with hammers and/or pick hammers, and re-filed. This process is repeated until no low spots are revealed, at which point the panel surface is level. However, it cannot be repeated ad infinitum, because each filing cycle removes metal and makes a panel thinner. You need to accomplish leveling in three or fewer filing applications, and that third one should be very light.
Always keep in mind that the object of metal finishing is to achieve correct contours and smooth metal with a minimum of material removal. Beyond that, try to leave as little need for body filler—plastic or metal—as is possible. After metal finishing, it is best to use little or no filler.
AUTOMOTIVE BODYWORK & RUST REPAIR
For a comprehensive guide on this entire subject you can visit this link:
SHARE THIS ARTICLE: Please feel free to share this article on Facebook, in forums, or with any clubs you participate in. Copy and paste this link to share: http://www.cartechbooks.com/techtips/automotive-bodywork-metal-finishing-guide/
Filing Done Right
All 14-inch, flat, body files come in a variety of tooth counts—between 6 and 16 teeth per inch. The finer files tend to cut more smoothly, but to remove less metal in a stroke than the coarser ones, making them somewhat easier to use. They are intended for finishing work. A body file with 8 teeth per inch is good for general metal finishing work.
Although it is possible to sharpen dull files several times, it is difficult to find file sharpening services these days, so it is best to try to keep your files sharp for as long as possible. One trick to accomplish this is to brush their teeth lightly with turpentine, from time to time. This retards rust and lubricates the cutting action. It tends to double the life of a new or sharpened file, and helps you achieve the proper smooth-gliding motion.
Body files are held in file holders made of wood or metal. I tend to use both types. There are also specialty files, like laterally concave and con-vex, and lengthwise convex (“banjo”) files. As well, there are specialty file holders for particular jobs. The most useful general-purpose holder is a flexible metal rig that allows you to custom contour files by adjusting the holder. This is important for working with different crowns, and in some situations where access is a problem.

The proper motion with a body file is forward, away from you, and slightly side-ways. As the file is moved, your down force on it should be shifted from its front to its back. You should always file toward areas of lower crown.

From the gallery of great ideas that just don’t work, I offer spring-loaded, automatic Bulls-eye picks. Supposedly, you locate the target anvil over a low spot, and squeeze the handle. Bingo, raised metal. But most situations lack room to fit these clunky devices, and they never strike accurately enough to work.
The instructions for using body files are based on time-tested methods of filing, and are designed to optimize both revealing depressions in metal, and leveling it. The first rule is to always file toward the flattest crown in a panel. This reveals low spots as voids in filed metal, while preventing the file from skipping over features of the panel, like crown changes, as might happen if you fail to file toward low-crown areas.
Your filing stroke should use as much of your file’s length, in contact with metal, as is practical. As you file, there are two motions that should be used, beyond pushing the file forward and away from you.
The first is to slide it sideways, about 15 to 20 percent of the distance that you push it forward. This must be done smoothly, or gouging may occur. If you see tooth gouges in the metal, you are doing something wrong. The second motion amounts to a subtle shift of force. It is to rock the file from its front (toe) to its back (heal) as you push it away from you, forward and sideways.
Since, as a child, you doubtless mastered the trick of rubbing your tummy in a circular motion with one hand, while patting the top of your head with the other hand, the filing motions that I describe here should come to you as, well, kid’s stuff. If they don’t, hours of practice certainly helps to fill any gaps. This combined filing motion is important and well worth mastering. Once you do, it should quickly become natural.
The sideways file shift should be alternated from one side to the other. Say that you start by filing forward, and shifting your file to the left. You may repeat this stroke a few times. Then, you should begin filing the same area to the right, from the point where your earlier file strokes ended. In this way, you cover an area of maybe 1 foot x 3 to 5 inches, always filing toward areas of lower crown.
The Art of Pick Hammering
Here is one of those confidence builders. The first time that you try to use a pick hammer, you will, almost certainly, make a complete mess of it. I know that I did. This is because once their function is explained, people expect pick hammers to be miracle tools that naturally find low spots, and apply just enough hit to raise them to the perfect level for fin-ish filing. Sadly, to date, no such pick hammer has been invented.
The first problem is that without some experience in the matter, it is frustratingly difficult to hit exactly the right spot with a pick hammer. That spot is usually on the other side of the panel from the one at which you are looking, so you are hammering toward yourself. The second problem is that people tend to choose pick hammers that are far too sharp for what they are trying to accomplish. I suppose that these predictably bad hammer choices are made because sharp looks purposeful and sexy. After all, stiletto heels and sharp features of the human anatomy are said to convey sexual appeal and power. However, in pick hammers, very sharp items are more useful for assault than for serious body work. If very spiked pick-hammers have any good application, it is for very fine work; and then, only in the hands of very highly skilled and seasoned metal workers.
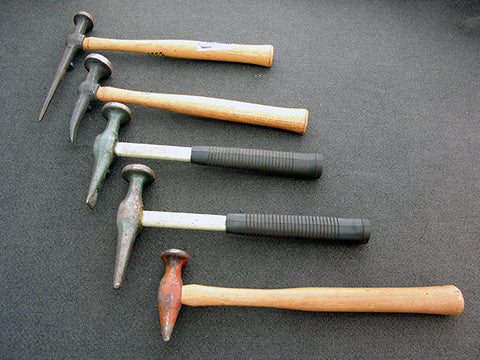
This pick-hammer assortment has just about every device that you will ever need for picking work. The sharp, pointed one (top) has limited application, mostly for very fine tuning operations. The bottom three picks cover most work to raise small low spots.
Left to right: 9- and 7-inch electric disc sanders. Right: a 7-inch pneumatic disc sander. Electric sanders are preferred for metal finishing, because they have more torque. Note the warped disc on the middle sander. It will cause chattering and skips if its disc is not changed for a flat one.

That first problem, locating the place to raise metal, amounts to translating where you know a low spot is from the side of the metal that you can see, to the one that you can-not. There are body workers who do this by hitting tentatively with their pick hammers from the backs of panels, and sensing the hit on the other side with their fingers, until it is in the right place. Another locating technique is to follow the hammer under or behind the panel and sense where it is located in relation to the side that you can see. This works for locating where to hit metal up. How-ever, it leaves the problem of hitting exactly the spot that you have identified. You might be amazed at how lost that spot can become, between nesting a hammer on it, and then swinging the hammer away from it and then toward it again. Several short, light strokes work best for pick-ing. A short stroke presents less chance of missing your spot. And if you do miss it, a short stroke does less damage than a more powerful one.
After you gain pick hammer experience, you will be able to find the right spot on the other side of a panel fairly quickly, as a result of increasing your hand/eye coordination. It is still a good idea to give the identified spot a light tap and feel its location through the metal, to confirm that it is correct. You will learn to see the metal rising each time that you hit it with your pick hammer. This allows you to make small adjustments in your hammering position, as you monitor your results from the other side of the panel. Always remember that you are trying to move metal just a few thousandths of an inch, and that you can correct some inaccuracies in your picking in the filing stage that follows it. Many small, incremental hammer strokes do the job far better than a few heavy ones, and involve much less risk to the panel.
Once you get the hang of picking metal up, it is easy to get carried away, and to try to raise it to Himalayan heights. This is unnecessary and it is destructive. To level metal, you need to pick up low spots to a point just above panel height. This allows you to file it perfectly level. If you raise metal beyond that point, when you file, you need to remove more metal than is necessary to get things level. Always stop picking just after you achieve level, and let your body file or sander do the rest. You make this determination by running your finger tips over the spot that you are picking. It is a good idea to put a smooth, clean rag or tissue under your finger tips when you do this. That prevents the oils and moisture on them from making your fingers grip, drag, or grab on the metal as you feel it, and gives you a much better sense of the topography of what you are feeling.
The Disc Sanding Alternative
After you have mastered the techniques of using body files and pick hammers to level metal, the brave new world of disc sanding awaits your discovery. Disc sanding offers an alternative to body filing, but comes with several cautions and warnings. Disc sanding tends to be much faster than body filing and, for that reason, it can damage a panel much faster than filing it. The degree of difficulty in using a body file or disc sander is about the same. Which technique you choose is largely a matter of personal preference. Many body metal workers use both techniques, each in specific situations or in sequence.
Disc sanders come in various powers, speeds, and disc sizes. Most body work is done with 7-inch units, with either rubber or fiber backings behind the abrasive discs. When disc sanders are used for paint removal, an open-coat abrasive disc is preferred. When they are employed in metal finishing, closed-coat, resin-bonded abrasives are best. The 36- and 50-grit sizes are appropriate for metal finishing with a disc sander, while 50-, 60-, and 80-grit sizes have applications for the final smoothing of metal, after it is leveled.
AUTOMOTIVE BODYWORK & RUST REPAIR
For a comprehensive guide on this entire subject you can visit this link:
SHARE THIS ARTICLE: Please feel free to share this article on Facebook, in forums, or with any clubs you participate in. Copy and paste this link to share: http://www.cartechbooks.com/techtips/automotive-bodywork-metal-finishing-guide/
The first phase of using a disc sander for metal finishing is the discovery phase. It involves disc sanding metal surfaces so that the sander skips over depressed areas in a way that reveals their presence.
Proper disc sanding technique, in the discovery phase of the operation, is to hold the abrasive disc against the metal with moderate pressure, tilted about 15 degrees away from it, and toward you, so that the sanding disc’s edge bends to contact and cut a narrow swath of surface, say 1 to 11⁄4 inch wide. The sander is moved sideways, and held mostly laterally flat to the panel, with a very small amount of tilt toward the direction of sideways travel. At the end of each lateral stroke, as the sander’s direction is reversed, it is moved the width of its cut swath, up or down. When the sander’s lateral direction is reversed, it should be lifted slightly to avoid dwelling too long on the area where the reversal of direction takes place. You also can accomplish this by untriggering and retriggering the sander, as you reverse its direction, but that is clumsier than slightly lifting it to reduce the pressure on its contact edge. When travel resumes, in the opposite direction from the just completed stroke, the leading edge of the sander should be raised, just slightly, in the new direction of travel, as it was before.
The final procedure in metal finishing is to disc polish the metal with 50-, 60-, or 80-grit abrasives. This gives it a sheen that makes it easy to spot dimensional deviations. I always dull that finish with a DA orbital sander, for better paint adhesion.

This disc cutter has two functions. One is to trim off the outer 3/4-inch from used discs, so that new abrasive is exposed for general disc sanding. Its other function is to cut discs into various shapes, with rounded sides and corners, for final surface-smoothing sanding.

It is critical that the sander always be in motion on the metal. While it is running, it can never stay in one spot. If it does, and if you are lucky, you will only overheat the metal where it dwells, with a very good chance of gouging it. If you are not lucky, you can burn through the metal. A telltale dark bluing of the metal surface under the disc contact patch will warn you that you are burning the metal.
Disc sanding for discovery should leave a series of swirl marks, or shiny paths. Any voids or dull spots in these paths are low spots. High spots may leave visible low voids around them. However, if they are not very high not high enough to need to be hammered down they will be ground off by the disc sander as it passes over them, thereby ceasing to be a problem.
The cycle of leveling with a disc sander and pick hammer is the same as for a pick hammer and body file. Sanding identifies low spots and removes most high spots. Hammering, as necessary and preferably with a low-crown hammer, drives down the high spots that are not removed by sanding. Hammering, usually with a pick hammer, picks up low areas. Occasionally, when low areas are relatively large, they need to be driven up with a highly crowned hammer. As with filing, the hammering and sanding operations are repeated until the panel is level and continuous. Also, as with filing, disc sanding removes material and cannot be repeated to the point of excessively reducing the thickness of a panel.
The 36- and/or 50-grit abrasives used in the discovery and leveling phases of disc sanding leave surfaces that are too rough to complete the metal finishing phase of panel work, although 50-grit abrasives are some-what usable for this purpose. Before metal finishing is complete, the metal must be smoothed for painting. Although filling follows metal finishing, it is bad practice to leave final smoothing for that stage of this work. It should be the last part of the metal finishing operation. That means that when metal finishing is completed, there should be few, or no, ridges or sanding marks that need filling. It also means that surfaces are not so smooth that they lack the tiny nooks and crannies that help paint to mechanically adhere to metal. The 50-grit abrasive disc will accomplish this, but 60- and 80-grit discs are better bets.
In the final smoothing phase of metal finishing, your disc sander is operated somewhat differently than in the discovery and leveling phases. For this operation, it is best to run your disc sander at right angles to the direction that you sanded in the discovery and leveling phases of metal finishing. Your sander should be held as flat to the panel as possible, producing as much disc contact as possible. This creates an averaging effect, and avoids any likelihood of gouging the panel, as might happen if only the outer edge of the disc contacted it.
A good disc cutter is an important disc sanding accessory, one that anyone who uses a disc sander should own. A disc cutter is used to trim the edges off discs used for sanding paint or for discovery sanding. It removes the spent outer inch, or so, from the disc, allowing the good abrasive that is left on the disc to be used. It would be a shame to throw away a disc with only 30 percent of its usable area consumed. A disc cutter allows you to avoid doing this.
The second use of a disc cutter is to allow you to modify a round disc by cutting a symmetrical and balanced rounded-side-and-rounded-point pattern into it. You can do the same thing with a knife or a pair of scissors, but a disc cutter lets you do it faster and more consistently. The object is to cut a shape into a disc that has from three to six apexes. I like a pentagon-shaped disc best, but tastes vary in this matter. The points between the rounded sides also should be slightly rounded, to keep them from tearing apart too easily in use.
In the final stages of metal finish sanding, these cut, non-round discs should be used exclusively. The reason is simple: When you use them, you do not have a consistently round sanding disc that is always presenting the same edge to the metal that you are sanding. A round disc can quickly cut a groove into metal, particularly when it is moved into an area like the transition from crown to reverse crown. In such an area of changing crown, it may be presented to the metal at very sharp angles that cause its edge to dig in. Damage can occur in a fraction of a second. However, a shaped, sided disc presents different radii of its shape to the metal as it spins against it, greatly reducing the chance of gouging it.
When metal finishing is completed, your work should have a consistent, silvery appearance, with curves that remain consistent as you move your sight line past them. Enjoy that sight because, after you perform some filling to remove the few minor surface defects that may remain, your work will move on to finishing or refinishing. After that, you will probably never have the opportunity to admire that particular metal surface again.
Written by Matt Joseph and Posted with Permission of CarTechBooks
AUTOMOTIVE BODYWORK & RUST REPAIR
For a comprehensive guide on this entire subject you can visit this link:
SHARE THIS ARTICLE: Please feel free to share this article on Facebook, in forums, or with any clubs you participate in. Copy and paste this link to share: http://www.cartechbooks.com/techtips/automotive-bodywork-metal-finishing-guide/