BMW E30 Transmission Swaps
There are two main reasons to swap transmissions in an E30: to exchange one worn transmission for a better one or to change from an automatic to a manual (more preferred). FYI, the first scenario is easier.
From Worn to Better
With both automatics and manuals, there are some year-to-year differences in the six-cylinder engines that make seemingly straightforward swaps a little more complicated. For one thing early eta engines have two crank-position sensors mounted to the bellhousing. The 1987 and later “super” eta engines and all 325i engines had crank-position sensors mounted to the front of the engine. This means that swapping from early to late is easier than from late to early, since there are no holes in the later bellhousing for mounting the sensor.
In addition, there is a difference in the output flange of the transmission, matching the two different giubos used on the E30.
This tech tip is from the full book, BMW 3-SERIES (E30) PERFORMANCE GUIDE: 1982-1994.
For a comprehensive guide on this entire subject you can visit this link:
LEARN MORE ABOUT THIS BOOK HERE
SHARE THIS ARTICLE: Please feel free to share this post on Facebook Groups or Forums/Blogs you read. You can use the social sharing buttons to the left, or copy and paste the website link: https://www.cartechbooks.com/blogs/techtips/bmw-e30-transmission-swaps
If you are swapping an automatic into an early car, make sure to stick with the early transmission to resolve both problems. Later cars can use either transmission (with some concerns noted below) but need to have the matching driveshaft. If you are replacing the same kind of transmission (automatic for automatic, 260 for 260), you can use the original driveshaft by swapping the output flange on the transmission case to match. A 30-mm thin-walled socket is needed and you may as well replace the rear seal while you have it apart.
There are three different versions of the Getrag 260 transmission installed behind six-cylinder M20 engines. All three are very similar because they have the same bellhousing bolt pattern and are the same length. That means they can be interchanged relatively easily. They all have a similar external shift linkage. Many external parts are swappable, but each has some differences that can complicate swaps.
The first difference is in the crank-position sensor location. A few later transmissions were cast with an undrilled boss for the position sensors, so check carefully if you want to install one on your early eta engine.
If you want to use an early transmission on a later engine there is one slight issue. The bellhousing is approximately 10 mm deeper than the later bellhousing. Many people have successfully swapped them without difficulty, but to be on the safe side you can use a thicker Sachs throw-out bearing (PN 21-51-12-04-525) to make up the difference.

It looks complicated, but the Getrag 260 is actually a straightforward, tough transmission that can handle lots of power and even some abuse. Rebuilding one isn’t for the timid, but it’s not impossible either. (Photo Courtesy Metric Mechanic)

Here’s the first- and second-gear synchronizer sleeve. It is moved by the shifter to select either first or second gear. The synchronizers slow the shift and match the speed of the gear to the synchro sleeve for a smooth shift. (Photo Courtesy Metric Mechanic)

There you can see the relationship between the synchronizer sleeve (top), synchronizer (middle), and gear (bottom). All three have to be in near perfect condition for the transmission to shift well. (Photo Courtesy Metric Mechanic)
There is one other important difference. First, the early (up to 1986 model year) shift linkage is mounted to a stamped-steel bracket bolted to the rear of the transmission. Starting in 1987, the transmission case incorporated bearing posts to more solidly mount the shift linkage. The linkage is not interchangeable between the two types, so make sure to get the linkage that matches your transmission and car. If you need to use the later linkage with an earlier transmission, you can use the mounting bracket from an E30 M3.
If you are working with a four-cylinder car, the Getrag 240 can only be replaced with one from a similar car. The 240 transmission in M10-powered cars is not the same as the one in M42-powered 318is cars. The bellhousing bolt pattern is the biggest difference, aside from the later-style shift linkage. The M10 engine has a unique, smaller bolt pattern that ended with the demise of that four-cylinder engine family.
Unfortunately the 260 cannot replace the 240 because the M20 bellhousing bolt pattern is not the same as that of the M10. The M42 318is engine shares its bolt pattern with the M50 six-cylinder family of engines used in the E36 models as well as the S50 engines used in later E36 and E46 cars.
This is the same bolt pattern as the M20 six-cylinder, but it is rotated 10 degrees to the left, which means that swapping the E30 transmission for a later one is possible but difficult. The transmission mounting crossmember has to be modified to fit the tilted angle of the later transmission.
Other than the obvious issues with driveshaft length between the various transmissions, the mounts, shift linkages, and other issues have to be dealt with on a case-by-case basis. In general it’s best to stick with a transmission that matches the engine you are running—or at least one that shares the same bellhousing bolt pattern and orientation.
The M3’s tough 265 transmission can be used to replace a 240 transmission behind an M10, but there is no real reason to do so. The gearing is the same and the 240 transmission is plenty strong enough to handle the power of even a modified M10 engine.
The same goes for swapping later Getrag 250 and even ZF six-speed transmissions, from an E36 or E46 behind an M42 engine. Sure, it bolts into place, and a good driveshaft shop can shorten and weld a driveshaft to match, but any other transmission is going to be much heavier and stronger than needed.
Some people prefer the E36 Getrag 250 behind the M20 engine because it has a direct-drive fifth gear and slightly closer ratios. It must be used with a higher final-drive ratio to compensate on the highway, but really there is very little advantage and a few disadvantages. The 250 has a reputation for poor shift quality and is not as strong as the 260 used in the E30.
Bolted to an M20 engine, the Getrag 250 requires a modified transmission crossmember to account for the tilt and a matching driveshaft from an E36. The E36 driveshaft requires that you swap the center support bearing for an E30 unit.
The ZF transmissions installed in the later E46 and E36 M3 (310 and 320) can also be used behind an M20 (with the same notes as above). These are great-shifting, strong transmissions but it is hard to imagine a combination of M20 parts that stresses the strength of a Getrag 260. If you are swapping in a DOHC engine, a ZF is a great choice versus the Getrag 250.
In general, if you are keeping your stock engine I recommend that you stick with an E30 transmission for the best combination of cost, hassle, performance, and weight. This holds true for engine swaps too. In many cases it’s recommended to stick with the car’s original transmission, clutch, and flywheel.
From Automatic to Manual
Chances are, if you have an automatic transmission E30 you are interested in getting rid of the slushbox for a proper manual and a third pedal. This is not a difficult swap to perform, although collecting all the parts can be a challenge. The easiest way to do the swap is to buy a parts car and park it next to the transplant recipient while you perform the swap. That makes it easier for you to figure out all the small differences and ensure that you aren’t missing some little fastener or clip. [insert

The reverse idler gear is small, but generally does not have to transmit much power. Rarely do they give trouble. (Photo Courtesy Metric Mechanic)

Here’s what a few hundred thousand miles and some rough treatment do to a moly-lined synchronizer ring. The shiny spot is actually iron transferred from the friction surface on the speed gear. This ring needs to be replaced. (Photo Courtesy Metric Mechanic)

The shiny synchro ring (left) is new, while the darker one (right) has seen some use. The dark color is from additives in the transmission fluid. (Photo Courtesy Metric Mechanic)

Total failure of synchronizer rings often involves cracking or breaking. When this happens there isn’t much time left before the ring comes apart and causes further damage. (Photo Courtesy Metric Mechanic)
This tech tip is from the full book, BMW 3-SERIES (E30) PERFORMANCE GUIDE: 1982-1994.
For a comprehensive guide on this entire subject you can visit this link:
LEARN MORE ABOUT THIS BOOK HERE
SHARE THIS ARTICLE: Please feel free to share this post on Facebook Groups or Forums/Blogs you read. You can use the social sharing buttons to the left, or copy and paste the website link: https://www.cartechbooks.com/blogs/techtips/bmw-e30-transmission-swaps
If you don’t have room for a parts car, don’t worry. You can find most of the parts at a local junkyard or online with a bit of searching. Just be prepared for your swap to take a little longer since you don’t have another car nearby for reference. A pull-your-part type of junkyard makes this a little easier since you can use a parts car in the junkyard as your reference.
Obviously the most important part of the swap is the transmission. Make sure to choose a manual based on the information in the “Interchange Chart” above. Pick one that has the holes for the rear crankshaft position sensors if your engine has them, otherwise you don’t need to be so picky. Pull the complete shift linkage from a manual car, including the tunnel bracket.
Make sure to get a driveshaft that matches your new transmission too. This driveshaft must come from the engine and transmission combination you will end up with—a 318i with its Getrag 240 needs a different shaft than a 325 with a Getrag 260. Match giubo diameter or swap the output shaft on your donor transmission.
You need a transmission mounting crossmember from a manual transmission car, as the mounts are different than those on an automatic. You also need a set of brake and clutch pedals—either an entire pedal box assembly or just the two pedals and their pivot. It’s easy enough to pull the old pivot from under the dash and replace just the pedals, although some people prefer to swap the entire box assembly, which requires pulling the steering column.
Buy a single-mass flywheel and matching clutch assembly, which bolts in place of your original torque converter and flex plate. Make sure to buy and install a new pilot bearing in the back of the crankshaft to support the manual transmission input shaft. Get new master and slave cylinders. It’s just not worth the chance of getting a defective set from a parts car.
The same goes for the mounts, giubo, and center support bearing. If you are going to remove all these parts during the swap, it makes sense to do it right and replace all the rubber pieces and wear items at the same time. Take your time and rebuild the shift linkage and check for other issues as well. Replace any used nylon self-locking nuts with new ones; they are not designed to be used indefinitely as their locking feature (the nylon insert) tends to break down with repeated use, especially in a hot and oily environment.
Once your new transmission, shifter, driveshaft, and clutch linkage are in place, you can start on the wiring. E30s with manual transmissions have two clutch switches, one for the start relay and one for the cruise control. Manual transmissions have an external reverse light switch, which plugs into the car’s harness. In place of all this, automatic transmissions have a five-wire harness that connects each of these points to the automatic shifter.

The Getrag 240 transmission used behind four-cylinder engines has a number of improvements including asymmetrical synchronizer engagement teeth on the second gear (bottom). Compare the engagement teeth to the symmetrical teeth on the first gear (top). This improves shift performance in upshifts. (Photo Courtesy Metric Mechanic)

Third gear also has asymmetrical engagement teeth in the Getrag 240 gearbox. This feature also helps make it a smooth-shifting transmission. (Photo Courtesy Metric Mechanic)

Later Getrag 260 transmissions have synchronizers with asymmetrical teeth. Similar to the 240 transmission’s asymmetrical engagement teeth, these help the upshift performance of the transmission. (Photo Courtesy Metric Mechanic)
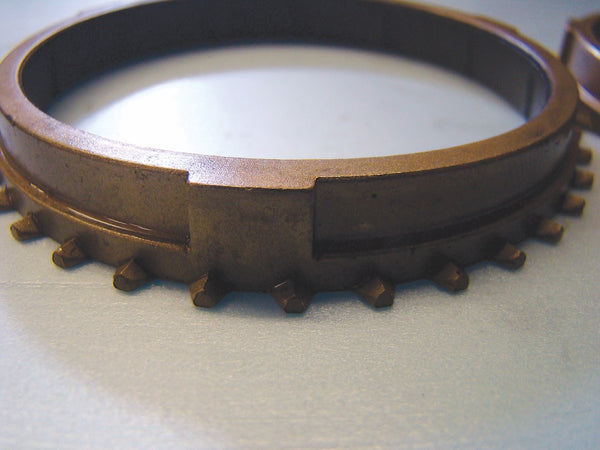
The early Getrag 260 transmissions have different synchronizers. This is the kind of improvement that can be made during a transmission rebuild. (Photo Courtesy Metric Mechanic)
The easiest way to get your car started and have reverse lights is to disable this special harness and install at least one clutch switch (if you want the cruise control to work). Install both switches if you must have a functioning clutch-in start enable. If it does not bother you that your car can be started with the clutch in or out, just use one clutch switch.
If you use one switch, disable the start relay by removing it and installing a jump wire between pin #30 and #87 (the two switched connections on any Bosch relay). To get the cruise control working, find and unplug connector C143 (refer to the factory wiring diagram). It’s under the instrument panel and has a green/black wire on one side and a blue/brown wire on the other. This enables the cruise control when the start relay is disabled. Unplug the jumper connected to one of the clutch switch connectors near the pedal assembly. Plug the now-open connector to the clutch switch that you have installed. Your cruise control should now function properly.
To get the reverse lights working, you can trace the harness back under the dash and connect the MT wires to the connector they are supposed to connect to in a manual car. Or you can simply splice the two reverse light wires to the green/yellow and blue/white wires near the shifter (after cutting out the automatic shifter wires).

Here you can clearly see the relationship between the gear, the synchro cone on the gear, the synchronizer, and the synchronizer sleeve and hub. It’s hard to visualize how all these parts work together but after you spend some time with the parts in your hand it all makes sense. (Photo Courtesy Metric Mechanic)

These little balls and springs are responsible for allowing the sleeve to move and grab the synchronizer teeth; they also exert pressure on the synchronizer during the shift. Any damage or wear here causes poor shifting. Usually it’s the 2-3 synchronizers that go first. (Photo Courtesy Metric Mechanic)
Written by Robert Bowen and posted with permission of CarTech Books
LEARN MORE ABOUT THIS BOOK
If you liked this article, you will LOVE the full book!
Get your copy here.