
The 1964–1974 GTO, though offered in three distinct generations, used a front suspension system that was very similar in design and componentry. The conventional independent front suspension design featured upper and lower control arms with coil springs and tube shocks. The steering system used a recirculating ball mechanism and hydraulic power assist was optional. The 1964–1972 cars used the same basic system, varying only in spring rates, shock specs, and steering gear-ratios. All used common upper and lower control arms and the spindle designs varied only by the braking systems offered.
The 1973 GTO used an upgraded version of the GM independent front suspension system, which was shared with the second-generation Firebird and the 1971-and-up full-size cars, differing only in spring rates, bushing hardness, and shock valving. The newer design offered improved bump-steer performance and was engineered from the beginning for use with disc brakes and radial tires, though radials weren’t used across the board right away.

For a comprehensive guide on this entire subject you can visit this link:
LEARN MORE ABOUT THIS BOOK HERE
SHARE THIS ARTICLE: Please feel free to share this article on Facebook, in forums, or with any clubs you participate in. You can copy and paste this link to share: http://www.cartechbooks.com/techtips/mastering-gto-restorations-suspension-guide/
Of all the A-Body GTOs, the 1973 is easily the best handling, especially if the optional heavy-duty suspension was ordered. Even by modern standards, these cars were very capable handlers and were on par with the Trans Ams of that era. If you have one of these cars, you really do not need to do much more than add stiffer bushings and performance-oriented shocks; they really were that good.
A properly rebuilt suspension, such as the one in Sam Ranalli’s 1969 Judge, shows how form and function can merge into a visually-pleasing system that performs just as it did on a new car fresh from the factory. The bushings are new and the finishes are correct, but in this case, originality was the goal, so factory installed items that might be simply replaced in a driver restoration were rebuilt. Determining how much should be kept and reused and how much needs to be replaced varies by the car, the level of restoration, and the intended use. For a daily driver or a weekend car, newer or reproduction pieces are suitable because most parts have a stock appearance and generally cost less than rebuilding the original parts. However, if it is a concours restoration, originality is needed for the highest point totals in competition and factory-supplied parts are needed.

The 1974 GTO used a front suspension system that was similar in design to the 1967–1969 Firebird, which shared the same basic floorpan and firewall. That system was in turn similar to what was used on the 1964–1972 GTO, in terms of control arm design and basic dimensions.
The rear suspension on the 1964–1972 GTOs was shared with other GM A-Bodies. The trailing-arm-design suspension featured upper and longer lower control arms, coil springs, and tube shocks locating a solid rear axle. The upper arms are triangulated to keep lateral axle deflection to a minimum. This rear suspension was very capable in terms of getting the abundant torque of the Pontiac V-8 to the ground. In fact, very little was needed to prep it for drag-racing duty. To this day, many 10-second GTO drag cars employ a stock suspension, except for springs and shocks.
The 1973 rear suspension, similar to the front, was an upgraded version of the previous generation. Owing to its very stout design, this basic suspension was used in A-Bodies through 1977 and under the 1977– 1996 full-size GM cars such as the Buick Roadmaster and Chevy Caprice and Impala SS.
The 1974 GTO, based on the X-Body platform, was the sole unibody version of the original GTOs. It shared its parallel leaf-spring rear suspension design with its GM siblings, Chevy Nova, Olds Omega, Buick Apollo, as well as the 1967–1981 Camaros and Firebirds. As a benefit, there is a lot of commonality, so the highest-performance rear-suspension components from a late Gen II WS6 Trans Am can easily be integrated into a 1974 GTO and still look authentic. It’s a point to keep in mind.
Restore Safety, Functionality and Appearance
The proper restoration of the suspension of your GTO is an important safety and performance consideration. Making sure all systems are working as designed is an important step but you cannot ignore the effects of 40 or more years of exposure to the elements. Rust-belt cars can experience heavy enough corrosion to where upper and lower control arms become too rusted to re-use. Even Southwestern cars experience deterioration.
In dry climates, items such as bushings, suspension stops, and rubber mounts dry up, crack, and deteriorate, and the suspension no longer works as it is designed. You hear things like squeaks, groans, and clunking sounds that come from suspension components not properly isolated from the frame. While these items are important from safety and performance standpoints, the good news is that returning your suspension to its original condition and operation is not terribly difficult but requires quite a bit of disassembly.
A freshly-rebuilt and correctly-date-coded steering box wins points with the concours judges, but there could be more going on here than a stock rebuild. Companies, such as Power Steering Services, can rebuild your steering box to exactly new and correct condition, or they can upgrade the internals with faster ratios from later, high-performance GM offerings such as a WS6 Trans Am or Impala Super Sport. Best of all, these changes do not hinder collector value because they go completely undetected, so even a concours judge wouldn’t be the wiser. It is an option that is highly recommended if the restoration is for a car that will be driven.

Once the main suspension components, such as the upper and lower control arms, are off the car and disassembled, cleaning and painting can commence. Depending on the amount of corrosion, a wire brush, sandblasting, or even electrolytic rust removal can be used to remove rust, but I recommend that you do not acid dip these components. Acid can make the metal brittle, which could lead to stress cracks. Once free of grease and rust, they can be painted, much like the bolt-on outer sheet metal. Then the replacement of bushings and other items can be accomplished. (Photo Courtesy Scott Tiemann)

If the restoration is a concours type with originality and correctness a top priority, you have the responsibility to retain as much of the original suspension componentry as possible. The rebuilding of the original pieces is also necessary, and replacement of components is to be limited to those items that were too damaged or worn to refurbish. Those pieces must be replaced with correct, original NOS pieces or used items in rebuildable condition. In cases where the parts in question are date-coded, properly dated replacements are necessary.
Find more Tech Tips like this in the book:
HOW TO RESTORE YOUR PONTIAC GTO 1964-1974
Learn everything you need to know about your GTO by getting your copy here!
SHARE THIS ARTICLE: Please feel free to share this article on Facebook, in forums, or with any clubs your participate in. You can copy and paste this link to share:
https://www.cartechbooks.com/blogs/techtips/mastering-gto-restorations-suspension-guide
None of that criteria is necessary with a driver-type restoration. If it is more cost-effective to rebuild what you have, then that is what you should do. If a reproduction item is available, it could be a financially viable alternative. Last, a better-performing, later-model component, such as a steering box, could be used with little, if any, loss of visible authenticity. When it comes to suspensions, there are a lot of minor modifications that can be made to greatly improve handling, overall performance, and safety. If originality and authenticity are secondary to performance, these relatively minor tweaks can reap large benefits and make your GTO handle much like a later-model relative, such as a 1994– 1996 Impala SS, as there is a lot more commonality under the skin than you may realize.
Inspection and Evaluation
If possible, take the time to drive your GTO and make notes on its handling qualities. Are there any obvious problems? Is there vibration, noise, or other undesirable qualities? Do you feel or hear any clunking? Does the car track straight or does it pull excessively to one side? Is there a lot of play in the steering? Does the car bounce around when going over bumps? These behaviors are indicators of specific problems.
For example, clunking sounds are usually from suspension bushings that have failed. Rattling sounds going over bumps or excessive body lean could indicate broken sway-bar mounts. Steering play (turning the steering wheel without a corresponding change in the car’s direction) could indicate a worn steering box, steering-arm damage or wear, or a combination of both. Porpoising indicates worn-out shock absorbers. Evaluate your GTO’s driving traits to get an idea of what it needs and get a head start on any surprises that might pop up.
After driving the car and taking notes on its handling, it is time to go a bit deeper. With your car on a lift, begin by checking the ball joints for excessive play and wear. Most shops just stick a crowbar between a control arm and the steering knuckle and start rocking back and forth. If there is excessive free play, then the ball joint needs to be replaced.
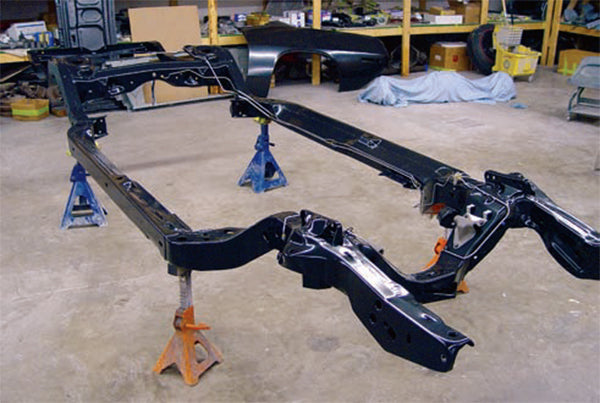
This 1964 GTO frame is ready for the installation of the rebuilt suspension systems. The frame, like the rest of the chassis has been painted with a semi-gloss black paint to resist rust and to present an authentic finish. The procedure for metal surfaces is the same, whether it is a frame rail, oil pan, or outer body panel. Once the metal has been sandblasted or otherwise stripped, use PPG’s DP-40 epoxy primer to seal the metal. Then place any body filler (frame rails can become pitted) on top of the DP-40. This encapsulates the filler between two layers of primer. After block sanding, prime it with PPG’s K-38 primer. Sand with 180-grit sandpaper and then wet-sand with 220. Apply the top coat. In the case of the frame, use either PPG’s DCC 9348 single-stage urethane, which comes pre-flattened, or DCC 9300 high-gloss paint with flattener added. (Photo Courtesy Scott Tiemann)
The 1974 models were the last run of the original GTOs. Based on the 1968- 1974 X-Body platform, these were the only GTOs that featured unibody construction until the Australian-designed GTO was released in 2004. As a result, the handling of these early 1970s unibody cars greatly benefits from the addition of front-to-rear subframe connectors. Subframe connectors add a lot of strength to the vehicle’s structural rigidity. This not only helps with performance and handling, it also helps preserve the body structure because the frame/body is subjected to less torsional stress and therefore you shouldn’t see stress cracks or distortion. Different types are available for bolt-in or weld-in installation. Bolt-in units are suitable for street-driven cars and can easily be removed, if desired. (Photo Courtesy Hotchkis Performance)

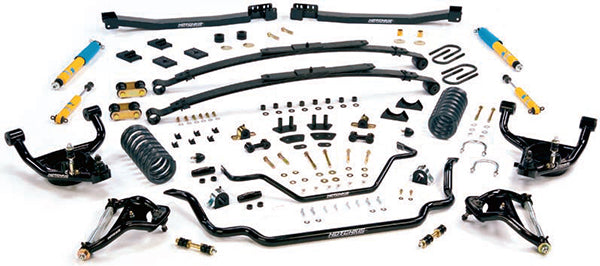
Many aftermarket manufacturers offer handling kits that run the gamut from mild to wild, depending on your intent and budget. (Opting for a suspension kit other than stock rebuild is beyond the scope of this book.) It is not difficult to take your 45-year-old Goat and bring it up to modern handling standards with the addition of a balanced blend of shocks, springs, sway bars, and bushings. This is an area where a driver-quality car can really make some huge strides in drivability. Even concours-style restorations can benefit from harder bushings and other small changes not readily visible. This kit is for a 1974 GTO; similar kis are available for A-Body GTOs. (Photo Courtesy Hotchkis Performance)
Unless the ball joints are perfect, with no play at all, it makes sense to replace them—it is easiest to replace them with the control arms off the car. It can be done at the same time that new control arm bushings are installed. These two operations do a great job of tightening the front end and returning the original feel to the car. Again, your shop manual is the best source of information on this topic.
When ball joints fail, it is usually at low speeds, with the wheels turned to a locked or near-locked position. This is when the most stress is being exerted on them. They generally do not fail at highway speeds, which is a good thing because the driver would have a tough time keeping the car under control.
Control arm bushings give you plenty of warning before they fail. Clunking sounds, the binding up of suspension movement, as well as the creaking and scraping sound as the suspension moves through its travel range are clear indicators that a rebuild is in your future. My first Pontiac restoration made all of those noises as well as a few others that elude explanation to this day.
Suspension and chassis restoration is straightforward mechanical work, and most first-time restorers are well equipped to perform this kind of work. You need to simply remove the suspension arms, springs, bushings, and ball joints, then you need to inspect and evaluate each component. If each major suspension arm is in sound condition, it needs to be sandblasted or stripped, primed, and repainted. Then it should be carefully set aside for reassembly.
Paint Finishes
To restore the luster of your car’s underbody, most components must be stripped to the bare metal, primed, and have factory-correct paint applied. Most components, such as the control arms, fit into a bead-blasting cabinet. For larger components, use a sand blaster or soda blaster to remove the former finish, grease, rust, and grime.
If you’re restoring a concours car or restoring to factory-correct finishes, pay attention to the type of black paint applied to the suspension parts. Eastwood and other companies offer spray paints, such as Ceramic 2k Satin Chassis black, but some of these are just close and not spot-on. With most GM chassis, the chassis parts are 30-percent gloss. To apply the highest quality finish to your suspension, first strip it down to the metal. Use a professional spray gun with non-sanding primer to shoot the parts. Once done, let it dry and then apply the correct tint of black paint. For most but not all components, use 30-percent gloss-black enamel. To arrive at that tint, add the requisite amount of flattening agent to the paint and properly mix. PPG, DuPont, Eastwood, and Valspar all offer suitable enamel paints to apply to the suspension.
Upgrades
Upgrading your GTO’s suspension for improved performance can run the gamut from increased spring rates and better shocks to heavier front and rear sway bars to complete C5 Corvette IRS conversions for a full Pro Touring experience. Here, the discussion of upgrades is limited to bolt-on components, as suspension conversions of that type go well beyond the scope of a restoration.
While rebuilding your suspension, you may consider harder bushings to eliminate the “slop” found in factory systems. If you are willing to give up a little ride quality for a tighter feel, this is a good way to go. The choices are harder rubber or urethane. Harder durometer bushings are good for mild upgrades and help retain ride quality. Urethane bushings greatly enhance handling and road control but transmit more harshness. If you use urethane bushings, use the graphite-impregnated versions or some other means to prevent squeaking or binding like regular urethane units do.
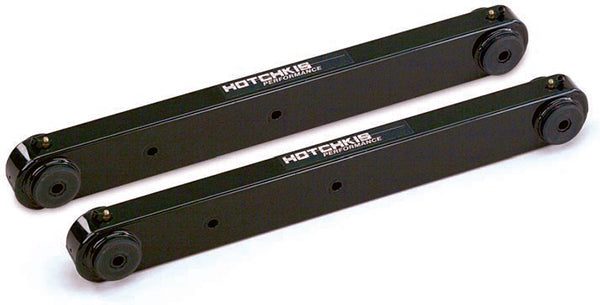
Boxed rear lower control arms came from the factory on some high-performance GM cars and can be added to your GTO if it’s not already equipped. They are less prone to flex under high-horsepower loads, extreme street use, and racing. If you are handy with a welder, you can modify your existing units with steel plate or you can purchase new ones from most suspension parts manufacturers. These units fit a 1973 GTO. (Photo Courtesy Hotchkis Performance)
Sway bars are the best bang for the buck for improving the handling of your GTO. Rear sway bars were offered from 1970-on and really helped with cornering stability (keeping the car flat through the corners). In addition to retrofitting factory sway bars, even beefier aftermarket versions are available from Global West, Hotchkis, H-O Racing, and others. It is usually not necessary to increase the spring rate for improved handling, though some may want to, depending on the use of the car. Larger aftermarket sway bars control body roll while maintaining a relatively low spring rate for ride. It is a philosophy generally credited to Herb Adams, the Pontiac engineer who did much of the suspension development for the first two generations of Trans Ams.
Steering
Another area that can be upgraded without significant visual change is the substitution of the stock steering box with a newer, quicker version. Early GTOs are hampered with slow steering boxes, especially the manual steering boxes, which were an agonizingly slow 24:1 ratio, which worked out to more than four turns lock to lock. Variable-ratio power steering became optional equipment in 1970.
Though still of the “low-tech” recirculating-ball type and not of the more modern rack-and-pinion variety, there are some factory GM steering-box choices that provide improved feel, faster ratios, and improved steering response, so much so that converting to rack-and-pinion isn’t really necessary. Look for steering boxes from a 1983–1987 Chevy Monte Carlo SS, 1986–1987 Buick Grand National, 1982–1992 Trans Am, or 1994–1996 Impala Super Sport and 9C1 Caprice police car. These all fit, though things like removing the internal stops on F-Body versions must be done in order to preserve the turning radius. Additionally, flex couplings and hoses may need to be exhanged for later-model equivalents, due to the implementation of different sizes and/or metric sizes.
Another option is to have your existing steering box rebuilt with all of the “good stuff” installed, giving you all of the advantages of a late-model box without any conversions needed. Externally, it looks exactly like a stock unit, so the concours would have a tough time detecting the change without actually driving the car. Companies such as Power Steering Services in Missouri can do the conversion for little more than a stock rebuild.
Aftermarket Control Arms
Many advancements in suspension technology, aside from tires, have been in the area of suspension geometry. For example, if you bolt a set of wide wheels and low-profile tires on an otherwise stock early GTO, you notice that as the steering wheel turns from lock to lock, the tire’s tread does not remain perpendicular to the ground. Instead, the wheels camber in. This was an acceptable situation in the past, as the narrower tire tread stayed flat on the ground when the body leaned over. With today’s wide tires and low profiles, that situation is no longer acceptable.
The addition of aftermarket control arms brings a new level of road-holding and cornering force— they keep the cambering effect under control, providing just the right amount for today’s wheel/tire combinations. Though the cambering situation improved somewhat with the the introduction of the suspension design of the 1973 GTOs, it can be upgraded even further. Companies such as Hotchkis, Ride Tech, and Global West offer tubular control arms that improve camber and steering geometry, are stronger than factory arms, and reduce unsprung weight.
Upgrading the factory upper and lower control arms on your Pontiac GTO is probably as deep as you can go with suspension upgrades and still stay in the realm of a restoration. Anything more and you’re into a pro-touring build. Some actually say that they are over the line, and while they are entitled to their opinion, I respectfully disagree, here is why.
Over the past 20 years or so, adding a second-generation Firebird spindle to an otherwise stock 1964– 1972 suspension layout has been a popular upgrade that improves handling and facilitates the addition of disc brakes at the same time (if the car was not already so equipped). While this mixing of early and late front suspension components does help with cornering and overall handling, it also introduces a bump-steer situation that is not desirable. Bump steer is the phenomenon where the wheels involuntarily turn as the suspension moves through its travel range. The “mix-and-match” aspect of swapping pieces between the two generations is the culprit. The handling improvement does come at a cost.
Aftermarket control arms corrects that particular handling flaw and feature much stiffer bushings, which greatly improve road feel and eliminate any “sloppiness” found in a stock suspension. Hotchkis Performance, Ride Tech, and others build their own versions. While the car doesn’t look stock underneath the hood, it isn’t an obvious visual red flag as you walk past it. This is a modification for driver-type restorations and makes a dramatic difference in handling, especially when coupled with proper springs, shocks, sway bars, and a wheel/tire combination that makes use of the new technology.
I have spoken with owners of GTOs using aftermarket control arms and all have praised the car’s newfound handling prowess. One owner who lives near me combined them with a set of 15-inch Rally II wheels and conventional-size radial tires. It has provided him with a car that looks nearly stock but corners as well as many late-model vehicles. This one car sold me on the idea of including them in a driver-style restoration without it turning into a pro-touring build. These upgrades truly bring the handling of your vintage Pontiac into the twenty-first century.
Written by Donald Keefe and Posted with Permission of CarTechBooks
Find more Tech Tips like this in the book:
HOW TO RESTORE YOUR PONTIAC GTO 1964-1974
Learn everything you need to know about your GTO by getting your copy here!
SHARE THIS ARTICLE: Please feel free to share this article on Facebook, in forums, or with any clubs your participate in. You can copy and paste this link to share:
https://www.cartechbooks.com/blogs/techtips/mastering-gto-restorations-suspension-guide