Automotive Painting Guide: Equipment for Home Painting
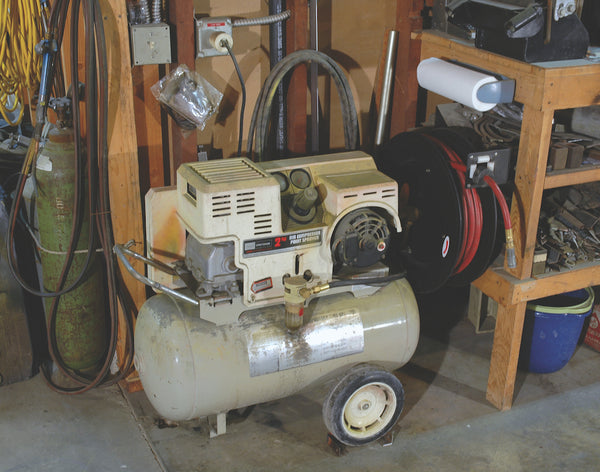
All sorts of home shop compressors, including ones with rotary pumps and vertical tanks, are available from a variety of sources, but an old standard for many years is the 2-hp, 2-piston Sears unit with a 20-gallon tank. It puts out 10 cfm at 40 psi, or 8.5 cfm at 90 psi, which is fine for old-style spray guns and most air tools, but not for HVLP guns. After years of winding and unwinding a 50-ft. hose, I recently got the spring-loaded reel and highly recommend it.
 This Tech Tip is From the Full Book, HOW TO PAINT YOUR CAR ON A BUDGET.
For a comprehensive guide on this entire subject you can visit this link:
LEARN MORE ABOUT THIS BOOK HERE
SHARE THIS ARTICLE: Please feel free to share this post on Facebook Groups or Forums/Blogs you read. You can use the social sharing buttons to the left, or copy and paste the website link: https://www.cartechbooks.com/blogs/techtips/automotive-painting-guide-equipment-for-home-painting
You can improve your car’s finish in a couple ways without a compressor and spray gun. One way is to buff and polish the paint to make it look new again; the other is to disassemble and partially prep the car yourself before taking it to a one-day-type paint shop. We’ve covered the first already, and the other is shown in Chapter 7. But even in these two cases, it’s nice to have home spray equipment so you can at least spray some professional-quality (i.e., not spray can) primer during the sand-and-prep stage, or spot-in a few bad places on an old paint job that can then be otherwise rubbed out and saved without a full respray.
There are a couple other ways to paint a car without buying your own compressor and other spray equipment, but I don’t recommend them. In fact, they might not even be available in most places anymore. The first is to rent a compressor (and possibly other equipment) to use at home. But a quick check of equipment rental yards recently produced slim results. They either had low-capacity gasoline-powered portable compressors (or the small electric ones, with no air tank, more compatible with air brushes), or “airless” units designed for house painting. In the past, I have rented spray equipment from my local automotive paint store—obviously of the type needed for car painting—but a round of calls to such paint supply houses recently produced no positive results. I think the main problem is the recent change in paint equipment technology, primarily due to HVLP (high-volume, low-pressure) systems and government demands that such systems be used by professional shops with no provisions for the occasional, at-home painter. Perhaps you could do better in your area.

To run most HVLP guns, you need a larger, industrial-type compressor, such as this 5-hp unit with a 50-gallon tank, which puts out 14 cfm at 125 psi. Unfortunately they cost about $1,000 new, and buying a used unit is risky. The vertical tank is a definite space-saver.
Another approach, at least in the past, was a rental spray booth. I have used these a few times. The good part was that you got to paint your car in a clean, filtered, well-lit professional-type booth that had a nice, big compressor, filters, hose, etc. All you had to bring was your gun, paint materials, and a prepped car to paint. The bad part was getting the car there and back, stripped—especially after it was painted. You couldn’t leave the car in the booth overnight. But it’s probably a moot point, because I couldn’t find any spray booths for rent, and if you can’t find one in car-crazy Southern California, perhaps they are a thing of the past. Can’t hurt checking your area, though.
If you were only going to paint one or two cars in your life, you could consider trying to rent or borrow a compressor. In the long run, however, the amount you save going that route hardly justifies not buying your own. Compared to other shop tools, and especially compared to the cost of a professional paint job, a good home air compressor is downright cheap. In fact, you can get one for about (or less than) the cost of an entry-level one-day paint job, and way less than something like a home welder, band saw, or the like. A recent check of Sears (the old stand-by for home-shop tools) and other home builder big-box stores yielded a decent selection of good compressors in the $300 to $500 range and even big, shop-quality ones for less than $1,000.
Normally, I would say get the best compressor you can afford, because as soon as you have one, you find all sorts of uses for it, and you probably want to add some air tools to your garage closet. But since we’re concerned with the low-buck approach here, my first advice is to get your own compressor, period. My second admonition is to get one that operates a spray gun adequately and continually throughout a paint job. This immediately brings up the question of what type of spray gun to get, including HVLP (high-volume, low-pressure). We will get to this shortly.
Several 110-volt compressor models are available, with horsepower ratings manufacturers are playing with to make them more appealing. What was a 2-hp compressor is suddenly a 6-hp compressor—until it’s running. Obviously a HP rating “when running” or “under load” is the only one that counts. I’d recommend at least 1-1/2 and preferably 2 hp (while working), and a 25 to 30 gallon air tank. Even more important is the compressor’s air rating in cubic-feet per minute. The designation is SCFM, for standard cubic feet per minute. This is often given at air-pressure levels of 40 pounds per square inch (PSI) and at 90 psi. A regular siphon-feed spray gun requires 6 to 8 scfm at 40 psi, while many air tools, such as sanders, can require 6 to 8 scfm at 90 psi. If all you’re going to do is paint, the lower rating is fine, but it’s always better to have more capacity than less.
My personal choice, and therefore my recommendation to you, is to acquire a 220-volt compressor. The last thing you want to do in the middle of a paint job is blow a fuse (i.e., trip a circuit breaker)—which very likely not only shuts off the compressor, but turns off all the lights as well. Most houses are wired with 220 volts from the power pole; running it to your garage is not a big deal. If you’re at all serious about working in your garage—on cars or whatever—I strongly recommend wiring it with a 220-volt circuit. Other shop equipment, specifically MIG welders, are available in 110 and 220 volt types, too, and 220-volt is better. I speak from experience.


Large or small, I highly recommend a 220-volt compressor to avoid blowing circuits in the middle of a paint job. Plug shapes and sizes vary; make them match. When rewiring the garage, you’ll find that an in-line off/on switch is helpful. A bright red “on” light is even more so, since the compressor shuts itself off at a set pressure, but starts back up in the middle of the night (after leaking down) if you forget to turn this switch off.

Since compressing air causes any moisture in it to condense, you need a water trap in the line for painting. This one, mounted at the compressor outlet, is doing some good (you can see water in it, which needs draining), but it really should be 20-ft. down-stream to work effectively, which can be difficult to do in your garage.

Most industrial applications locate the compressor outside the spray booth, with hard pipe running to a water trap (with adjustable pressure regulator, in this case) inside the booth, to attach the hose to. If you can do this at home, it would be optimum.

Just as you don’t want water in your air, you don’t want dirt or dust. Your compressor intake should have an air filter of some sort, such as this “felt pad” type. Keep replacements on hand and change them regularly, especially if the compressor is located near where you paint (because it sucks in overspray, which clogs the filter).7. In the last chapter we showed the use of an electric rotary disc grinder (top), but only alluded to air-powered sanders such as the jitterbug type or oscillating type (such as the “DA”—dual action—at lower right).

I got this water trap that hangs on your belt or pocket years ago, and drain it periodically as I paint or use air tools. Even in dry California, it’s amazing how much water it collects (which you don’t want mixing in your paint). An alternative is a small, disposable trap that mounts to the gun’s air inlet.

If you have a compressor, it’s nuts not to attach a quick-connect coupler to the end of the hose, and matching receptacles for your guns, tools, and accessories. One of the first accessories you should get, especially for painting, is a blow-gun.

In a previous article we showed the use of an electric rotary disc grinder (top), but only alluded to air-powered sanders such as the jitterbug type or oscillating type (such as the “DA”— dual action—at lower right).

When you have a compressor, your collection of air tools grows. These small die grinders, with straight or right-angle chucks, do a variety of jobs with interchangeable tools or mandrels. Squirt a couple drops of oil directly into the inlet of all your air tools every time you use them. Never use an in-line oiler in the hose if you plan to paint.
The smart choice in the long run is to get the best practical compressor that you can afford. “Practical” means don’t go to the machinery auction and buy some huge industrial unit that takes a crane to lift and is very likely worn out. It also means don’t go to the “Offshore Tool Shack” or the “Backdoor Freight Dock Emporium” and buy something cheap just because it looks like something good. If you’re saving $1,000 to$2,000 (or much more) on just one paint job, why not spend a little more money on your compressor? It lasts a lot longer than one paint job. And get one now that runs air tools because eventually you’ll want some.
A couple of other considerations: every home garage needs more room, so a good choice is a compressor with a vertical tank (if you’re in earthquake country, bolt it to the floor). Also, most home compressors have wheels, but I’d suggest finding a permanent location for it, and attaching a hose long enough to reach wherever you need it. You need at least 25 feet to get around a car to paint it—50 feet is much better—with at least 3/8-inch internal diameter. Be advised that air hose creates a pressure drop (sort of like resistance in electrical wire). The longer and smaller (i.d.) the hose, the greater the pressure drop is between the compressor and the end of the hose—it can be as much as 10 psi per 25 feet of length with 3/8-inch hose. That’s another reason to get a better compressor.
Since compressing air separates water from it (turns humidity into water drops), you need a good water trap at the compressor outlet (actually 25 feet from the outlet is best), and another one (possibly disposable) at the end of the hose, near the gun. The compressor tank also has a water outlet on it; drain it regularly. Obviously you don’t want water in the air that you’re using to spray paint. You don’t want anything else in it, either. All compressors have an air intake port somewhere, and it should come with a replaceable filter of some sort. Buy extra filters, keep them handy, and change them regularly. Most people have the compressor somewhere in the garage, where you’re going to be painting. That means the compressor is inhaling air filled with paint overspray. Check the filter on your compressor after a paint job, and you’ll be surprised. In most garages, there’s not much you can do about it. Just locate the compressor where it can breathe the cleanest air possible. Pro shops put the compressor outside and plumb air into the spray area with hard piping, fitted with quick-connect outlets at various locations around the room. You could do this at home.
Speaking of quick-connect couplers, by all means use them, even if all you have is one spray gun (believe me, you’ll have more air stuff later). They make everything, from cleaning that gun, to attaching your tire filler, much easier. Just be advised that different brands use different shapes and sizes; get them all (male and female) at the same place.
We won’t cover air tools in this book because, for the home car painter, they really are a luxury. If you do get some, however, add a few drops of air tool oil to the inlet, before you attach the air line, every time you use one. Never install an air tool oil mister at the compressor if you ever intend to spray paint with the same hose.
Spray Guns
The spray gun and supporting equipment primarily serve the purpose of depositing the liquid paint on the vehicle surface in a practical—hopefully somewhat artistic—manner so that it bonds and hardens (i.e., “dries”) properly. If you have any kind of decent, properly maintained, and properly adjusted spray gun, and you know how to use it, you can lay on a smooth, even, glossy coat of paint that won’t need further rubbing out (assuming it’s a gloss coat). Even if your painting skills and equipment are not top notch, you can probably still get a layer of paint on the car that you can sand smooth and rub out to look pretty darn good (assuming you’re using modern two-part paint and you mixed the chemicals properly).
All this is to say that there’s no magic to a spray gun. The most expensive or most sophisticated one won’t spray paint any better than any other good, clean, properly adjusted one. A good spray job comes from a rather prosaic combination of a clean, consistent, properly regulated air supply; good-quality paint products, properly mixed; a clean, well-lit, ventilated environment in a specified temperature range; of course the always-mentioned proper surface preparation; and, finally, a deft, practiced hand with a good-quality, clean, and properly adjusted spray gun.
I got my first spray gun, a standard DeVilbiss Model JGA 502, nearly 40 years ago. It was lying on someone’s garage floor, and the owner gave it to me. Lord knows how old it was then. But it was my only spray gun for 25 years. I used it for everything from lacquers to urethanes, candies and pearls, high-build primers and high-solid clears. I keep it clean, I change the packings once in a while, put a little white grease on the needle shaft, and have maybe changed the nozzle head once, and it works just as well now as ever. I still use it today, mostly for primers. Kept clean (without using sharp objects) and maintained, a good spray gun never wears out.

Like most of my stuff, my small arsenal of spray guns is old, but well-kept. In fact, the JGA DeVilbiss was well used when someone gave it to me 30+ years ago, and it still works fine. The small touch-up gun is great for what its name implies, as well as countless small jobs, from doorjambs to model cars or bicycles. These are all siphon-feed, non-HVLP guns.

Even if you have a regulator on the compressor, it’s nearly mandatory to have an air adjuster at the gun, since different paints require different pressures, and even the length of your hose changes air pressure. Note each gun has an adjuster attached. Although I usually adjust pressure by “feel,” some painters like a dial gauge at the gun.
Keeping your guns clean is paramount to proper spraying as well as long life. Especially important is keeping the inside of the nozzle area free of any dried paint.
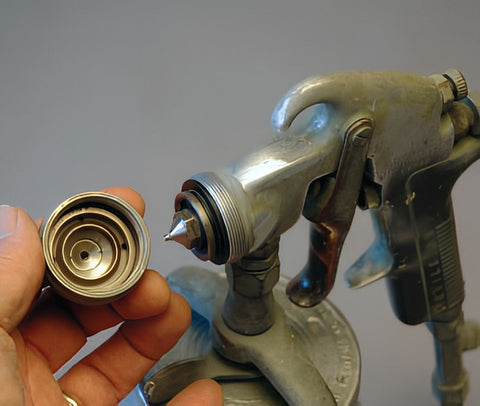
But we have a quandary here. Just as all paint products are in a major state of change, as we discuss in the next chapter, so is automotive paint spraying equipment. The industry is shifting from “siphon-feed” guns to “gravity feed” types. The age-old siphon-feed guns mount the paint pot under the spray handle/nozzle, and the paint is sucked out of the cup by the pressure-drop of the air passing through the nozzle, a process very similar to the venturi effect that draws fuel into the air stream in a carburetor. On better guns, the paint cup quick-disconnects from the gun for easy filling on the workbench. The only disadvantages to this type of gun involve the paint cup. Sometimes the seal at the top can leak if the top is not tightened properly or if the gasket is worn out. Also, the air vent hole in the top can get plugged with paint or leak if you tip the gun (with a full pot of paint) at too much of an angle while painting something like a horizontal surface. In the old days, many painters would tie a shop rag around the top of the cup to guard against any drips. Later guns have a small, coiled tube connected to this vent hole to prevent such drips.
On the gravity-feed gun (which we used to think of as “European-style” because they were common there for years) the paint cup mounts on top of the nozzle/handle, and the paint feeds by gravity into the gun. To fill the cup, you remove a vented screw cap on top. The cup screws into the top of the gun, and the two remain attached while you fill the gun. This design requires a special rack to hold the gun while you fill it, and does not allow you to set the gun down on a workbench when it has paint in it. Obviously, you would have to modify your hand motions to accommodate the new size and shape when changing from one type of gun to the other.
The major advantages of the gravity-feed gun are that it is much less prone to dripping or leaking (one drip can spoil a coat of paint); it does not start spitting when paint nears the bottom of the cup; and you are able to spray all the mixed paint in the cup, without that little extra left in the bottom you otherwise have to throw out if it is catalyzed. A few painters I questioned asserted that the gravity-feed gun was better at “breaking up” or mixing modern metallics and pearls for a more even coat, but others said this was psychological. Most of the gravity-feed guns available today are HVLP models.
HVLP Systems
HVLP stands for high volume, low pressure. The vast majority of painters tend to adjust air pressure at the gun by “feel” rather than checking a gauge. I think the old rule of thumb was 50 psi at the gun for spraying regular enamels, and 30 psi for lacquers. I don’t think I’ve heard a rule for two-part paints, but they’re in that range, depending on whether they’re base coats or clear coats. The new HVLP guns, however, are designed to spray at pressures in the 3 to 5 psi range. Nearly all the professional painters I asked admitted they shoot at higher pressures than that—but only about 10 psi.
The HVLP spray gun was invented by a man named Ross Mattson in the 1980s to spray candy colors on production-line motorcycle parts more evenly. Its advantage over older, higher-pressure systems, is that it produces much less overspray—and therefore much less waste and pollution. It was strictly a practical improvement on the age-old paint spray gun. Mattson manufactured and sold his guns, and in the beginning they were the only ones that worked really well. The only problem was that they were quite expensive. But then the air quality government guys got wind of this and said, “Hey, that’s good for the environment…less overspray means less pollutants in the air.” And, in controlled areas, they immediately mandated HVLP spray equipment for all production (i.e., professional in any way) shops. I just visited and called all the automotive paint supply stores (which is where you go to buy a good spray gun) in my area, and they all told me that they are only allowed to sell HVLP guns. Worse, I was told that I really needed to buy three of these guns (at about $350 each), with slightly different-sized nozzles and tips for spraying undercoats, color base coats, and high-solid clears. “That’s what all the professionals do,” they said.
So here’s the quandary: HVLP spray guns really are better. They spray more evenly and they cut down significantly on overspray. HVLP cuts your paint use (and cost) as much as 50%. That’s good. Very good. The problem is the “high volume” part of HVLP.

This is a more modern HVLP gun, nearly all of which are the gravity-feed (cup on top) type. Although they may be in different locations, most also have adjusting knobs for fluid (paint) flow, airflow, and fan-pattern width. This one also has an adjustable air pressure regulator, with a dial gauge, between the inlet and the hose.

The big advantage of HVLP guns is that they greatly reduce overspray, and therefore use (and waste) far less paint. The disadvantage of any gravity-feed gun, however, is that you can’t set it down, or fill it, without a special holding rack, such as this homemade one. The upper ring is for holding a strainer.

Most “pro” paint shops and mail-order houses sell only HVLP guns, which can be expensive (and require a big compressor). However, we found most “big store” home centers, as well as our local Tool Shack, carried both inexpensive HVLP guns (left) as well as non-HVLP guns (right; this one labeled as an “LVLP”—Low Volume Low Pressure—gun).
Most compressors can build high pressures for short periods of time, but to sustain a large volume of airflow at any pressure—even 5 to 10 psi—requires a big compressor with large pistons and, more important, a big tank (like 50-plus gallons). We’re talking about an industrial-size compressor. You need one of these compressors to run a good HVLP gun. As one professional painter said, “With the new urethane paints, you can’t stop and wait for the compressor to catch up, like you could with lacquers.” Under any circumstances, you want the pressure you set at your gun to remain constant (whether it’s 30 psi with a regular gun or 5 to 10 psi with an HVLP) all the time you’re painting, which means the pressure in the compressor tank has to be more than that—at all times. Obviously, if the pressure drops or varies in any way while you’re painting, the spray pattern and paint flow from the gun varies (or even stops). You don’t want this.
I would certainly recommend a good HVLP gun if you had the budget, the room, and the wiring circuitry in your garage for an industrial-size compressor—but I have to assume you don’t. At the other end of the scale, several types of “home HVLP systems” are offered by mail-order houses and some big-buy tool stores. These can be in the form of a pseudo-HVLP gun that works with a home-shop compressor, but more often include some sort of “turbine” air-blower rather than a compressor with a tank. The types I have tried in the past do not work well. They might have better ones by the time you read this. But cheap is cheap. If possible, try something before you buy it.
Presently, the best solution for the home garage painter is to use the older-style (non-HVLP) gun, whether in a siphon-feed or gravity-feed configuration, with a good quality, home-type compressor. Such guns might not be available at your automotive paint store (which caters to the professional market, not you), but they are plentiful at home-builder stores and through mail-order sources. Again, you have three main choices. The same pro painter I quoted above says he buys the cheap “off-shore” HVLP knock-off guns for $69.95, and uses the same one for all types of paints with no problem (including candies, pearls, and clear coats). When it gets worn or malfunctions, instead of rebuilding it, he just buys another. That’s one option, but it means you have to be able to tell a good “knock-off” from a junk one. The second and probably preferable option is to buy a name-brand, good-quality non-HVLP spray gun. The third option is to buy a good-quality, used, name-brand spray gun—whether at a swap meet, through the “recycler” ads, or on the Internet. If it hasn’t been abused, it should be fine. And rebuild parts should be available for quite some time.
This Tech Tip is From the Full Book, HOW TO PAINT YOUR CAR ON A BUDGET.
For a comprehensive guide on this entire subject you can visit this link:
LEARN MORE ABOUT THIS BOOK HERE
SHARE THIS ARTICLE: Please feel free to share this post on Facebook Groups or Forums/Blogs you read. You can use the social sharing buttons to the left, or copy and paste the website link: https://www.cartechbooks.com/blogs/techtips/automotive-painting-guide-equipment-for-home-painting
Final Equipment Notes
Lots of painters like to keep an old, or cheap, gun for painting primers, in addition to a better “top-coat gun.” There’s no real need to do this unless you’re lazy about cleaning your primer gun, or you just like to buy equipment. I can’t imagine you’d be painting primer and color coats at the same time, and you can’t leave today’s catalyzed paints sitting in a gun for any length of time. I would suggest, instead, that you first invest in a smaller “touch-up” gun. You can adjust the spray pattern and material feed on your full-size gun to spray in small areas, but the smaller gun is better for getting into areas such as doorjambs, and for painting smaller parts such as dashboards, window frames, chassis components, whatever. You can keep it adjusted for small areas, and if you’re only using a small amount of paint, the smaller cup wastes less and cleans up more easily. They come in siphon or gravity-feed styles.
Plus, get a charcoal respirator face-mask—and use it. In fact, as with air filters for your compressor, keep some extra “refill” mask inserts on hand. I don’t think you need the whole “space suit” that some professional painters are made to (and probably should) wear.

Another “accessory” that should be in any painter’s cabinet is a good breathing mask with replaceable charcoal filters (and extra filters, as shown). Unlike old lacquer, which only made you high from breathing too many fumes, recent paints contain isocyanates and other bad stuff that can kill you if you breathe (or even absorb) too much. If you paint daily, you want the full-on “space suit” with fresh air pumped into it to breathe. Most hobby painters do less than one car a year, but you should still use a good filter mask every time you spray. Fortunately, they’re making paints safer now.
A note on the environmental impact of automotive painting: I’m very pro-environmental protection. I recycle, I never pour used oil down any drains, and I spend a lot of time outside among trees. But the typical hobbyist, like me, who paints cars in his garage at home cannot be compared to any sort of production paint or body shop, where several cars are painted daily. How many cars are you going to paint, realistically? One, two, maybe three in your lifetime? Even if you averaged one a year, how many would that be, total? Not nearly enough to be in any way environmentally measurable. Now multiply or divide that by the number of automotive hobbyists in your city or state who actually paint their own cars. The point is, you don’t need the full-on EPA-approved shop, equipment, clothing, and so on to protect the environment from the type of painting you do (in my opinion). But I still wouldn’t paint any large amounts (i.e., a whole car) of any type of paint—and especially not catalyzed ones—in my garage without a good, filtered, respirator face mask.
Preparing the Garage
Let’s hope you have a garage, it has a paved floor, it’s big enough to paint a car in, and it isn’t full of junk. If it is full of junk, clean it out. Even if it’s not full of junk, clean it. Use an air nozzle on your compressor hose to blow all dirt, dust, cobwebs, etc., out of all nooks and crannies of your garage, especially any-where above where you will be painting. Do this well before you’re ready to paint. If possible, finish the garage cleaning process by hosing out the floor with water. Both the blowing out and hosing out are highly recommended if you’ve done all your filler and primer block sanding in the garage. Some old-school painters like to wet down the floor and keep it wet while painting, to keep any dust down. But I don’t like having water anywhere near where I’m painting—not on the floor, not in the air hose, not absorbed in the primer, and I’d prefer not to paint on a humid day if I can help it.
Just as getting dust in your paint is a problem, so is getting paint overspray (especially with today’s urethane paints) on everything in the garage. To help control both, tape up plastic sheeting, such as Visqueen, wherever necessary.
You also need ventilation. Never paint in a closed garage. Most garages have built-in vents around the lower walls and at the peaks of the roof. This is good, but you also need a fan to move air (and overspray) while you’re painting. A typical portable house fan, in a 3 x 3 foot frame, is excellent for this. You want it to blow air out (exhaust), not in. You could put it in a window (if you have one), but the simplest is to prop the garage door on it. Start the fan before you start painting, and keep it going for a good while after you’re done to exhaust vapors as the paint dries. You can get more elaborate than this, as we show later, using air conditioner filters for inlet air, or even building a mini-booth of plastic sheeting in your garage (or outside—some of these have been available commercially). But making your garage relatively dust-free and rigging an adequate exhaust fan are the first requisites.

If you have a garage to paint in, hopefully it’s a clean, well-lit place, with enough room to move all around the vehicle. For painting, you need lights overhead, as well as on the sides, to really see what you’re doing. This garage has about the minimum.

Note the door is propped open slightly on a regular house fan. It is turned to blow air out of the garage (exhaust). This is mandatory. Like-wise, there should be some vents elsewhere (preferably at the other end) to let outside air in. You don’t want any fans blowing toward your paint job, because they blow dirt (or bugs) into it. Don’t paint at night if you can help it. Morning, when the air outside is still, is best.

This plastic shower curtain, hung on nails, covers a bicycle.

Even with a good exhaust fan, overspray from urethane paints can be very messy in your garage. The best way to keep it off stuff is to hang clear plastic sheeting—available at your auto paint or hardware store—on the walls and over anything else you want to keep clean. Use plastic shipping tape, or thumbtacks, for easy installation and removal. The boxes on the shelf also have plastic on top.

Form-fit car covers, such as these with elastic around the bottom, are excellent for keeping overspray (and other stuff) off vehicles that might be in the garage while you’re priming, spot painting, or doing bodywork. If you’re painting a whole car, move any others out of, and well away from, the garage.

Cabinets with doors are good for keeping out overspray, as well as hanging posters. Just make sure the doors close tightly.

One big difference between a spray booth and your garage is that the booth doesn’t have shelves, cabinets, and junk in it—that’s the idea. But the painter still needs a place to mix paints, fill his gun, clean it, and store paints, reducers, cleaners, strainers, stirring sticks, and so on—not to mention a trash can, paper towels, rags, and other clean-up items. So professional booths usually have a small “mixing table” in one corner, with a small storage shelf to hold such things.

You do lots of things other than paint in your garage, and you undoubtedly have a bench to work on. When it’s time to paint, clear and clean a section of the bench to use for mixing paint, filling your guns, and so on. It’s probably a good idea to spread out a few layers of absorbent newspaper, and tape it down. And if you paint very often, it also helps to have paint supplies—especially cleaning thinners, rags, strainers, sticks, tape, and so on, stored on shelves or in cup-boards nearby.

Speaking of doing other things in your garage (including bodywork and sanding on the car you’re going to paint), most create dust and dirt. Before painting, at least sweep the floor thoroughly and knock down any cobwebs from the rafters, etc. Many painters like to spray water on the floor when they’re painting to catch dust and lint, but that doesn’t work very well in a garage (and I’m personally averse to having water—which evaporates into the air—anywhere near my paint). So I use the air-gun with high-pressure to blow any dust, dirt, bugs, cobwebs and so on from the rafters, walls, shelves, along the baseboards, and the whole floor, with the exhaust fan going, working from the back of the garage toward the front. Do this an hour or two before you paint to let things settle.

If your garage looks like this, I’m afraid you might be better off painting in the driveway. Even if you cleaned all the junk out of it, (1) it’s barely one-car size without enough room to walk around a car to paint it, and (2) it’s so old and decrepit it will rain dust and dirt on your paint job (especially when a flock of pigeons lands on the roof in the middle of a job).


On the other hand, painting is not some sort of religious rite that must be performed in an immaculate temple. At least this guy has a two-car garage, lights, fans, and he has hung plastic sheeting over some stuff. And he’s wearing a good facemask. This is not where I’d want to spray a car, but color sanding and rubbing out will erase most imperfections in the spray job.

Then again, you can go from one extreme to another. Literally painting a car in your driveway is certainly possible (I’ve done it), but I’d have to consider it a last resort. A portable awning, preferably in the back yard, would be better than this.

As you can see, the finished product looks as good as any high-dollar pro paint job done in a fancy spray booth.
Another “must-have” for home painting is proper lighting. You can’t paint properly if you can’t see what you’re doing. Overhead lights won’t cut it. You could rig up temporary lights to shine on the sides, front, and back of the car as you paint, but fluorescent light fixtures are not expensive, and are easy to attach to your garage walls, positioned to light all sides of the vehicle. Professional spray booths often have lights in the floor as well as the walls, and the entire inside is painted white for further reflectivity. You try painting a car black, or some other dark color, in a poorly lit garage, and you will see why.
We’ve already discussed wiring to some extent. I recommend a separate 220-volt circuit for the compressor, if possible. Also make sure you have electrical capacity (enough circuits and breakers) for plenty of lights and at least one fan. As I said before, you don’t want the lights going out in the middle of a paint job.
Another thing that doesn’t get discussed often enough in paint books and articles is temperature control. Even old-style paints are very temperature-sensitive in terms of drying, and newer paints won’t chemically harden (or “cross-link”) if not kept above a certain temperature for a certain period of time (read the information sheet, or talk to your paint supplier about this). The question is: how do you control the temperature in your garage? Few garages have any sort of air conditioning (but being too hot usually isn’t the problem…for the paint). One option is to wait to paint when the weather is optimal, but that is often impractical, especially in seasonal areas. Many of you auto hobbyists in colder climates do have good garage heaters, either of permanent or portable varieties. But this brings up two questions. First, how do you maintain heat in the garage and good ventilation at the same time? I’m not sure, but ventilation is very necessary. Second, most garage heaters are gas-fed, and most paints are highly flammable (especially when atomized in a closed garage). I have been told not to paint in a garage that even has a gas water heater in it, because the pilot light could ignite the whole thing when it’s full of lacquer overspray. I must say I’ve never heard of this actually happening—and I have heard of a lot of people who paint cars in garages, during winter, with gas heaters going. I’m from California, however, and the amount of heating required is minimal compared to what a person would have to do in a frigid northern state. Talk to your paint supplier about your proposed painting space, how you plan to heat and ventilate it, and the associated risks.
Legality and Neighbors
In most “controlled areas,” stores are highly restricted on what types of paints and products they can sell (including spray guns, and so on), but there are no restrictions on what you can use in your home garage. So, in most areas, if you buy paint such as acrylic lacquer in an area where it’s still legal to sell, and bring it home and spray it in your garage, even if you’re in a “restricted area,” it’s okay.
If you live in a rural area, you should have no problems. But if you want to paint a car in your garage in an urban or (probably worse) suburban area, you have several considerations. Even though I live in a densely populated city near Los Angeles, the way my garage is built (large) and situated (at the back of a deep lot), most of my neighbors neither see, hear, nor smell what I’m doing in there. My one close neighbor (his garage is three feet from mine) builds special effects things for the movie studios, and I often help weld or paint something for him, or loan him a tool when he needs it. No problem. And as long as I recycle my used oil, thinner, or other paint products through their special program, the city seems to have no other restrictions on painting in garages.
At my previous house, however, on a typical residential street in a different city, a next-door neighbor called both the police and the fire department while I was spraying my wife’s VW bug with urethane paint. The neighbor didn’t like the smell. I suppose I can’t blame her. But the officials made me stop painting, informed me that it was illegal to paint a car in a home garage in that city (a table, bike, or boat was fine), and further that it was illegal to have more than one gallon of flammable material, of any kind, in my garage. I had painted at least three other cars in the same garage with no problems. But this time I was stuck. I sold the house and moved.
Of course other solutions are available. The first is to find out what the laws are in your particular area. This is more a consideration than a solution. Second—and this can be touchy—it’s probably a good idea to get to know your immediate neighbors, and at least feel them out to see if they might have any objections to what you might be doing in your garage. Regardless of any specific laws in your community, a complaining neighbor is a problem. You have two possible choices here. One is to make friends with your neighbors; let them know what you are (or “might be”) doing, tell them to call or come to you first if they have any complaints about noise, dust, fumes, what-ever; and maybe even offer to fix a dent or two in their cars, touch up some scratches—it can help (if you can do a good job). On the other hand, to be blunt, a neighbor won’t complain if they don’t know what you’re doing. This is just a statement, not a recommendation.

Two things here: rather than hang plastic or get overspray on stuff, you might use the driveway to spray the numerous smaller parts that need painting or priming during any paint job. Secondly, whether in the driveway or garage, you need something to hang or prop such parts on while painting them. A trash can works well for medium-size parts like a door, hood, or gas tank, but notice plastic over it to keep dust from flying out. I also keep two wooden orange crates for parts spraying, with a stash of cardboard boxes if I need more. Cut and bent coat hangers work well for hanging parts from the ceiling or rafters.

Customizer/sculptor Lee Pratt lives in a large, open “artist’s loft.” To keep overspray from drifting out or dust and dirt from floating in, he built this temporary, self-contained spray booth from 2 x 4s and plastic sheeting.


It has a sealed ceiling and four walls, a small door for access (which has plastic over it during painting), and electric lights inside plus plenty of natural light through the clear plastic from nearby windows. Since he doesn’t paint regularly, he builds the booth to fit the car he’s doing—in this case a fiberglass Porsche Speedster for his wife.

A regular house fan is built in to exhaust overspray, with ducting to carry it out of the building. Also note the air hose from the compressor, which is just outside the “booth.”

To let clean air in, Lee installed a couple of air conditioner filters in the back wall, where he also hung a paper/tape dispenser. Also note that the hood and deck are hung from the ceiling beams with wires for easy painting on both sides.


After the Porsche was done, Lee took that booth down and built a bigger one to spray this ’58 Impala in gorgeous black lacquer with a purple candy, lace-painted top. This car wasn’t done by a professional in a fancy booth using the latest paints and equipment, but by someone spraying lacquer in a hand-built, sheet-plastic, makeshift “booth” at home. Sure he’s had some practice and knows what he’s doing—but you can do the same, even if you don’t have a garage to work in. Have you been practicing?
But use some common sense. This book is about painting your own car in your home garage. Many, if not most, home garages are in neighborhoods. So you have to consider your neighbors. We’re not talking about any kind of professional activity; it’s strictly a hobby, or you could even consider it maintenance/upkeep. I’ve never heard of anyone getting in trouble for painting their own house—or even having professionals do it. Who would, or could, complain about that? But the same neighbor who has any army of lawn-mowing, weed-whacking, leaf-blowing “gardeners” invade her yard for an hour or two every week will be the first to complain that your compressor makes too much noise. So don’t be out in your garage sanding, grinding, or body-hammering late at night. I especially don’t recommend painting in your garage at night for several reasons, only the first being neighbor consideration. Bright lights at night attract bugs. Do your masking and prep the night before, then spray paint in the morning, just about the time the neighbors leave for work, when the air is still and the rest of the day is hopefully warm and dry for the paint to cure. Make sense? Other considerations would include not placing your exhaust fan where it blows fumes into your neighbor’s yard.
Finally, if your home garage really isn’t suited to painting a car (or you don’t have a garage), you might be able to rent a space to do it, which would still be much less expensive than a professional paint job in most cases. Public storage-type garages used to allow this when they first became popular, but most no longer do. Finding an industrial space in an urban area can be difficult or expensive in some cases, easy in others. In one case, I found someone who already had his own shop space for doing bodywork and paint, and I sub-rented space from him to do a couple paint jobs of my own. In another case, members of my car club rented a shop, and I was able to use that. There are plenty of options. In fact, there might even be some rental spray booths operating in certain parts of the country. Or, there’s always the possibility of talking a local pro painter into renting you his booth for a day, when he’s not using it.
Just as you don’t want water in your air, you don’t want dirt or dust. Your compressor intake should have an air filter of some sort, such as this “felt pad” type. Keep replacements on hand and change them regularly, especially if the compressor is located near where you paint (because it sucks in overspray, which clogs the filter).7. In the last chapter we showed the use of an electric rotary disc grinder (top), but only alluded to air-powered sanders such as the jitterbug type or oscillating type (such as the “DA”—dual action—at lower right).
Written by Tommy Lee Byrd and Posted with Permission of CarTech Books

If you liked this article, you will LOVE the full book!
Get your copy here.