Tips on Differential Teardown
A rear end or differential rebuild is in your near future if the pinion seal is leaking or the differential is exhibiting excessive gear noise. Often, you hear gear whine or noise that becomes louder with increased vehicle speed, and the common result of over-worn gears or failing bearings. If the differential clunks or consistently thumps when the vehicle is cornering, most likely the rear end will fail soon.
If your differential is exhibiting these symptoms, a disassembly and rebuild needs to be performed.
Find more Tech Tips like this in the book:
HIGH-PERFORMANCE DIFFERENTIALS, AXLES & DRIVELINES
Learn everything you need to know about differentials, axles and drivelines by getting your copy here!
SHARE THIS ARTICLE: Please feel free to share this article on Facebook, in forums, or with any clubs you participate in. You can copy and paste this link to share: https://www.cartechbooks.com/blogs/techtips/differentialsaxlesanddrivetrains
Tear-Down Process
Every rear end has a differential. There are many types available, but I will concentrate on the most common types, which are the open (or standard) differential and the limited-slip differential.
Every manufacturer has its own unique proprietary name for these limited-slip rear ends, but all differentials essentially function in the same way. I chose the Ford Traction-Lok as an example to rebuild, but keep in mind that it is very similar to the GM Eaton-style differential and others. These are relatively simple mechanical devices that are quite effective when compared to an open differential. If your limited-slip differential is worn out, you will end up laying down one of the most monstrous, single-wheel peels possible.
The first step is to remove the differential from the axle housing. Consider removing the ring gear for the rebuild process. Some differentials can be rebuilt with the gear still attached (depending on gear ratio and manufacturer), but the differential is a bit heavy and bulky, and the ring gear only adds to that. Additionally, the ring gear can partially block the already small differential case windows. Usually the tear-down is much easier than the re-assembly process because in most cases the clutch pack is worn and loose.
The differential pin retention bolt threads into the differential case to hold the pin in place.

Once the differential is removed from the axle and the ring gear is off, the next step is to remove the differential pin bolt and push the differential pin out. The differential pin bolt is the 5/16-inch head bolt with the long shoulder on it that keeps the differential pin from falling out.
Thread locker is applied to the new differential pin bolts. You can use the old bolt, but you need to clean the threads and re-apply thread locker.

It is also a good idea to replace the bolt, if possible, or at least re-apply some thread locker before final installation.
Next, remove the preload spring. To make it easy, use a hammer and soft punch or suitable piece of wood to tap the spring out.
Drive out the Ford-style S-spring between the side gears and through the differential window. The spring will pop out the opposite side. As it is under some compression, be sure no one is standing in front of it when it finally releases.

Be careful as you push the last portion of the Ford S-style spring out. It tends to follow the differential side gears’ tooth path and may shoot out of the housing. To minimize the chance of the spring flying out, place a rag over the opposite end of the differential case window.
In order to prevent the spring from shooting across the shop, a rag is placed over the end of the differential case to catch the spring. This sounds like common sense, but many folks forget it and the spring flies across the shop. More importantly, you don’t want to risk injury.

Find more Tech Tips like this in the book:
HIGH-PERFORMANCE DIFFERENTIALS, AXLES & DRIVELINES
Learn everything you need to know about differentials, axles and drivelines by getting your copy here!
SHARE THIS ARTICLE: Please feel free to share this article on Facebook, in forums, or with any clubs you participate in. You can copy and paste this link to share: https://www.cartechbooks.com/blogs/techtips/differentialsaxlesanddrivetrains
Once the spring has been removed, take note of how much play there is in the gears. Keep in mind that the thickness of the clutch packs and shims controls the position of the side gears. If the clutches are worn, the side gears are allowed to move farther outboard and the gears have more backlash or clearance between the teeth. A typical acceptable backlash range is 0.005 to 0.015 inch.
With the gears in place with the clutch, you can check the backlash with a dial indicator.

Since we are talking about high-performance rear axles, you should shim the pack tighter for your hot rod and driving preference.
Before you remove the internal gears and clutch pack, mark and keep track of the side gears so they can be returned to the same position or purposely swapped if excessive wear is visible. This is not absolutely necessary, but you want to make certain that you keep track of the parts and have plenty of bench space to lay out the parts.
The Revacycle gear is a cut gear as opposed to a net-forged gear. There are serrations from the cutting process on the gear tooth surfaces and there is no webbing on the inside or outside of the gear.
A net-forged side gear has a much smoother tooth surface. Since the tooth profile is forged in place and not cut, it allows for webbing to increase the strength.


As you inspect the gears for wear, don’t mistake machining marks for wear. Revacycle is an older machining process for producing the tooth profile, and it produces machining marks from the inside diameter of the tooth face to the outside diameter. This process is still used today but is not very common.
Using either net-formed or forged-tooth profiles is a more current process, and this process does not leave signs of machining on the gear teeth. The net-formed process is becoming the standard for all new differential gears. The process allows for additional webbing in the gear profiles and therefore stronger gears.
The differential pinion gears (a.k.a. spider gears) can be rotated out. There are a few methods to do this. If the clutch pack is worn, it can be as easy as simply rotating the side gears, and the pinion gears will turn relative to the side gears inside the differential case and “walk” toward the window.
If the approach of rotating the gears with your fingers doesn’t work, there are tools available to help do this. In fact, you can make your own tool. An old axle shaft, with the spline end cut off and a square plate welded to it, is a good makeshift tool.
Just like old bearing races, these can be helpful as press tools. Old axle shafts can be used to help rotate the side gears. Here we cut the shaft down in length and welded a plate to the end.
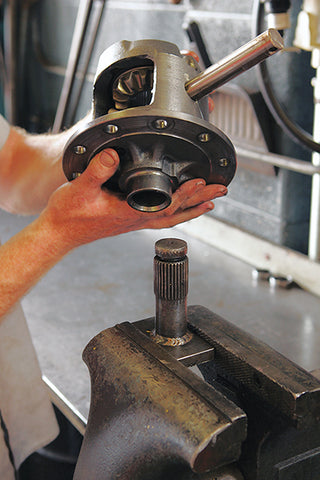
Another way to accomplish this (if you don’t have an axle shaft that you are willing to destroy) is to place the axle shaft from the vehicle vertically in a bench vise and place the differential over the splined end. You can even bolt the original axle shaft to the wheel. Then just set the wheel on the ground with the axle pointing vertically upward.
We can also use a complete axle shaft; we just need an old wheel to bolt to it. This takes up more space in the shop, but is easier if you do not have access to a welder.

Now that the differential side gear is essentially locked to the bench vise via the splined connection, rotate the differential case. The pinion gears will walk around inside the differential case, allowing you to remove them from the access window. In addition, pinion thrust washers are typically located between the pinion gears and the housings and usually these come right out with the gears. If you don’t see them immediately, look closely, as they may be stuck to the pinions from the lube film or inside the differential housing.
Once we are ready to rotate the differential housing, we can use the differential pin for this purpose. We partially install the pin and rotate the housing to walk the gears out.

If, for some reason, the differential case won’t rotate by hand, do not worry. Some of these can be very tight. I recommend partially install-ing the differential pin into the differential case. Install it just enough to engage the housing, but not the inside diameter of the pinion gear. The pinion gear needs to be free to rotate relative to the case, and the pin restricts that if inserted too far.
You can put a “cheater bar” on the end of the differential pin to get additional leverage. Be very careful; the pin is hardened and the case is just cast iron. Never pound or bang the pin during this process. Evenly pull on the bar until the pinions rotate. If you yank and bang on the differential pin, there is a good chance that the differential pin hole will be damaged.
Once the pinions are out of the differential, the side gears can be removed as well. Carefully remove the clutch pack and shims with each side gear. Note that the last shim tends to stick in the housing, from the lube film.

Once the pinion gears have been removed, the top side gear and clutch pack will want to fall out of the case because the differential is vertical. Be prepared for this and catch the gear and the clutch pack. Again, note the order of these parts and their condition; you don’t want these parts falling and bouncing all over the shop. Make certain that the shim between the clutch pack and differential case has also come out.
Now the other side gear, clutch pack, and shim can be removed. At this point, the differential case should be completely empty. This is the perfect time to clean the differential case, either in a parts washer or rinsed thoroughly with brake cleaner.
Find more Tech Tips like this in the book:
HIGH-PERFORMANCE DIFFERENTIALS, AXLES & DRIVELINES
Learn everything you need to know about differentials, axles and drivelines by getting your copy here!
SHARE THIS ARTICLE: Please feel free to share this article on Facebook, in forums, or with any clubs you participate in. You can copy and paste this link to share: https://www.cartechbooks.com/blogs/techtips/differentialsaxlesanddrivetrains