Fixing Burned-Up Cable
by Tony Candela

This tech tip is from the full book, AUTOMOTIVE WIRING AND ELECTRICAL SYSTEMS. For a comprehensive guide on this entire subject you can visit this link:
LEARN MORE ABOUT THIS BOOK HERE
SHARE THIS ARTICLE: Please feel free to share this post on Facebook Groups or Forums/Blogs you read. You can use the social sharing buttons to the left, or copy and paste the website link: https://www.cartechbooks.com/blogs/techtips/fixingburnedupcable
This is a jewel. Not only was the cable routed way too close to a source of high heat (and not protected in high-temperature sheathing), the ring terminal was improperly terminated on the cable.

Many classic cars and some newer cars need wiring runs replaced. Above all else, your vehicle needs to be safe, and wires in good functioning condition are imperative. You don’t want to risk a fire in a valuable collector car, or any car for that matter.
Wires get burned up for a number of reasons. These include: a chafed wire has shorted out on the sheet metal, wire ran too close to the exhaust, or too much current traveled through a small-gauge wire. The list goes on and on. But before you replace the wiring run, you need to identify and remedy the problem, so the new wiring provides a long service life.
This is a classic example of what happens when you’re in a hurry! I had the negative cable off of the battery within about 3 seconds of sizing this up. To fix this problem the correct way, here’s what to do:
1. Remove the starter (which requires removing the passenger side header) so that you can clean and tighten the connection between the solenoid and armature. Use a lock washer to prevent this from occurring again.
This tech tip is from the full book, AUTOMOTIVE WIRING AND ELECTRICAL SYSTEMS. For a comprehensive guide on this entire subject you can visit this link:
LEARN MORE ABOUT THIS BOOK HERE
SHARE THIS ARTICLE: Please feel free to share this post on Facebook Groups or Forums/Blogs you read. You can use the social sharing buttons to the left, or copy and paste the website link: https://www.cartechbooks.com/blogs/techtips/fixingburnedupcable
2. Replace the entire run of 4 AWG cable from the batteries to the starter with new 1/0 AWG cable (to ensure the starter never bogs down).
3. Loom said cable to protect it the length of the run and anchor it along the frame rail so that it is secure.
The cables and fuel line are properly anchored to the frame rail. Even though they are in close proximity to the exhaust and rear tires, a minimum of 2 inches is between them. The 1/0 AWG supply cable and the 4 AWG charge lead from the alternator to the batteries directly, as this vehicle has a bumper-mounted main power switch on the supply cable.

4. Install snap bushings in the tin surrounding the fuel cell to protect the insulation of the cable itself (before, there were none) as it passes through the tin in three different spots.
As the charge lead passes through the tin that surrounds the fuel cell, it must pass through a snap bushing to protect its insulation. The 1/0 AWG supply cable is directly above this and out of the photo. It also passes through the tin in the same fashion.

5. Install a distribution block on the firewall so that you can terminate the 1/0 AWG and have numerous 4 AWG and 8 AWG take-offs for anything you need—one such 4 AWG output goes directly to the starter.
The 1/0 AWG supply lead feeds this firewall-mounted distribution block. The 4 AWG red wire (top right) is the supply to the starter motor. The 4 AWG red wire and the two 8 AWG blue wires (bottom) supply power to the interior fuse panels.
6. Route the cable down the firewall and over the top of the starter to the solenoid, to get it as far away from the headers as possible.
7. Sheathe about 3 feet of said cable within the high-temperature sheathing, just to be safe.
The wiring to the starter motor is protected in high-temperature sheathing. In addition, the ring terminal is soldered to the end of the cable, ensuring a good solid connection to the starter.

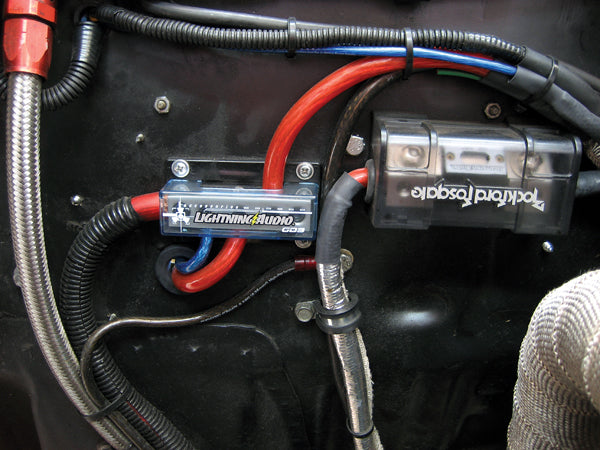
8. Add a pair of 200-amp circuit breakers wired in parallel. These breakers run between the battery and the ON/OFF switch mounted on the bumper. They protect the run of the cable from an unlikely short. (Admittedly, these breakers are large, but the pair of 140-amp units I installed originally would open on occasion during a cold start.)
A pair of paralleled Die Hard Golds ensure that the Olds starts right up, even on a cold morning. When locating your batteries in the trunk, it’s a good idea to protect the run of wiring between them and the front of the vehicle with a circuit breaker, or a pair wired in parallel (shown here).

Remember when I said it gets worse? Well, imagine my surprise when I noticed that both batteries were wired in parallel with 4 AWG and grounded with a 5/16-18 bolt and nut to the tin surrounding the fuel cell. In addition, the tin was painted black on both sides, and tack welded to the fuel cell frame. Also, the bolt and nut were loose enough that the ring terminal easily moved! As I replaced the tired, mismatched batteries, aftermarket battery clamps made the connection of 1/0 AWG wiring between them a snap. I also took this opportunity to tap an existing hole in the frame rail and ground the batteries to the frame directly.

This tech tip is from the full book, AUTOMOTIVE WIRING AND ELECTRICAL SYSTEMS. For a comprehensive guide on this entire subject you can visit this link:
LEARN MORE ABOUT THIS BOOK HERE
SHARE THIS ARTICLE: Please feel free to share this post on Facebook Groups or Forums/Blogs you read. You can use the social sharing buttons to the left, or copy and paste the website link: https://www.cartechbooks.com/blogs/techtips/fixingburnedupcable