A Primer on Ignition Timing for your Classic Ford
The Basics of Ignition Timing
Before we get into the steps involved in setting your timing, we should cover the basics of timing and the internal combustion process. That’ll help us understand what we’re trying to accomplish.
The timing we’ll be covering here is your ignition timing, or spark timing. Sometimes people confuse ignition timing with valve timing, but valve timing is as likely to be adjusted. When people say “timing”, they’re most likely referring to ignition timing. On most classic cars, spark or ignition timing is easily adjustable and should be a regular part of tuning. Adjusting the timing on newer cars is usually more difficult, as it requires modifying the factory computer.
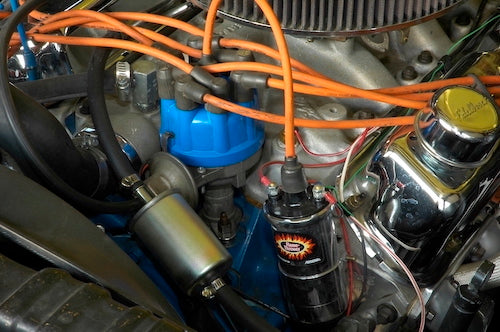
This is a typical 1960s Ford distributor. The metal pod on the front left is the vacuum advance canister, which is connected to a vacuum tee or fitting on your carburetor via a black vacuum hose. You can see the distributor hold-down bolt and bracket at the base of the distributor. Loosening this bolt and rotating the distributor changes the ignition timing.
What is ignition timing?
Let’s start at the beginning. Almost all passenger vehicles manufactured within the last 100 years have what’s called a 4-cycle, or 4-stroke engine. That is, the combustion process requires the piston to go up and down in the cylinder two times (or four strokes, up-down-up-down), which equals two complete rotations of the crankshaft. Two-stroke engines work a little differently in that they fire once every two strokes (up-down) of the piston, or once every complete crankshaft rotation. Two-stroke engines are found in some small motorcycles, lawn mowers, and outboard engines. They have never really been popular for powering automobiles, and have not been used to do so for some time. Although 2-stroke engines make more power for a given engine size, they require you to add oil to the gasoline, which is inconvenient, and they send a lot of smoke out the tailpipe. Most people are familiar with 2-stroke engines on their lawn mowers, but even these have fallen out of vogue. Our discussion about ignition timing will focus on the 4-stroke engine.

Find more Tech Tips like this in the book: HOW TO REBUILD THE SMALL-BLOCK FORD
Learn everything you need to know about the Small-Block Ford by getting your copy here!
SHARE THIS ARTICLE: Please feel free to share this article on Facebook, in forums, or with any clubs your participate in. You can copy and paste this link to share: https://www.cartechbooks.com/blogs/techtips/how-to-build-chevy-big-blocks-cylinder-head-guide
The 4-Stroke Engine
Most classic engines have two valves per cylinder. One is an intake valve, which allows an air/fuel mixture into the cylinder at the appropriate time, and one is the exhaust valve, which allows burned gasses, or exhaust, out of the cylinder at the appropriate time. While some newer or higher-performance engines have more valves in the cylinder, they are only there to perform these two functions.
Let’s examine each of the 4 strokes:
Intake Stroke
The intake stroke is the first stroke of the 4-stroke cycle. In this stroke, the piston is moving downward as dictated by the rotation of the crankshaft. Since the intake valve is open, when the piston moves down, it creates a vacuum, which sucks the air/fuel mixture in through the air cleaner, carburetor, intake manifold, and finally into the cylinder. Around the time that the piston gets to the bottom of the cylinder, or bottom dead center (BDC), the intake valve closes, thus ending the intake stroke.
Compression Stroke
The second stroke is called the compression stroke. It gets its name because the piston compresses the air/fuel mixture. With both valves closed, the crankshaft pushes the piston up the cylinder, which compresses the air/fuel mixture in the combustion chamber. The piston travels up until it reaches top dead center (TDC). We want to fire the spark plug at around TDC, as this is when the air/fuel mixture is the most compressed and volatile. The point at which the spark plug fires relative to TDC (the timing) affects the engine’s efficiency, but we’ll discuss that in a minute.
Power Stroke
The third stroke is called the power stroke, or combustion stroke. When the spark plug fires, it ignites the air/fuel mixture, which creates heat energy. This causes a rapid expansion of the charged gasses, forcing the piston back down the bore with considerable force. This force spins the crankshaft, which transfers the power through a series of parts and eventually moves your vehicle. The power stroke concludes when the piston reaches bottom dead center (BDC).
Exhaust Stroke
The fourth stroke is called the exhaust stroke, because the piston expels the burned gasses from the cylinder. During the exhaust stroke, the piston moves up the cylinder from BDC to TDC, pushing the exhaust gasses out of the open exhaust valve. The gasses travel out through the exhaust manifold and the rest of the exhaust system. When the piston reaches TDC, it has expelled all the burned gasses, and the 4-cycle process begins anew.
You can remember the four cycles as Intake-Compression-Combustion-Exhaust; though some in the industry find it easier to remember Suck-Squeeze-Bang-Blow. You decide. Now that you know the fundamentals of how a 4-stroke internal combustion engine operates, spark or ignition timing will make more sense.
How Does Ignition Timing Work?
The terms spark or ignition timing refer to when the spark plug fires relative to TDC. It is most often referred to as a measure of degrees of crankshaft rotation. For instance, almost all base ignition timing is set either at TDC, which is when the piston is at the very top of the cylinder, or in degrees BTDC (Before Top Dead Center), which is a measure of how many degrees before TDC the spark plug fires.
The reason 99% of the cars on the road have a base timing set BTDC is to compensate for the difference in speed between piston travel and flame travel of the ignited air/fuel mixture. Since the piston is able to travel at a speed greater than the flame front of the air/fuel mixture, we need to give the flame front a head start, so ignition happens at the perfect time for powerful and efficient combustion.
Let’s say, your tune up spec sheet or shop manual recommends that you set your base ignition timing at six degrees BTDC. This is a very common setting for many vintage small-block Ford engines. This setting calls for your ignition to fire the spark plug at six degrees of crankshaft rotation before the piston reaches the top of the cylinder. While it may seem crazy to set the ignition to fire while the piston is still traveling upwards in the compression stroke, setting it to fire just six degrees BTDC gives the flame a little head start. That way, when actual combustion occurs, the crankshaft has already rotated those six degrees and the piston is in position to begin the power stroke.
What happens when the timing is not set correctly?
If the spark timing is not set correctly, you could lose efficiency in your engine, or even cause internal damage. That’s why it’s important to check and reset your timing as necessary.
Let’s assume the timing specification for your engine is six degrees BTDC. If your timing is set too late, at say just two degrees BTDC, or even retarded to After Top Dead Center (ATDC), the combustion energy won’t start pushing the piston down until after it’s already on its way down the cylinder. This will cause you to lose power and efficiency because the less of the combustion energy is imparted on the piston. This inefficiency will not only cause you to lose power and mileage, it may also cause your engine to run hotter.
In the opposite scenario, if your ignition timing is set to fire too soon (too far advanced), say at 12 degrees BTDC, you will ignite the air/fuel mixture too soon, and the flame front from the mixture will collide with your piston as it is still on the way up in the compression stroke. This will cause a pinging noise and greatly reduce performance of your engine. This can cause damage to the piston over time if not corrected. Hard starting is another symptom of timing that is too far advanced.
How to Check and Adjust Your Ignition Timing
The first thing we should look at is the tools required for this task. Below is a list of tools, some that you absolutely must have, and some that you may or may not need depending on your application:
-
Timing Light
-
Tachometer (if your vehicle doesn’t already have one)
-
Distributor wrench or standard wrench
-
Chalk or wax crayon
-
Golf tee, vacuum cap, or bolt to plug a vacuum line to the distributor
-
Wire brush
-
A bump start switch
-
Ramps or a jack and jack stands
-
Cleaning solvent
The first step is to make sure you have a good inductive timing light. Timing lights are specially designed for this task and are essential for checking and setting your timing. A good basic timing light can be had at parts stores or online parts retailers for about $50. While this isn’t exactly cheap, a decent timing light will last for years.

These are some of the basic tools that will be helpful for setting your timing. A repair manual is very handy, especially if you need tuning specs. At the very top is a ratchet and socket for turning the engine over manually. This can be avoided if you purchase a starter switch, which is the black item shown at the lower right. The timing light is the gray gun-shaped item. Also shown are some specialty wrenches for the distributor hold down, a wax crayon for marking your timing location, and a wire brush, for cleaning any rusty parts.
You’ll also need some kind of wrench to loosen and tighten the bolt at the base of the distributor. The type of wrench you’ll need varies quite a bit by application. In some cases, a regular open-end/box-end wrench will work; in other cases a specially made distributor wrench will be required. I made my own distributor wrench by taking an inexpensive box-end wrench from Sears, heating it up with a torch, and bending it in a vice to a convenient angle for this application. You may just want to buy one! With some small-block Ford applications, especially equipped with air conditioning, it can be difficult to get at the bolt without some pretty creative tools. There are sockets, extensions and other gadgets manufactured to get around this problem. Again, you will have to determine what tool you need depending on your particular application.

Here’s a view of the harmonic balancer from the bottom. As you can see, jacking up your car to access to the balancer from the bottom is often easier than accessing it from the top. This makes it easier to clean off the surface rust (if necessary) and draw the proper timing mark on your balancer (yellow stripe).

It is possible to see the timing mark, timing pointer, and harmonic balancer from the top. As you can see, there is often a lot of clutter around this area, and quite often you only have just enough space to see the timing pointer and little room for anything else. This is why marking the balancer from the bottom is often easier. The pointer should line up with the mark you make on the balancer when setting the timing.
Begin by marking the spot on the harmonic balancer that corresponds to the factory specification for your application (six degrees BTDC in the example above). The harmonic balancer is the big balancing weight that is bolted onto the front of your crankshaft. It’s also what the lower pulleys are bolted to, so you can find it by looking for the lowest pulleys on your engine.
If your specification is six degrees BTDC, you need to find that spot on the harmonic balancer and mark a line with a piece of chalk, or better yet, a wax crayon. You can find little yellow wax crayons at most auto parts stores. The wax adheres well to the harmonic balancer, and will stay on there for a long time. It works much better than chalk.
The reason I listed a wire brush in the tools section is because quite often, the factory paint has peeled off of the harmonic balancer and it will be covered with surface rust. Since the timing numbers are etched into the harmonic balancer, you may have to use the wire brush to clean the balancer enough to see the marks.
Depending on access, it also may be difficult to get at the harmonic balancer from above. There are a lot of belts and hoses and brackets that are bolted to the front of the engine, and quite often they will be in your way. It’s usually very easy to gain access to the harmonic balancer from underneath the car. For this, you’ll need either a pair of ramps or a jack and jack stands. If you change your own oil, you should already have these.
Find more Tech Tips like this in the book: HOW TO REBUILD THE SMALL-BLOCK FORD
Learn everything you need to know about the Small-Block Ford by getting your copy here!
SHARE THIS ARTICLE: Please feel free to share this article on Facebook, in forums, or with any clubs your participate in. You can copy and paste this link to share: https://www.cartechbooks.com/blogs/techtips/how-to-build-chevy-big-blocks-cylinder-head-guide
Sometimes, you’ll need to bump the starter to get the timing mark to a location in the crankshaft rotation where you can mark it easily. You can either bump the starter using the key, or you can get a remote starter switch. Remote starter switches are extremely handy, and can be used for a variety of tasks like setting ignition points, checking cylinder compression, adjusting valves, and of course, setting timing. If you plan on doing a number of these tasks, I would highly recommend one. They can be purchased from Summit or Jegs for around $15, and after you have one, you’ll wonder how you lived without it. Always remember to disconnect the coil wire when bumping the ignition, or your car will try to start!

If you own a vintage Ford and plan on doing your own maintenance and repairs, I highly recommend a remote starter switch. They are used to crank the engine over without having to get in the car and turn the key. A remote starter is very handy for setting valves, rotating the engine for marking the harmonic balancer, setting the points, etc. Here we’ll use the switch to bump the engine over until the timing marks on the harmonic balancer are in a location where it will be easy for us to mark them with a wax crayon.

There are four terminals on a Ford starter solenoid. Starting on the far left, there is a large terminal to which your positive battery cable connects. Then there are two smaller terminals in the middle, the one on the left is the “S” terminal, and the one on the right is the “I” terminal. Finally the large terminal on the far right is the terminal that goes to your starter motor via another starter cable. To use a remote starter switch, connect one lead to the “S” terminal on your starter solenoid (should be labeled on your solenoid), located on the engine bay wall next to your battery. You’ll probably need to pull the existing wire and boot off this terminal to gain access. It’s usually an angled boot as shown in this image on the terminal directly to the right of the “S” terminal.

The other starter switch lead connects to the positive battery terminal.
Now that you have the timing marks established, you need to start the car and run it until it reaches operating temperature. It’s important when setting your timing that the choke be fully disengaged, and the easiest way to do this is to warm the engine up. After the engine is warm, shut it off and disconnect the vacuum line to the vacuum advance canister on the distributor. This vacuum advance provides spark advance in the distributor based on certain driving conditions. It’s important to disconnect this before setting base idle speed and setting your timing. You can plug the vacuum line with a golf tee, a pencil, or even a small bolt.
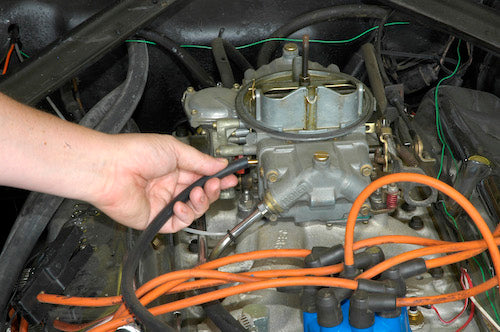
The vacuum line from the vacuum advance canister leads to a vacuum source on the engine. This must be disconnected to properly set the base ignition timing. Shown here is the ported vacuum source on a Holley 4-barrel carburetor. This is a common source for vacuum advance. To disconnect this vacuum source at the carburetor, remove the vacuum line and place a vacuum cap in its place on the carburetor. The vacuum line can be plugged with a golf tee, small pencil, or bolt. You can also disconnect this hose at the vacuum advance canister, put a vacuum cap in its place, and then plug the hose at that end. Either way will work.

This photo shows a vacuum cap being used to plug the vacuum advance source. Assortment packs of vacuum caps can be found at auto parts, hardware, and home-improvement stores.
Now that the vacuum advance is disconnected, you need to make sure the idle speed is within specification. Setting the idle speed is very simple, but you need a tachometer to do it correctly. If your car doesn’t have one, you’ll have to use an external tach to determine the engine speed. Tachometers, or multi-meters that act as tachometers, are available online, as well as a number of home improvement store chains and auto parts stores. Some are called multi-meters because they perform functions other than just serving as a tachometer, such as acting as voltmeters, ohmmeters, etc. They come with instructions to connect the tachometer to your engine.
Remove the air filter housing to gain access to the idle adjustment screw. Adjusting this screw increases or decreases engine idle speed. The adjustment screw is part the carburetor linkage and is easy to find. If you manually rev the engine up while the car is running, it’s easy to see which screw is the one to adjust. If there is more than one screw, which is rare, it will be the screw that will butt up against a form of positive stop at the base of the carburetor. The positive stop remains stationary, and when turning the screw clockwise, the turning motion causes the linkage to come to a stop further away from the base. This prevents the throttle plates in the base of the carb from closing all the way. The gap left in the throttle plates allows more air to enter the engine at idle, increasing the idle speed. It is important to have the vehicle fully warmed up before making this adjustment. Turn the screw clockwise and the engine speed increases; turn it counterclockwise and the RPM drops. Get the speed as close as possible to the factory spec.

Adjust the idle using a screwdriver to rotate the idle-adjustment screw. Turning it clockwise increases the idle speed, while turning it counterclockwise decreases the engine idle speed. Remember to make sure the engine is at operating temperature when setting idle speed.
After setting the idle speed, it’s time to connect the timing light to the car. The light has positive and negative connections that go to their respective terminals no the battery. There should also be an inductive clip to go over the plug wire for cylinder number one. The number-one cylinder on small-block Fords is in the front on the passenger side, and for Ford straight six-cylinder engines, it’s the cylinder at the front. Consult your manual if you are unsure which cylinder is number one for your particular application. The inductive clip receives a signal every time voltage travels through the plug wire and fires the plug. This signal is also what fires the strobe light in your timing light.

The timing light is very simple to hook up. Simply connect the positive lead to the positive battery post, and the negative lead to the negative battery post. Shown here is the only other lead you need to hook up. This is an inductive clip that clamps over the number-one plug wire. There will be an arrow on the inductive clamp that indicates which side faces the spark plug. Be very careful to route all the timing light wiring in a manner that will keep it from touching anything hot or getting caught in the fan. The engine will be running when you use the timing light, so caution is very important.
Next, point the timing light at the harmonic balancer and pull the trigger. The strobe will fire once per engine revolution, and the yellow crayon mark you put on your harmonic balancer will flash brightly under the strobe. See where the yellow mark is in relation to your timing pointer, and you can see where your timing is set.
(One note of caution: please be very careful during this procedure with your timing light and your tachometer. When the engine is running, the cooling fan is spinning, and you need to be very careful to keep all wires AND hands away from a rotating fan. It hurts. A lot.)

With the engine running, point the timing light in the direction of the timing pointer and pull the trigger. The timing light is really just a simple strobe light that flashes when the number-one plug fires. When the light flashes, the timing mark that you made on your harmonic should be somewhere close to the timing pointer. Loosen the hold-down bolt and rotate the distributor until both marks line up. Rotating the distributor clockwise advances the timing; counter-clockwise retards it.
Now that you know where the timing is set, you know if you need to adjust it. Hopefully it isn’t too far off! To advance or retard the timing, you simply rotate the distributor. Loosen the bolt and hold-down clamp at the base of the distributor. Loosen it just enough to turn the distributor, but do not remove it. Loosening the bolt just enough makes it easier to make small adjustments (one degree isn’t very far!) and to tighten it down once you have the timing properly adjusted. Rotating the distributor clockwise advances the timing, while rotating it counter-clockwise will retard the timing.

This is an aftermarket distributor hold-down manufactured by ARP. Instead of the factory bolt and clamp setup, ARP uses a stud, nut, and clamp. Either will work well.

Use a wrench or special socket to loosen and tighten the hold-down bolt while setting the timing. This is a custom-made box-end wrench bent specifically for this application. There are a variety of options, including special distributor wrenches, special sockets, and swivel sockets to loosen and tighten the bolt. Access here is fairly simple, hence the box-end wrench. Depending on accessories, especially air conditioning, the distributor hold-down can be a bit more difficult to access. There is no one tool for all applications, and you will need to look at your engine before getting started to determine which tool will work the best for you. Remember, the engine will be running while you’re performing this procedure, so choose a tool that will keep your hands and arms away from rotating fan blades and hot engine parts.
With the engine running, pull the trigger on the timing light and watch the timing mark on the harmonic balancer move as you rotate the distributor. Adjust it until the timing mark that you made with the wax crayon lines up with the timing pointer just as the timing light strobe fires. Once you get the timing just right, tighten the distributor hold-down bolt.
You may have noticed that changing the timing setting can alter your engine speed. Generally, advancing the timing increases engine speed, and retarding the timing decreases it. If your engines timing was far off of the factory specification, you may have to set the timing and idle speed in increments. Make sure to check the idle speed after you have set the timing to make sure it is still within specification. If not, readjust the idle speed to spec, and then double check your timing. Then go back and check the idle again, and so on, until they’re both perfect.
You may have to do this a few times to get the timing and idle speed set correctly, but it sounds more difficult than it is. Just gradually adjust each, going back and forth until you get them dialed in.
Hook the vacuum lines back up and reinstall your air cleaner. Make sure you’re timing light and external tach are disconnected and put away. Go for a quick test drive and see how the car drives. It shouldn’t ping under any circumstances, and the operating temperature should be within range. If that‘s the case, you’re done! If your car pings on acceleration, you’ll need to go through the procedure again and retard the timing slightly until the pinging goes away. If you car runs too warm, you may be able to advance the timing to help with that problem, although there could be any number of reasons, besides the ignition timing, for it to run warm.
Power Timing
Quite often, performance enthusiasts will adjust timing to get the maximum power. You can usually advance the timing a little past the factory specification to get a little more power than the factory was willing to risk. The manufacturer was responsible for a warranty on every vehicle, so they tuned things on the safe side to minimize customer complaints and warranty claims.
Power timing is slang for an old technique used by hot rodders to get the most possible power out of an engine without breaking any parts. Basically, tuners would just advance the timing in increments until they started to hear pinging under load or acceleration, and then back it off in increments until the pinging went away. While hearing a little pinging while testing and tuning is fairly safe, setting your timing so that your car pings all the time is dangerous territory.
Let’s say your factory specification for base ignition timing is six degrees BTDC. Try setting it to eight degrees BTDC and test-drive it. If it doesn’t ping, keep advancing the timing in two-degree increments until it does start to ping. Once it does, retard the timing in one- or two-degree increments until it no longer pings.
Once you’ve advanced your timing as far as you can without any pinging, you’ve power timed your engine. It’s better to do this in warm conditions, as engines are more prone to ping on hot days. After you’re done, check your gas mileage and power, and you may be surprised to find that you find a timing setting that’s much better for your car and wallet than the factory spec.
Written by Bob Wilson for CarTech Books.
LEARN MORE ABOUT THIS BOOK!
