Manual Transmission Assembly Tips and Techniques
The transmissions outlined in this book were chosen because of their popularity as well as their capacity to be rebuilt with common shop tools. Although you may want to rebuild a transmission not outlined in this book, you must realize that the cost of certain specialty tools required for a one-time job may not be justified. Please take the time to read all of the build-ups. Some of the tips and techniques used on one transmission may be used on another as well, or on one not covered in this book. Investing in factory shop manuals is a great ideaIt’s important to comprehend why the specialty tools are needed and what their function is. Working on a transmission you have never worked on before without any form of reference is a recipe for disaster. You may find that a required tool’s function may be duplicated by another means that you have at your disposal. I remember a Doug Nash overdrive having needed a special spring compressor and retaining-bolt kit. A shop press and three standard 8-mm bolts served the same function.

This Tech Tip is From the Full Book, HOW TO REBUILD & MODIFY HIGH-PERFORMANCE MANUAL TRANSMISSIONS.
For a comprehensive guide on this entire subject you can visit this link:
LEARN MORE ABOUT THIS BOOK HERE
SHARE THIS ARTICLE: Please feel free to share this post on Facebook Groups or Forums/Blogs you read. You can use the social sharing buttons to the left, or copy and paste the website link: https://www.cartechbooks.com/blogs/techtips/manual-transmissions-explained

Typical kits sell for under $200 and make a rebuild quite easy. Be aware that all kits are not alike, and kit parts have a great range of quality from very high to poor. It is best to ask what components come with the kit before making a purchase. (See “Choosing a Premium Rebuild Kit” on page 32.) Better companies offer support.
Professional Mechanic Tip

Aluminum bar stock, old bearing races, used wrist pins, or the other pieces you see here are useful during a transmission rebuild.
So What Do I Use?
Manual transmissions can be quite old, so if you are going to do a rebuild and not a quick repair, I suggest you purchase a rebuild kit. These kits include all wearable parts, such as bearings, synchro rings, thrust washers, needle bearings, gaskets, and seals. High-grade kits have OEM bearings and gaskets. Less expensive kits may have “no name” bearings, which are not worth the $30 savings.
As far as tools go, a basic tool kit is a good starting point. Tools that have a lifetime warranty form a basic foundation and are a wise investment. Hydraulic shop presses can be purchased for under $200. They are great for gear work and prove useful for other projects as well. A few different-size bearing clamps, old transmission cases, piston wrist pins, aluminum round stock, and bearing races are great additions to your collection of press tools.
An assortment of snap-ring and retaining-ring pliers is always needed. I’ve purchased pliers at swap meets at rock-bottom prices. Buy up cheap retaining-ring pliers so that you can grind them if needed for specialty work. Old driveshaft yokes help you align tailhousings, and make sure the rear bushings are installed correctly. These also help you spin a transmission. Pry bar sets and screwdrivers, which you don’t mind using for anything but screws, are ideal for this work. Two-jaw or three-jaw pullers are nice, but I rarely use them. Propane torches for heating parts help install slip-on components, such as steel speedo gears that could get ruined by pressing or hammering them in place. Telescopic magnets are great for removing detent balls. Cheap dental-tool kits are great for removing O-rings and retrieving detent springs. I prefer nonserrated steak knives for removing gaskets rather than special gasket “scrapers.” Copper scouring pads are great for removing silicone sealant without marring aluminum surfaces. A big mistake is to use an air-powered rotary scouring pad to remove gaskets. This ruins the precision flat surface of the case and will lead to leaks.

Be creative! I find cheap party platters at the Dollar Store and use them as parts organizers.

Copper scouring pads are abrasive enough to easily remove sealant.

Special chisels used for muffler work make removing tailhousing bushings a snap.

Insert the cutting edge of the chisel along the oil-feed passage and tap out the bushing.

Use an old driveshaft yoke to make sure your new bushing is pressed in properly.
Professional Mechanic Tip

Dremel rotary tools have a reinforced cut-off wheel, which makes for very easy deburring. Reinforced wheels do not shatter and are much safer to use. I prefer 1- to 11⁄2-inch wheels using a 1/8-inch mandrel. I save all the discs that wear to smaller diameters for work in tight places.

This front countershaft bore has been bushed to restore its center-tocenter distance. It also creates a larger steel surface area and tighter press fit, and it prevents leaks. For performance applications, rebushing both front and rear bores and moving the countergear up a few thousands of an inch helps reduce gear deflection.
A vise holds some transmissions, but building a custom holding fixture is the way to go if you plan on doing volume work. Personally, I’ve never used a holding fixture because setting up a transmission fixture is a time-consuming process. By following the techniques detailed in this book, a fixture simply isn’t required.
If you are going to clean your own parts, then you should invest in the proper cleaning tank, safety glasses, and gloves. It is easier just to send all of your parts to a production transmission shop and pay to have them pressure cleaned.
I also don’t have air in my shop. Instead, I use electric impact guns. I hate the noise of compressors, and I don’t like blowing off parts because it creates more airborne contaminants. You can get small air compressors for under $300 that even come with starter air tool kits. In addition, a small can of compressed air typically used for cleaning computers is usually adequate for the one-time job.
If you are rebuilding a transmission and you require the installation of new gears, you may need to deburr them. A Dremel rotary tool with cut-off wheel is ideal for cleaning up gears. Bench grinders, drill presses, and a 4-inch disc grinder should be acquired for more serious work, such as slick-shifting gears or clearancing gears by cutting them back a bit.
Repairing Castings
A transmission doesn’t have to fail to have its fair share of problems. The environment and service people can be a hazard as well. I’ve seen people run over objects, drop transmissions, and get into accidents. This leads to cracks, holes, and stripped threads.
Aluminum and cast-iron cases can be heli-arc welded. Welding broken mounting ears, caused by people pulling a transmission into the engine with bolts, is a common job, which should be done by a professional. You can warp a transmission case easily by using too much heat. Epoxies, such as J-B Weld, are great for fixing small cracks or porosity problems. Drilling and tapping out a small hole and then plugging it with a bolt is also an alternative to welding. Alloy main cases tend to stretch when a gearset explodes. Muncie and T10 transmissions have a tendency to leak from the front countershaft bore.
Gear Preparation
Inspect gears for typical cracks, chips, and obvious missing teeth. Gears with missing teeth do not work. Since the gears in most manualshift transmissions are in constant mesh, if the teeth are broken on one gear, usually the matching gear exhibits some form of damage or stress caused by the upper gear slamming against it. Often, people ask to purchase a new input shaft because the old one is missing three teeth. I ask them if they want to purchase a new matching countergear, and the response is usually “no,” because that gear is not missing any teeth. These people haven’t noticed the bent, cracked, or deformed teeth. As a rule, if one gear has broken teeth, always change the matching gear, too. When transmissions are run low on oil, gears can become blue or black in color. Usually the front gears starve of oil because oil moves to the back of the transmission when a car accelerates. Gears appear scuffed looking or gouged out in the center of the tooth. Chipped teeth are another story.
Debris getting lodged in the gear usually causes chipping in gears. Sliding gears that are non-synchronized, such as most reverse gears, also have chips. Some gears are simply chipped by poor assembly or handling techniques. It’s quite common for many new gears in boxes to have their share of dings and chips. Any transmissions I build also have the gears completely deburred. You can deburr most chipped gears just as long as the chipped section is no longer than one-quarter the length of the gear tooth and never extends into the root or center section of the gear tooth. Anti-rattle or anti-backlash plates are quite common in Muncie, Chrysler, and Saginaw transmissions. These spring-loaded plates are offset in relationship to the actual tooth profile. I cut these plates off because they can loosen up in a performance application.
Bolts and Threads
Older transmissions may have bolts that are seized in place. Using an impact gun is a sure way to either strip or snap the bolt. If a bolt seems hard to remove, try heating it first with a propane torch and strike it with a hammer. You want to hit the bolt flat on the head. The idea is to stretch the threads enough to loosen the bolt. Hex-socket pipe plugs easily strip. To remove really difficult bolts, heat and strike them, and then use a hammer to drive a Torx bit into the hex bore. Slamming the Torx bit into the plug deforms the threads and produces a stronger contact pattern to make a stripped hex plug removable.
Step-1: Inspect Gears

The gear on the left has heavily worn engagement teeth, which hold the transmission “in gear.” It is worn to such a degree that it will disengage or fall out of gear. In comparison, the new gear on the right shows how much material is actually missing from the gear on the left.
Important!

This is common damage on a Muncie reverse gear. The gear is still usable because both chipped ends overhang each other when engaged. This damage is always evident in gears that are unsynchronized and the overhang design is built into them.
Step-2: Repair Damaged Threads

Fastener threads strip out from time to time, but they are easy enough to repair. Inserts designed to repair threads, such as those made by Heli-Coil, have special taps and drill sizes. Only use the recommended drill and tap.

The insertion tool winds the drive tang into place. Once it’s seated, the drive tang is snapped off.

The threaded inserts form standard-size threads from nonstandard threads. Tool supply companies and most auto parts stores usually have these readily available.

Before removing the drive tang, check to see that the new thread actually works. You can use needle-nose pliers to grasp the tang and pull out the insert if your installation doesn’t work.
If a bolt has broken off, try to get the remaining surface as flat as possible. Use a sharp centering punch in the middle of the bolt. The centering punch helps you start a drill. Drill with a small bit first and work up to the size of the bore so that you can install a threaded insert. When you have stripped threads, the wrong thing to do is rethread to a larger size. That is unprofessional. Threaded inserts from Heli-Coil make it possible to restore damaged threads to the correct size. The hole is tapped using a special tap that allows a threaded insert to be screwed into the bore. Once the insert is installed, the drive tang is broken off and the thread is restored.
Hydraulic Press Basics
There is one basic rule when using a press. That is to only press and support the part against the area that is holding the press fit. For example, if a bearing is held in a housing by the outer race, press against that outer race. If the bearing is held on by the inner race, press or support against that inner race. If you support against the inner race and press against the outer race, you will deform the raceways, and basically damage the part. I cut apart older bearings and use the old races as support surfaces. I’ve purchased cheap socket sets and use the sockets as press tools as well. However, never hammer on hardened parts.
Step-3: Load Needles in Countergear

The first step is to place the spacer tube in the countergear. Be sure to use plenty of grease.

Once everything is in place, push the countershaft you are going to use through the gear, but hold a thrust washer in the front to prevent parts coming out of the opposite end.

A generous amount of grease provides ample adhesion, so you can load the needles into place.

Inspect the countergear to ensure you’ve added as many needles as possible and they are all in place.
This Tech Tip is From the Full Book, HOW TO REBUILD & MODIFY HIGH-PERFORMANCE MANUAL TRANSMISSIONS.
For a comprehensive guide on this entire subject you can visit this link:
LEARN MORE ABOUT THIS BOOK HERE
SHARE THIS ARTICLE: Please feel free to share this post on Facebook Groups or Forums/Blogs you read. You can use the social sharing buttons to the left, or copy and paste the website link: https://www.cartechbooks.com/blogs/techtips/manual-transmissions-explained
Loading Needle Bearings
People seem to have a hard time loading needle bearings in countergears. The thought of loading more than 100 bearings in a gear can be intimidating. Oddly, most factory shop manuals advocate the use of “dummy shafts,” to load needles. I always say, “Dummy shafts are for dummies.” The problem with the dummy shaft is that you don’t see the needles or the position of the needles in the gear. You can’t see if you’ve put in the proper number of needles. When removing the dummy shaft and sliding in the real shaft in place, sometimes the needles can drop, which means starting over again.
Consider the following procedure and the thought process behind it. I use grease to pack the needles in place. You can use wheelbearing grease if the transmission is using conventional 75W-90 gear lubes. There are new assembly lubes, such as Trans Gel and Trans Goo. These assembly gels break down faster for both gear lube and automatic transmission fluid applications. They also seem to retain viscosity better in colder or warmer climates. If you’re working in a 96-degree shop in Florida, wheelbearing grease will not hold as well as an assembly gel.
Step - 4: Inspect Syncro Ring (Critical Inspection)

Synchro rings should be fitted and checked on each gear. Don’t assume that a new ring is okay. I’ve seen many rings with defective machining or warping—you can warp a new ring by simply dropping it on the floor. A good ring should not wobble on the gear cone. It should fit firmly and lock to the gear while applying pressure to the ring as you rotate the gear. Make sure the ring is not sitting too high or too low. The average ring gap is 0.030 to 0.060 inch. A low-fitting ring makes for poor lock up and displaced strut keys. A high-fitting ring can cause binding. A worn gear cone that shows defined ridges prevents a ring from properly grabbing the gear. Sometimes a ring may lock well on one gear but not another. You can also use lapping compound, which is basically an abrasive paste to fit a ring to a gear. Once rings are fitted, the “set” is put aside until the build begins. Always fit rings, and never just place new rings on gears.

Here are typically worn teeth on a slider. Once the teeth lose their point definition, they can ruin synchro rings and gears if not replaced because the teeth do not effectively mesh.

This ring looks good. However, if you look at the backside of the ring it sits too low and hits the gear. Therefore, this ring needs to be replaced.

When a ring has ballooned and sits too low, it cannot lock on the gear cone, which causes grinding when in gear. As the ring moves away from the strut key, the additional gap allows the strut keys to pop out and further damage the ring. You can see how slipping struts have damaged the key slot.

This is a 3-4 slider for a Muncie 4-speed. Installing it in the 1-2 position will cause the edge to hit the lower counter gear. Notice that this edge is square. It’s important to recognize these subtle differences.

This slider’s edge has a taper, which means it will clear the lower gear when the slider is engaged.
Step - 5: Inspect Spline Taper

This taper is purposely machined into the spline. The back taper or “torque-locking” design forces the gear’s engagement teeth to ramp toward the center, so it doesn’t fall out of gear.

Here is a standard-design internal slider spline. It should be used if the matching gears are in pristine condition. If the transmission tends to fall out of gear, the torquelocking sliders are better suited.
Critical Inspection

Always check the strut keys for wear. If the keys show significant wear, they should be replaced. This key has been worn flat and definitely needs to be replaced.
Step-6: Assemble Synchro Gears and Parts (Important!)

Start by placing the slider within the hub and make sure the slider’s notches line up with the key slots. Some sliders have notches on all the splines; others have them in just in three places. It’s a good idea to use a felttip marker to indicate where the notches are. If the notches are not lined up correctly with the synchro strut key slots in the hub, the synchro will not work.

Place all of the struts or dogs in their hub slots.

When using a hollow key, the spring tang usually is placed in the center of the key. Otherwise, it is alongside it. Insert the spring in a clockwise direction.

Flip the synchro assembly over and install the second spring in a clockwise direction. When assembled, the springs will be opposite of one another and create a nice balance.

This completed assembly shows solid-design strut keys. I usually grind the spring tangs, so they don’t hit the inside wall of the hub. This helps to provide a clean, positive shift.
When loading the needles you can only load as many as will fit. There is no need to count. If you can fit one more needle, then you need that extra needle. Once I have all of my needles loaded, I take the countershaft I’m going to use and push it through the gear. I hold a thrust washer on the opposite end of the gear to keep all the needles from getting pushed out, and then I push the shaft through. This adds some extra packing and squeezes out extra grease. I rotate the shaft in the gear because this allows me to check for binding and smooth rotation. Next, I then remove the shaft, which allows me to inspect the needles and check for complete rows, good alignment, and proper spacing. A dummy shaft cannot be used for any of these checks because the gear has been installed in the case after the shaft is removed.
Subassemblies and Synchronizers
Some of the basic assembly techniques pictured in this section are used in just about every build listed in this book. Rather than repeat these steps with each build, they are shown here only.
The synchro slider can exhibit wear on the teeth, but can also have an enlarged groove for the shift fork. Common causes for falling out of gear are worn engagement teeth on the slider and gear combined with a worn shift-fork groove and worn shift fork. Strut keys or shift dogs always give people assembly problems because they are spring loaded. Rather than assemble in this order: springs, keys, and slider, which is how most shop manuals tell you how to do it, simply place the slider on the hub first, then the keys and then the springs.
Step-7: Remove Bearing

If the bearing locates from the outside diameter, press or tap it in place from the outside of the case.

If the bearing locates from the inside diameter, press or tap it in place from the inside race. Its best to use a press, but a punch will work if the fit is a slip or snug fit.
Step-8: Check Snap-Ring Clearance

It’s simple to check snap-ring clearance. First, verify that the edge of the ring fits the groove before installing it. Then use a micrometer to measure the width of the groove and thickness of the ring. Dialing-in the correct endplay is a matter of subtracting the width of the groove from the thickness of the ring.
Step-9: Verify Bearing Dimensions and Condition (Precision Measurement)

Here is a typical sealed bearing. New designs always use them. This bearing had more than 100,000 miles and when I pulled the seals the bearing still looked pretty good. Most manufacturers today are using bearings made in the United States or Japan. If you need to replace the bearing, always use the OEM replacement bearing. Sometimes getting a bearing from a bearing supply house is not really a good idea because automotive- grade bearings require different fits and tapers.

I’ve taken the sealed bearing apart. If you look carefully you can see how one side of the bearing has more wear than the other due to the nature of thrust loads from the helical-cut gears.
Important!

Not all bearings of the same dimension are alike. This is something you must detect. The new bearing on the left has a slight chamfer to the inside diameter (ID). The ID of the older inner raceway has a very square cut bore with no chamfer. The bore with no chamfer is a better thrust surface and will support a snap ring better. Better designs use a spacer in front of the raceway to maximize snap-ring holding capacity.
This is a modular approach of fitting synchro rings to the gears and creating component subassemblies aids in building a quality transmission. They offer the rebuilder a simple way to perform quality checks. If you have more than one person working in a shop, it is a good idea to have your subassemblies inspected by someone else and vise-versa. Sometimes another set of eyes is all that is needed to prevent a potential disaster.
Bearing Tips
Misdiagnosing bearing noise usually leads to a worthless rebuild. The majority of people cannot distinguish between bearing noise and gear noise. Once bearings develop imperfections in the raceways and balls, these imperfections generate noise and vibration. Dust and debris in a bearing can cause noise when spinning it by hand, especially after cleaning a bearing in solvent that has debris in it! Try to get a light into the bearing to inspect the raceways for pits or craters. These usually appear as dark pits. A bad bearing produces sort of a growling, erratic noise because the components of the bearing never hit the exact same spot by the next revolution. However, gear noise is never erratic; it’s consistent. A broken tooth may translate into a knocking noise that gets faster as the RPM goes up. A whine or hum may change pitch with engine RPM, suggesting worn or mismatched gears.
In 4-speed operation, in which fourth gear is a direct drive, the input and output shafts are locked and reduce loads on the bearings and gears. This can cause the noise of bad gears or bearings to diminish when in fourth gear. Bearings are relatively cheap. There is no point in reusing 40-year-old bearings when the new bearings of today exhibit better quality standards. Sometimes transmissions have selective snap rings to set endplay. Often the tightest fitting ring works, since gear clearances for oil are usually built into the design. Some early T10 4-speeds actually lock up with a snap ring that is too thick. If I can find an equivalent bearing with seals for an application, I will use it. Dirt is the main cause of bearing failure; seals keep the dirt out. Oil actually still gets past the seals and keeps it lubricated.
Step-10: Use Gaskets and Sealants

Anaerobic sealants, such as #51813 from Permatex, seal on contact. These are currently used in a great many of OEM applications. I coat gasket surfaces with this sealant or use it in applications that do not require gaskets.
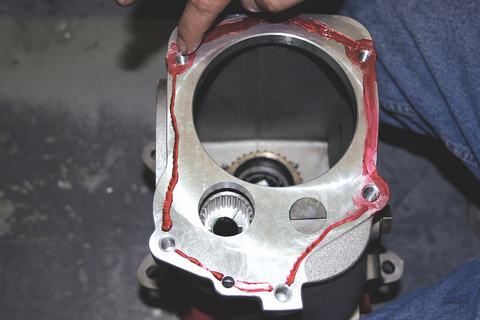
I always coat both sides of the case so the gasket is between a skin coat of sealant. It makes for easy removal of the gasket and cleanup. Grease the internal lip of the seal and spring.

Grease the internal lip of the seal and spring.
Step-11: Drive Seal into Tailhousing

You can use a hammer or plastic mallet to drive a seal in place just as long as you do it carefully and avoid distorting the seal. Also coat the outer shell of the seal with sealant, which prevents oil from leaking around the seal due to surface imperfections.
Step-12: Wipe Off Sealant from Housing

Taking the time to wipe off excess sealant makes a better-looking rebuild and shows that you are a professional.
Good-quality gaskets save you a great deal of headaches. Try to use original-equipment gaskets when possible. There are several companies that now reproduce gaskets using the same compounds the factory did years ago. I always coat both gasket surfaces with either RTV Silicone or anaerobic sealant. I prefer the anaerobic because it sets on contact and cures within 20 minutes. This is great if you need to get something sealed up quickly and back in the car. Silicone sealants don’t cure that fast. If a transmission requires a gasket, use one. Using gasket eliminators may be great for an oil pan or valve cover, but sometimes the gaskets in manual transmissions actually set the spacing of the gears as well as endplay. Certain front-bearing retainers crack when using sealant only, because the gasket fills the gap between the two parts. Without the gasket, you might bend the retainer around the bearing and crack it as you tighten the bolts.
Use Gaskets and Sealants
Most lip seals have an outer steel shell with the rubber seal vulcanized onto it. A circular spring surrounds the inside diameter of the seal to maintain its shape as well as contact with the shaft. Before installing any lip seal, grease the seal. Applying a liberal coating of grease to the seal aids in initial lubrication of the seal as well as using the grease to hold the spring in place. Certain case castings have bolt holes that break into the inside. Most front bearing retainers have bolts that go right into the case. Oil can leak past the threads, so it is important to use some sort of sealant in these areas.
Taking the time to wipe off excess sealant makes for a better looking rebuild, and shows that you are a professional.
Written by Paul Cangialosi and Posted with Permission of CarTechBooks

If you liked this article you will LOVE the full book.
Get your copy here.