Cart
Checkout Secure

Call us to order a book!

1-800-551-4754

Mon-Thur 7:30-5 pm Fri 8-noon

Ring and Pinion Gear Selection for Optimal Performance

In the rear axle there is a gear set that multiplies the driveshaft torque, reduces the driveshaft speed, and transfers the rotation of torque 90 degrees. Probably the main reason that you are going to perform any work on your axle is to dramatically increase torque to the wheels and increase acceleration of your car.


sa215small
THIS TECH TIP IS FROM THE FULL BOOK :

HIGH-PERFORMANCE DIFFERENTIALS, AXLES, AND DRIVELINES


SHARE THIS ARTICLE: Please feel free to share this article on Facebook, in Forums, or with any Clubs you participate in. You can copy and paste this link to share: http://www.cartechbooks.com/techtips/ring-and-pinion-gear-selection-for-optimal-performance/


Now let’s look at what is required to properly understand and subsequently assemble the hypoid ring and pinion gear set into an axle. This is probably one of the most misunderstood topics within the field of automotive repair, especially for the mechanic who does not specialize in axle assembly. Like many items in a car, if not properly assembled and adjusted, the axle hypoid gears often fail. What sets this topic apart from most, though, is the extreme accuracy with which the gears must be located relative to each other.

Automotive axle ring-and-pinion gears are called hypoid gears. The shape is derived from a revolved hyperboloid. Hypoid gears need to be positioned to within a couple of thousandths of an inch of their “ideal” position. To put that in perspective, the thickness of the pages of this book are approximately 0.004 inch; an average human hair is 0.004 inch in diameter. So, generally speaking, if your axle gears are incorrectly positioned by even the thickness of a human hair, it could be disastrous for your axle’s long-term durability.

Precision alignment is required to maintain the proper pinion-gear-to-ring-gear tooth contact in all driving conditions. Also, the hypoid gear set is one of the most highly loaded automobile parts, with torque contributing directly to gear tooth stress, extremely high surface pressures where the gear teeth touch each other, and sliding friction. This high surface pressure and sliding friction is enough to create the need for special lubricants and lubricant additives.


Torque Multiplication

From Chapter 1, we learned that one of the primary functions of the axle is to provide torque multiplication. This is the simplest part of the gears’ function to understand. Torque and speed are inversely proportional; therefore, as torque increases, speed decreases.


Input Torque x Axle Ratio = Ring Gear Torque

Input Speed / Axle Ratio= Ring Gear Speed


An example of this is to imagine that we have 500 ft-lbs of torque at 3,000 revolutions per minute (rpm) at the input (pinion) to the axle, and the axle ratio is 3.73:1:


500 ft-lbs x 3.73 = 1,865 ft-lbs

 And:

3,000 rpm /3.73= 804 rpm


So we have increased the torque from 500 ft-lbs to 1,865 ft-lbs and reduced the speed from 3,000 rpm to approximately 800 rpm.

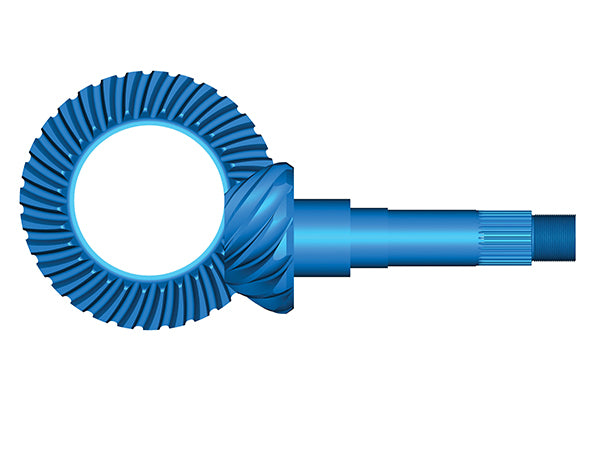
The diagram shows that the pin-ion is physically smaller when compared to the ring gear. As the ratio is numerically increased for a given size ring gear, the pinion must get smaller and is therefore weaker. This means that with the same size ring gear, a 2.73 gear set is stronger than a 4.11 gear set. Now, with this information in hand, we can verify the axle ratio in the vehicle or axle assembly. The easiest method is to have the axle cover removed and physically count the number of teeth on the ring and pinion gears.

Then take the number of ring gear teeth and divide by the number of pinion teeth. A ring gear with 41 teeth that meshes with a pinion that has 10 teeth yields 41 ÷ 10 or 4.10:1 axle ratio. This method is not always possible, and often a quick estimation is all that is required.


 The typical automotive hypoid gear set has the pinion below the centerline of the ring gear. The axes of the gears are at a right angle to one another, and the ring gear is always the larger gear. (GKN Driveline)


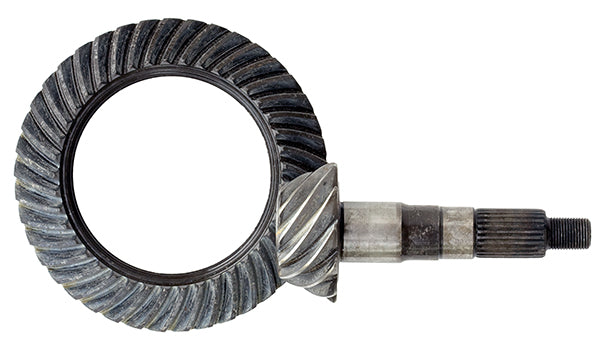
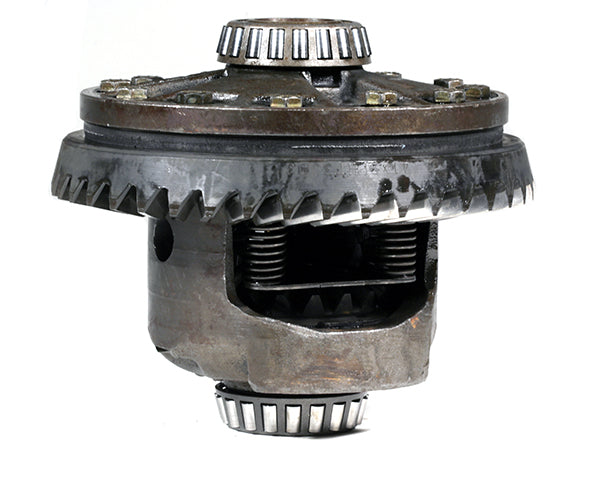
 With the rear axle removed, you can see the ring gear and count the number of teeth. It is difficult, but you should be able to see the pinion gear behind the differential and count the number of teeth on the pinion as well.


 You can use chalk or simple masking tape to mark a tire reference point to the body. We chose the 12 o’clock position but any position works. 


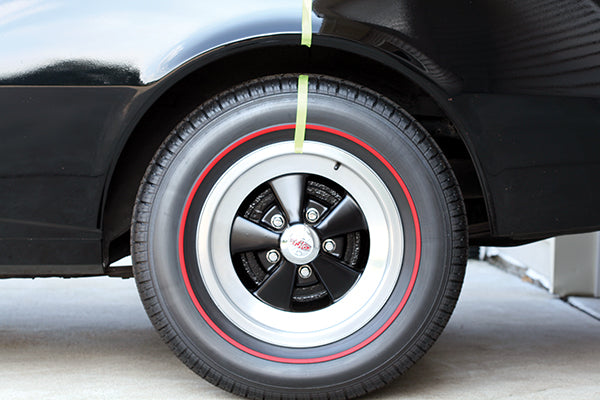
See Chapter 4 to determine if the axle has a limited-slip or open differential. If the axle has a limited-slip differential, raise both rear wheels off the ground. Place the transmission in neutral with the parking brake off. Mark the tire and fender.

Mark the driveshaft with tape or chalk. At this point, an assistant is very helpful. Slowly rotate the tire one full revolution while your assistant counts the number of rotations of the propshaft. Keep in mind that both rear wheels should be turning at the same speed and direction if you have a limited-slip differential.

The axle has an open differential if the opposite wheel is rotating in the opposite direction. In this case, lower the vehicle back to the ground and raise only one rear wheel off the ground. Rotate the raised wheel two full revolutions while your assistant counts the number of propshaft rotations. Your axle ratio is “number of propshaft rotations” to 1.

In Chapter 4, I stated that the following relationship described the open differential speed relationship.


2 x Ncarrier = Nleft + Nright


Now, Ncarrier is the same as the number of rotations of the ring gear. We want the ring gear to turn one full revolution and count the number of pinion or propshaft revolutions to get the axle ratio. Earlier I stated that [Input Speed ÷ Axle Ratio (AR)] = Ring Gear Speed. If we write this as:


Npinion  / AR=  Ncarrier


We can re-arrange the terms and get the following:


Ncarrier / AR= Ncarrier


Then just substitute the above result into the following equation for speed of the carrier (Ncarrier):


2 x Ncarrier = Nleft + Nright


We get:

2 x Npinion / AR= = Nleft + Nright


We held one wheel stationary by keeping it on the ground. The number of revolutions is zero. We turn the other wheel twice. This gives us the value on the right side of the equation: 2 + 0. So now we have:


2 x Npinion / AR = 2 + 0


Solving this equation yields:

Npinion / AR=1


Or, more simply:

Npinion = AR


Our assistant probably was not able to count exactly 3.55 revolutions of the propshaft. But we should be in the ball park and be able to tell the difference between 3.5 and 3.75 turns of the propshaft. With that information and the knowledge of typically available ratios for the axle in question, we now know the axle ratio.


Hypoid vs. Spiral Bevel Gear Systems

From a physical standpoint, there is just one main difference between the two different types of gears: In a spiral bevel gearset, the pinion centerline intersects the ring gear centerline. Also, the shape of a spiral bevel gear is normally conical.

The hypoid gear system has an offset or difference between the pin-ion centerline and ring gear center-line. This offset is given the variable E.

Most automotive applications utilize a hypoid gear system, meaning that the gears have an offset. Typical rear axles have a left-hand spiral angle on the pinion gear and a right-hand spiral angle on the ring gear to accommodate a below-center offset. A below-center offset allows the propshaft to be located lower in the vehicle relative to the axle shafts. This allows the tunnel in the vehicle to be shallower and protrude less into the passenger compartment. This pinion and ring gear spiral hand and below center offset arrangement are such that the pinion is thrust for-ward in the vehicle, or toward the head bearing, during forward-drive conditions. This is the main reason that the head bearing is typically larger than the tail bearing.


 The spiral bevel gear is not commonly found in automotive applications, but this arrangement lines up the gears at a right angle to one another, as with the hypoid. The pinion centerline actually lines up with the ring gear centerline.


This offset increases the contact ratio of the gear system and provides more torque-carrying capacity. Con-tact ratio is a term used to describe the average number of tooth pairs that are in contact between the mating gears. Typical values for total contact ratio are in the 2.2 to 2.9:1 range (2.2 means that two pairs of teeth are in contact at all times, and a third pair is in contact 20 percent of the time). Also, hypoid gear systems are quieter due to this higher contact ratio.

This offset, however, has the negative side-effect of sliding friction at the tooth interface. This sliding generates heat and, without the correct lubrication, extreme wear known as scoring. As a result, extreme pressure (EP) additives are blended into the gear oil. This sliding also allows for lapping during the manufacturing process. Due to front propshaft/joint angles, front axles on four-wheel-drive vehicles require a right-hand spiral on the pinion; left-hand on the ring gear with an above-center offset. The typical machining tolerance range for the offset value for ring gears less than 12 inches in diameter is ± 0.001 inch.


Hypoid Mounting Dimensions

You need to consider four basic dimensions during the assembly of a hypoid gear set: shaft angle, offset, pinion mounting distance, and ring gear mounting distance. Only the latter two are adjustable during the assembly process.


 The hypoid gear arrangement has the vertical offset of the pinion in relation to the ring gear centerline. In a common automotive application, the pinion resides below the ring gear centerline. The pinion shaft also has ground diameters for the bearings, a spline, and thread to mate with the flange.  


 When fully assembled in the axle housing, the pinion has a head bearing that’s located near the toothed portion of the shaft. A collapsible spacer, tail bearing, seal, flange, and pinion nut follow the head bearing. 


Shaft Angle

The shaft angle is measured between the pinion axis and the gear axis, which is represented by the Greek symbol alpha, α. A 90-degree shaft angle is common in automotive applications, is machined into the main axle housing, and is not an adjustable parameter.

It is important to recognize that even though this is not adjustable, there are situations where α may fall outside of the desired range. Typically if the shaft angle, alpha, is within 90 degrees + 0 degree 2’, – 0 degree 0’ (that is a range from 90.000 degrees to 90.033 degrees) the axle housing is fine. If the axle housing has been distorted or damaged and the shaft is outside of its range of operation, then the entire housing must be replaced.


Offset

Typically, offset is in the range of 15 to 20 percent of the ring gear outside diameter. The variable E rep-resents this (see top photo on page 93). Offset, like shaft angle, is not a dimension that can be changed once the axle housing is machined.

Even though the offset value can vary from one housing to another, most gear manufacturers utilize a common offset across all of the different gear sets that they produce. This allows for a common setup for tooling and checking fixtures in the manufacturing process. Hypoid gear ratios must be determined by tooth combination and not by relative gear diameters like helical or spur gears. Basing ratio on gear size will surely give you the wrong ratio.


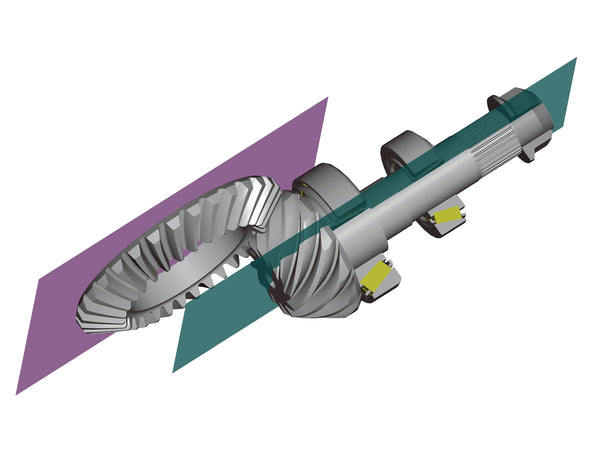
 The symbol alpha represents the angle between the plane through the pinion centerline and the plane through the ring gear centerline. These planes (green and purple) need to be at 90 degrees to one another. (GKN Driveline) 


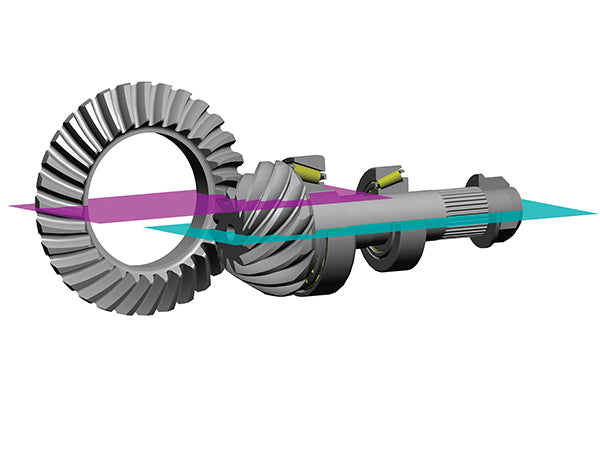
When referring to offset, I am talking about the vertical distance of the pinion centerline with respect to the ring gear centerline. The green plane is below the purple plane, so we have a below-center offset. The pinion bearings are represented here; the pinion head bearing is always larger than the tail bearing. (GKN Driveline) 


For example, Ford utilizes two common offsets.  The 7.5-inch axles use a 1-inch offset while all of the others (8-, 8.8-, 9.75-, 10.25-, and 10.50-inch) use a 11⁄2-inch offset.

The only other Ford gear set with a unique offset is the 9-inch hypoid that features a 2.25-inch offset. This large offset is required to allow adequate clearance for the additional straddle-mounted pinion bearing in the differential case. Back in the late 60s and early 70s, the Gleason formulas that were used for quick calculations added approximately 10 percent more torque capacity to straddle-mounted pinions like this one. The significant offset provides a strength improvement. This design process has been updated significantly since then, and many other factors can be adjusted to achieve similar strength without requiring a straddle-mount bearing.

Coincidently, GM axles have a similar offset range. The 7.25-inch gears are at a 1-inch offset, while the 7.5-, 7.625-, 8.5-, 9.5- and 10.5-inch all have a 1.5-inch offset.


Pinon Mounting Distance

The pinion mounting distance is the distance from the back face of the pinion to the centerline of the ring gear. This is sometimes referred to as pinion depth, or checking depth, and is represented by the variable P. On most axles, this is adjusted with shims between the pinion head and the adjacent bearing.

Dana axles have the shim between the bearing cup and the axle housing. This shim provides the correct pinion position in the axle housing. Some of the newer Dana axles, like the model 60, have a shim underneath the head bearing and the cone. They have close to 0.080 inch total shim and spread it over the two locations. This helps to maintain the bearing race press-fit integrity.


MuscleCarB


The bearing nearest the pinion head is referred to as the pinion head bearing because it is closest to the pinion head. This may sound intuitive but in vehicle position, the pinion-head is toward the rear of the vehicle, so this might be confusing. The pinion tail bearing is the bearing farther away from the pinion head.


Ring Gear Mounting Distance

The last basic dimension is the ring gear mounting distance. This is the distance from the back face of the ring gear to the pinion center-line. This dimension is typically not measured or specified directly. Instead, a total backlash, or the clearance between ring and pinion, is specified. This clearance specification makes certain that the ring gear mounting distance is correct, and that during heavy loading and deflection, the gear does not bind or run in “tight mesh.”

As mentioned above, as the axle ratio becomes numerically higher, the pinion head diameter gets smaller for a given ring gear diameter. Since the pinion head is smaller for a 4.56:1 ratio versus the larger 2.73:1 ratio, the ring gear mounting distance must be adjusted.

Ford uses a common differential mounting distance of 2.800 inches for the popular 8.8-inch axles, and accounts for the difference with thicker or thinner ring gears as required. This brings to mind Henry Ford’s saying about the Model T: “People can have the Model T in any color—so long as it's black.” You can have any ring gear mounting distance that you want, as long as it is 2.800 inches. This works out well since all of the Ford 8.8-inch differentials are common.

Unfortunately, the trade-off is that numerically higher ratios become thicker and therefore heavier. As the ring gear gets thicker, it becomes stiffer, and therefore deflects less. But as the ratio gets numerically higher, the pinion becomes the weakest link anyway, as it becomes smaller in size. This is why most vehicle manufacturers use a stronger grade of steel for the pinion as com-pared to the ring gear.

Dana and GM use different mounting distances based on ratios, and this led to the creation of GM term Series-2, Series-3, and Series-4 carriers. These are all for the 12-bolt passenger car axles; other variants are slightly different. For the 12-bolt (8.875-inch ring gear) differentials, the factory GM ratio range for a Series-2 carrier is 2.56 to 2.73:1 (the Series-2 differentials are the weakest, and the numerically low ratios are not common for high-performance applications), Series-3 is for 3.07 to 3.73:1 ratios and Series-4 is for 4.10 to 4.88:1 ratios. There are aftermarket gear ratios available for the different units that offer a wider gear ratio spread. If you measure the distance from the bearing shoulder to the ring gear mounting flange, you can deter-mine which series carrier you have.


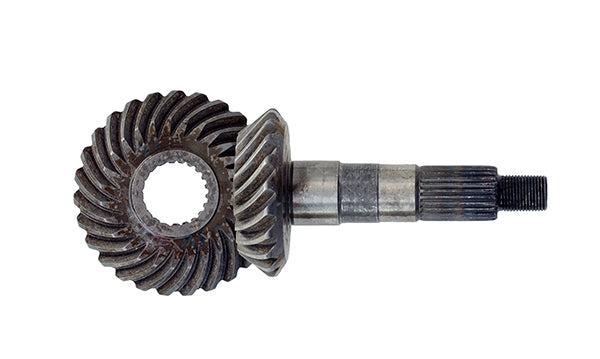
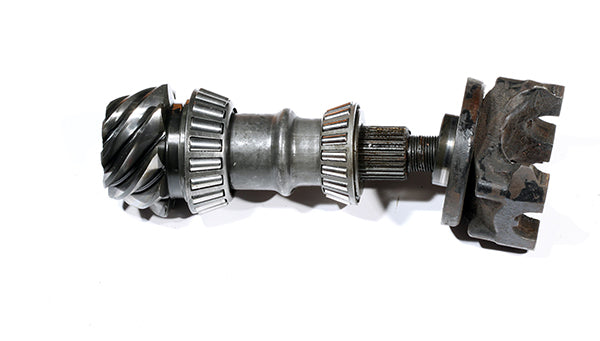
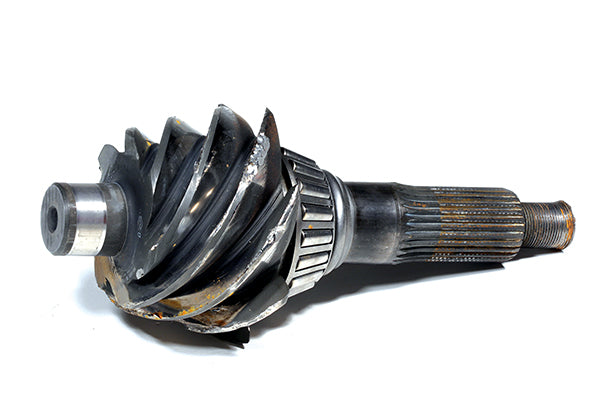
 A pilot bearing along with the two tapered bearings support the pinion on the typical Ford 9-inch banjo-style axle so rigidity is increased. The tapered bearings resolve the thrust loads while the pilot bearing (left of the pinion head) resolves radial loads at the pinion head. This particular pinion is dam-aged and should be discarded. 


 When we are shimming the pinion in place, we are adjusting the pinion mounting distance. This is the distance from the back face of the pinion head (green plane) to the centerline of the ring gear (purple plane). (GKN Driveline) 


 Even though we do not actually measure the ring gear mounting distance, it is the distance from the pinion centerline (green plane) and the back face of the ring gear (purple plane). It is much more practical and easy to measure backlash. (GKN Driveline) 


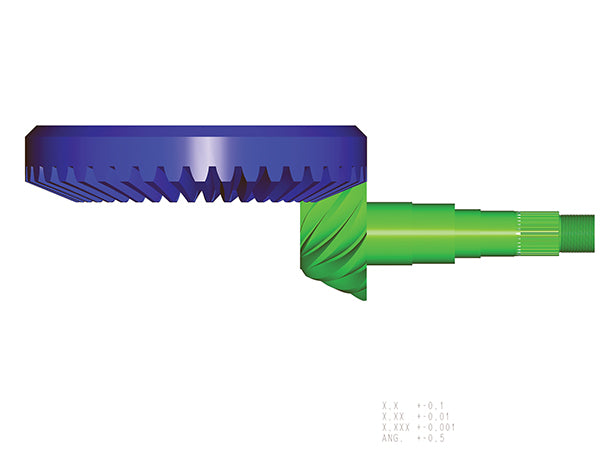
This illustration of a 4.56:1-ratio gear set shows how thin the ring gear back face becomes and how small the pinion head is. This pinion has an outside diameter of 3.461 inches.(GKN Driveline)


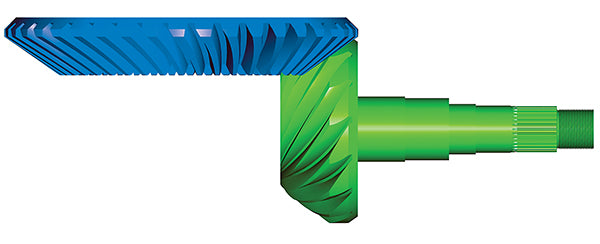
 A 2.73:1-ratio gear set is illustrated here. The ring gear back face becomes thicker while the pinion head is larger when compared to the 4.56 gear set. This pinion has an outside diameter of 5.528 inches. Based on the larger pinion, this is a stronger gear set compared to the 4.56:1-ratio gears. (GKN Driveline) 


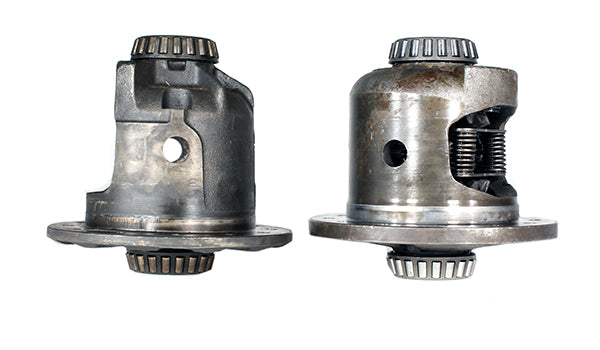
 A Series-3 is on the right; the Series-2 differential case is on the left. The different ring gear mounting distances are compensated for with the differential cases instead of thicker and thinner ring gears. 


The ring gears and pinions start off as billets and are forged into rough shape like these. The parts are recognizable as a ring and pinion but still require many more processes before it can go in an axle.


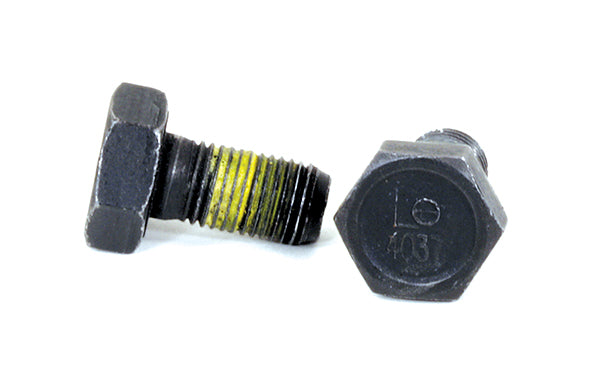
Left-hand-thread ring gear bolts can be found on some applications. Make certain that you carefully examine the head of the bolts for the telltale L or thoroughly research your application. Unfortunately, there are some left-hand-thread bolts that do not have the L on them.


The ring gear mounting distance for Series 2 is 0.590 inch; Series 3 is 1.120 inches; and Series 4 is 1.325 inches. This is important to under-stand if you are going to change your axle ratio. It may require you to also change the differential.

Some people use a ring gear spacer and longer ring gear bolts to achieve the proper ring gear mounting distance. I highly recommend against this practice. The ring gear bolts provide a clamp load to resist the torque reaction between the differential case and the ring gear itself. Some axle manufacturers even add a bonding compound between the ring-gear-to-differential case interface to add more shear strength capability for higher powered applications. By adding a spacer, another interface is added into that load path, creating an additional joint in the structure.

Also, the longer bolts stretch more than the shorter bolts (they act like longer springs in the bolted joint situation), so less clamp load is realized for the same ring gear bolt torque. As the bolts stretch and relax under load conditions they can actually loosen over time. Some of the newer European applications, such as BMW and Mercedes, are starting to laser weld the ring gear to the differential case. This alleviates joint integrity concerns and allows for a thinner and lighter ring gear as the bolt holes’ thread depth is no longer required behind the ring gear teeth. Note that bolts are for service and disassembly but are not a requirement for assembly.

For stock applications, you may get by with the spacer arrangement. If you are transferring the torque from a high-performance engine through the axle, skip the spacer method and get the correct differential case. Most high-performance shops won’t even install ring gear spacers. I would never take the risk, but of course, I have seen the damage from ring gear bolts coming loose inside an axle. I like to refer to the carnage as a “yard sale” because the internal parts of the axle end up scattered all over the yard. This is very similar to what happens when a crankshaft breaks in your engine at 7,000 rpm. The GM 10-bolt (8.2- and 8.5-inch) and 12-bolt (8.875-inch), along with the Dana 60 axles, require specific differentials to account for the ring gear mounting-distance change with changed ratios.

Another factor to consider is that some ring gear bolts are left-hand thread. These are more common on front axles of four-wheel-drive vehicles. You must keep this in mind when rushing into disassembling an axle. Typically, the bolt head has the letter “L” marked on it. Some typical applications for left-hand-thread ring gear bolts are the GM 10-bolt 7.5- and 8.5-inch gears, GM 8.25-inch independent front suspension  gears, and Chrysler 8.25-, 8.75-, and 9.25-inch gears to name a few.


Tire Size and Gear Ratio

As discussed earlier, the hypoid gears provide a torque increase and a speed reduction. There is another vehicle aspect that should be considered: tire size. If the tire size is decreased it, in effect, is like numerically increasing the axle ratio. If the tire size is increased, is like numerically decreasing the axle ratio.

Here is the basic equation to relate a change in tire size to effective axle ratio:


Axle Ratio = Engine Speed (rpm) x Tire Diameter (inch) x 60 (sec/min) x Pi / [Vehicle Speed (mile/hour) x 63,360 (inch/mile)]


Or:

Axle Ratio =  N x D x 60 x Pi V x 63,360


Some people combine the constants of 60 x Pi ÷ 63360 and just use 1÷336 instead. You get the same result either way.


Here is an example:

Engine Speed = 3,000 rpm Tire Diameter = 28 inches Vehicle Speed = 70 mph


Which means:

Axle Ratio = 3,000 x 28/ 70 x 336= = 3.57


Now change tire size to 30 inches:

Axle Ratio = 3,000 x 28/70 x 336 = 3.82


Another method is to simply look at the percent change in tire size. From the example above, divide the new tire size by the old tire size and multiply by the initial axle ratio:

30/ 28 = 1.0714 x 3.57 = 3.82


So if you wanted to change to 30-inch tires and have the same performance as before, you would need to change the axle ratio to 3.82:1.

Another way to look at this is to calculate what the effective ratio would become if you did not change the ratio itself, but changed only the tire size. This would be the inverse of the above or:

28/30= .933333 x 3.57 = 3.32


Therefore, the larger tires have the effect of numerically lowering the 3.57:1 ratio to 3.32:1. Keep in mind that the actual ratio (3.57:1) has not changed; I am just trying to get an understanding of how tire size changes performance.

One last method is to use the following formula:


New Effective Gear Ratio =  [New Tire Height ÷ Old Tire Height] x Old Gear Ratio


Use tire heights in inches. Note: It is best to measure the actual tire instead of what may be advertised on the side of the tire.

To estimate tire size, it is helpful to know how to translate the modern tire sizing convention into a usable size.

For example, a P255/60R15 tire has a 15-inch rim diameter. The tire width is 255 mm (divide by 25.4 to get 10 inches) and 60 is the aspect ratio or percent of the width-to-side-wall height. So this tire has a sidewall height that is 60 percent of 255 mm, which is 153 mm or 6.02 inches.

So, this tire height is 15 + (2 x 6.02), which is 27.04 inches; or simply plug your numbers into this equation (Fig. 6-1 below).

Of course, you can always use a tape measure to get the diameter, or at least a good estimate.


Gear Manufacturing

You next need a better under-standing of the different methods used to produce the gears. This is important to help set up the gear contact pattern later.

Remember that all gears begin as raw forgings. These forgings are machined to rough blank dimensions. All of the bearing surfaces and tooth cone angles are machined by turning operations. The splines and threads are rolled on the pinion shafts and then the teeth are machined. The ring gear mounting bolt holes are drilled and tapped. After machining, the gears undergo the basic thermo-chemical heat-treatment process of heat treating and carburizing to create a hard, wear-resistant surface on the gear tooth surfaces while still maintaining a softer core material for toughness and increased bending fatigue strength. This process involves heating the parts above their austenizing temperature in the presence of carbonaceous materials,  which induces carbon on the surface. Then the parts are quenched in oil, and finally reheated to temper the steel.


The ring gears and pinions start off as billets and are forged into rough shape like these. The parts are recognizable as a ring and pinion but still require many more processes before it can go in an axle.


 The heat treat process develops the hard outer surface and maintains the soft inner core for the gears, sort of like a loaf of French bread. Here are two ring gears stacked but properly spaced, being fed into the heat treat furnace. This is an automated process and quite impressive to witness.


 While the ring gears are still red hot, they are quenched with oil. To minimize distortion, the gears are pressed during the quenching process. Other-wise, we may end up with potato-chip-shaped ring gears.


 With a depth caliper, you can measure the depth of the of the tooth face on both ends of the face to determine the manufacturing method. This is a face-milled pinion gear. This measurement can be done with just about anything, even the tip of screwdriver and your finger as a measurement tool will work.


The face-milled manufacturing process for cutting the gear tooth profile inherently varies the tooth depth. From this illustration, you can see that the tooth depth is smaller on the right than on the left. (GKN Driveline)


Conversely, the face-hobbed tooth profile has a constant tooth depth across the entire tooth face.(GKN Driveline)


The carburizing temperature is between 1,550 degrees F and 1,700 degrees F in a carbon-rich furnace environment, and the parts are heated typically for 12 hours. A good general rule for carburizing is 0.004 inch per hour. So the 12-hour furnace time yields a case depth of about 0.050 inch. The exact desired case depth varies based on the over-all size of the gears.

Then the gears are quenched in oil in the range of 150 to 350 degrees F. A process using a quench press helps minimize distortion on the ring gears. The quenching process also produces the hardened case for the gear tooth surfaces. Typically, after the quenching process, there is a combined reheat (tempering) process to restore some toughness and ductility to the material structure. The final product is a hard wear surface on the outside and a softer, tougher core material on the inside.

The pinions typically undergo a straightening process to correct any distortion from the heat treat process. Because they are long and round, they tend to deform into the shape of a banana. In contrast, the ring gears are typically fixtured while quenched under load after the heat treat process. Their flat shape allows them to deform into the shape of a potato chip. Then, the bearing surfaces are ground. The final process is either lapping or grinding.

There are three different methods commonly used to produce hypoids:

  • Five-cut face milling and lapping method
  • Two-cut face mill completing and grinding method (This process is not very common and is mainly used on Euro pean applications. It is outside of the scope of this book.)
  • Face hobbing and lapping method

There are two major gear-cutting equipment suppliers: Gleason and Oerlikon. The Gleason machines are the most common, and they are made in Rochester, New York; the Oerlikon machines are more common in Europe as they are a German supplier.

The main difference between face milling and facehobbing is that the face-milled tooth depth (distance from tooth root to tip) varies from heel to toe.

In contrast, the facehobbed tooth root is parallel to the tooth tip, or is equal depth from heel to toe.

You need to be able to recognize this difference, by either measuring it directly or through careful inspection of the gear teeth. Most modern OEM-specified gears are manufactured using the facehobbed method. The new Ford gears are easy to distinguish, as the back face of the gear is beveled and therefore facehobbed. There are even some aftermarket companies that bevel the backside of your ring gear to save anywhere from 3/4 to 2 pounds, depending on the size of the gear. If you are looking to save every last pound on your race car, you may want to send the ring gear out to have the back surface lightened.

It is important to know which manufacturing process was used to make your gears in order to under- stand how the pattern moves during the shimming process. Keep in mind that most aftermarket gears utilize the face-milled process.


Lapping Process

The hypoid gear lapping process is basically a polishing operation during the manufacturing process that is used to refine the tooth surfaces. The lapping process can correct minute errors in the gear-tooth profile from heat treating, such as spiral angle, spacing, and eccentricity. The gears are mated together and rotated under light load with the presence of a silicon carbide abrasive media. The gears are also oscillated both axially and tangentially to achieve full contact of the entire tooth face. Upon completion of this process, the ring and pinion gears are now a matched set and must be kept together for life. You can no longer mix and match either of the gears this is why the gears are always replaced as a set in an axle.

Most gear manufacturers also add a phosphate coating to one or both of the gears to help with the break-in process. All new gears require a proper break-in procedure in order to ensure proper wear and durability.


Gear Materials

When you open any parts catalog, you notice that different types of gears are listed for the same application. They may even list different grades of gear steel with a four-digit SAE number like 8620. This number designates the grade of steel and amount of carbon contained in the alloy.

The first two digits tell you the series of steel—for our example, 8620 is an 8600 series, which has nickel chromium molybdenum in the following percentage: Ni 0.55 percent, Cr 0.50 percent, Mo 0.20 percent.

The last two digits tell you the amount of carbon content, in hundredths of a percent, by weight. So, our example 8620 steel is a nickel chromium molybdenum steel containing 0.20 percent carbon by weight. Some people abbreviate this and just call it nickel chromoly steel.

The 8620 steel grade provides great wear resistance and is typically used for standard or street gears. But 8620 cannot handle extreme shock loads as compared to 9310 grade gears. Typical production manufactured gears are heat treated to a hardness in the Rockwell C range of 59 to 63; aftermarket gears are similar, around 60 to 64. This hardness can be measured with a Rockwell hardness tester.

The other popular designation for gears is something like “drag race pro gears.” These gears are typically made from 9310-grade steel. The 9300-series steel is also a nickel chromoly steel, but the concentrations are different when compared to 8600 series. They are: Ni 3.25 percent, Cr 1.20 percent, Mo 0.12 percent.


For further analysis of the depth of heat treat, micro-hardness testing can be performed. This is a close-up of a section of one gear tooth. Look closely to find the black arrow, and you will see two sets of five little dimples.


We apply a measured load to dimple the part and measure the depth of the dimple, which will determine the hardness. The dial on the top of this Rockwell harness tester gives us the hardness value.


 This is an entire gear tooth that was ripped out of the pinion. A typical crack propagation began from the root of the tooth. The bench marks show where the crack initiated.


TThis illustration helps identify the different regions of the gear tooth profile. The top (or crown) is purple, and the root is green. The drive face is blue and the coast face is yellow.(GKN Driveline)


The amount of carbon is also half of the street gears. These gears are therefore softer and typically have a Rockwell C hardness value in the range of 52 to 56. These are specifically designed for the extreme impact loads of drag racing. Based on the smaller amount of carbon and subsequent softness, these gears wear quickly when compared to street gears.

The harder a material is, the more prone it is to cracking, like glass. The softer the material, the more likely the material is to deform, rather than crack, under load. If your vehicle is destined for any amount of street use, make sure you use street gears only. If you intend to drag race only, then you need gears that can absorb the extremely high impact loads that come from those huge slicks and harsh gear shifts that are experienced a quarter of a mile at a time.


Gear Tooth Geometry

Before we go further, we need to discuss gear tooth geometry and nomenclature. The hypoid ring-gear tooth surface is broken into several different areas. The reason for this is to have a method to accurately describe where the bench contact pattern is located.

  • The heel is the outside diameter of the gear.
  • The toe is on the inside diameter.
  • The bottom valley between the teeth is the root.
  • The top surface is called the crown or top land.
  • The face profile, where the actual tooth-to-tooth mesh occurs, has a different name for each side. The convex side is the drive side and the concave side is the coast side.
 

Disassembly and Assembly of Ring and Pinion Gears

Let’s assume that you have already removed the axle shafts, differential, and pinion from the axle, as outlined in Chapter 3. Don’t forget to mark the bearing cap and shim orientation as outlined in Chapter 3; they should be returned to the same side and orientation from which they came.

The next item to take care of is removing the ring gear from the differential. Loosen and remove all of the ring gear bolts. Then use a punch in the bottom of the ring gear bolt holes to drive the ring gear off the pilot feature of the differential carrier. Make certain to support the differential housing on something soft like a block of wood and alternate punching locations to move the gear off the differential evenly. Be patient and tap evenly across the ring gear in a crisscross pattern with the punch until the gear is loose.

You can also use a soft punch and tap on the side of the ring gear next to the differential case. Be care-ful, as some differentials have the anti-lock brake system tone wheel attached in this area. Do not hit the tone wheel because you will break it. Also, if the tone wheel comes off, make certain to keep track of the orientation so you can re-install it properly with the new ring gear.

At this point, the ring gear can be set aside or kept together with the pinion, in case you want to re-use the gear set or sell it to recoup some cash. Some axles have a removable pinion cartridge, such as the Ford 9-inch or GM Cadillac and Corvette axles to name a few. These pinion cartridge axles are unique, as the pin-ion bearing preload can be set independently of the pinion mounting distance. There is a separate shim between the pinion cartridge and housing to control the pinion mounting distance.

Now it is time to remove the pin-ion head bearing from the pinion. There are a few different bearing puller tools available for this. This shim is the baseline for the new gear set. This shim likely is not correct for the final set-up so don’t be surprised when you have to make adjustments to the overall shim thickness during the set-up process.


The ABS tone wheel is mounted to the differential base between the ring gear and the differential case. It is the spur gear toothed element behind the ring gear in this photograph.


 This aluminum-cartridge-style pinion uses a solid spacer for the bearing preload. Different thickness spacers at the cartridge-to-housing interface adjust the pinion mounting distance. The shim is still loosely in place on the cartridge sleeve. The small holes between and around the pinion bearings flow lube (as discussed in Chapter 1). 


The typical bearing-spreader tool consists of two split halves that are installed underneath the bearing race. Once installed, the bolts on either side hold the halves together. Normally you can press against the body of the tool. This tool also has some tapped holes to attach an additional puller across, if required.


 The clam-shell-style tool is great if your budget allows.


Most aftermarket gears are marked with the pinion mounting distance and ring gear backlash specifications. This is helpful when the gears are swapped. This set is engraved on the ring gear outside diameter and the pinion head surfaces.


If you don’t have access to the original shim for any reason, here is a baseline to start with (this is just a starting point to get you close): GM axles use 0.035 inch; Ford 8-inch and 9-inch use 0.020 inch; Ford 7.5-inch and 8.8-inch use 0.030 inch; all Danas use 0.035; Mopar 8.75-inch with 1.75-inch use 0.090 inch; Mopar 8.75-inch with 1.875-inch use 0.020 inch; and Mopar 9.25-inch use 0.020 inch.

Some gears have the pinion-mounting-distance deviation engraved on the pinion head. This is the difference from the nominal dimension and can be helpful when picking the initial shim. Not all gears have these markings. Also, in order for these numbers to be helpful, they must appear on the old and the new gears. Depending on your axle and the new gears, these numbers may not be available.

Let’s keep in mind that the primary function of the shims is to establish the correct pinion mount-ing position relative to correcting any manufacturing tolerances in the gears and axle housing.

Before you go further, verify that the new gears are what you expect them to be and are ready to be installed. At times, the new gears may require some preparation before they can be installed. It is worth a check; don’t install the gears without verifying their integrity.

First take the time to count the number of teeth on the ring and pin-ion to verify the ratio. Then examine each tooth to make sure there are no chips or nicks present. If there is any damage, now is the time to return the gear set to the place of purchase. Also, look very closely at the ring gear back-mounting surface and make certain that there are no nicks or burrs. If there are, lightly file them smooth and clean any debris from the gear with solvent.

There are four potential adjustments: pinion mounting distance, ring gear backlash, pinion bearing preload, and differential bearing preload. These ensure that the gears are in the correct position relative to each other, and that the bearings are operating in their ideal zone.

Bearing preload is a bearing condition that applies a constant load to the bearings independent of gear loads. This preload condition removes the internal clearances that normally exist between the rollers and the races. By setting preload, you basically build in an interference condition along the axis of the differential case and along the axis of the pinion gear. This preload provides for a more accurate shaft positioning, increases overall stiff-ness, reduces deflections under load, decreases bearing noise, and increases the impact-load-carrying capacity of the bearing systems. Too much pre-load is a bad thing as it causes the bearing running temperatures to increase, accelerate wear, and reduces total bearing life. The actual values vary from one axle design and size to another but is typically in the 1,000-to 2,000-pound range of bearing load.

After the gears are carefully examined, clean the parts with sol-vent and wipe or air dry. As a good baseline, re-install the pinion head bearing shim and bearing on the pinion. Since you are just looking for the proper pinion depth at this point, you can install the pinion without the crush sleeve or seal. Always make sure to lightly oil all of the bearings with gear oil during the assembly process.

Install the pinion in the housing with the correct bearing, flange, and nut and tighten the pinion nut until all of the endplay is removed and there is a slight preload in the range of 10 to 18 in-lbs measured at the pinion. This is not the final setting; you are just getting the pinion in place to check the pattern.

All tapered roller bearings need to be set with a slight preload in order to function properly. If the preload is too great, the bearings generate excessive heat and wear out relatively quickly. If the preload is too low, the bearing has excess clearance or endplay and may not be able to carry the loads correctly. Premature failure is likely.

Now you can assemble the ring gear to the differential case. Note that some applications have the anti-lock brake system speed pick-up, or tone wheel, between the ring gear and differential case as mentioned earlier. Now you can reinstall that.


MuscleCarB


First slip the ring gear over the differential case and set it into place. It will stop at the pilot diameter feature just before the flange. If you are re-using the old ring gear bolts, make sure that you apply thread-locking compound and start all of the ring gear bolts. Most new bolts come with a thread locker pre-applied. The bolts will serve to guide the ring gear into place. You can press the ring gear into place by putting it in an arbor press with the teeth on soft aluminum blocks or wood.

Another option is to use the ring gear bolts to draw the ring gear into place. If this is the method that you are going to use (not recommended) make certain that the differential case is properly secured in a bench vise. Also, tighten the bolts in a crisscross pattern and take four steps of increasing torque to achieve the final desired torque. For example, if the final torque will be 65 ft-lbs, tighten all of the bolts to 15 ft-lbs in a crisscross pattern, then to 30 ft-lbs, then to 45 ft-lbs, and finally to 65 ft-lbs. This is important because you do not want to overload the threads on the bolts without them being fully engaged. Exercise caution here, as it is possible to strip the bolts.


 You may find a burr on the back face of the ring gear. Make certain that this surface is smooth, flat, and free of anything that could impede the gear from sitting flush against the differential flange. Also check the differential mating surface.


The pinion is loaded in the axle housing from the rear, cover side. We are lining up the flange while holding the pinion in place. We already have the bearings, seals, etc., in place.


 A traditional hydraulic press is used to press this ring gear onto the differential case. We have threaded in all of the ring gear bolts to serve as guides to make certain that the gear is clocked correctly to the differential case. Once the gear is pressed in place, it cannot be rotated to align the bolt holes. 


 As always, we use a torque wrench to properly tighten the ring gear bolts. We want to make certain that we tighten them enough without overtightening them. If these bolts are overtightened, the threads will be damaged and the bolts can fall out inside the axle housing. 


 We always use a dial indicator to check backlash and run out of the various components. This unit is mounted to a magnetic base that can be switched on and off. The magnetic base acts like a second set of hands. 


  This dial indicator is magnetically attached to the axle housing while we are checking the ring gear backlash.


It is helpful to have an estimate of how much a shim changes backlash. To avoid too much trial and error, this chart serves as a good starting point.


To check the gear bench pattern, we apply gear-marking compound to the ring gear. We brush it on about four teeth.


Now it is simply a matter of rotating the teeth with the compound until they mesh with the pinion, and then rock them back and forth. This usually produces a good indication of the bench pattern.


The initial 0.026-inch pinion shim achieved this pattern. Note that the pattern is high on the tooth (closer to the heel) on the drive side. This gear requires a 0.004-inch shim increase to produce the correct pattern.


Now you can re-install the differential case into the housing with the shims, as outlined in Chapter 3. It is not necessary to obtain the exact bearing preload at this point, and it is easier to set up without preload. You just need to make certain that the differential has no play side-to-side in the axle housing. Also, make certain that the bearing caps are installed and the bolts are set to the proper torque, as outlined in Chapter 3. It is a good idea to rotate the differential a few times to make certain that the bearings are fully seated and the assembly rotates freely.

With the differential installed, it is time to check the pattern of the gears. First, make certain that the ring gear backlash is within specifications. This is accomplished by using a magnetic base dial indicator. The dial indicator is normally magnetically attached to the axle housing at the gasket surface and the dial indicator adjusted to be perpendicular to a ring gear tooth. Make certain the pinion does not rotate. Typically, you can hold the pinion flange stationary with one hand and rotate the ring gear back and forth with the other hand so you can read the backlash from the dial indicator.

A typical backlash target for a new gear set is 0.008 inch, and 0.010 inch is in the ballpark for a used gear set. If you are disassembling a used axle and want to re-assemble the same gear set, it is very helpful to measure the ring gear backlash before disassembly that way you can duplicate the ring gear position later. The installation instructions for the new gear set usually has a range for backlash: typically around 0.008 to 0.015 inch. As the ring gear is moved away from the pinion centerline, the backlash increases. To accomplish this, just remove the overall amount of shim thickness from the driver’s side and transfer that amount to the passenger’s side. Typically, a 0.010-inch shim transferred from one side to the other changes the backlash by 0.007 inch.

You are actually setting the ring gear mounting distance when you are setting the backlash. Since it is not convenient to measure the ring gear mounting distance, set the backlash instead. With the backlash correct, you can proceed to the pattern check.

The gears should be clean and free of any dirt or oil at this point. You just need to apply a small amount of gear-marking compound on about four or five adjacent ring gear teeth. Make sure that you use the correct gear-marking compound. It is typically yellow in color, and most new gear sets come with it. Do not use die maker’s blue ink, or felt-tip markers, or any other compound. Hypoid gear marking compound is a special grease formulation that provides a good visual pattern check and is compatible with the gear oil; other materials can contaminate the lubricant.

Rotate the ring gear teeth with the compound into mesh with the pinion. Once they are in mesh, rotate the ring gear back and forth a few times to establish the contact pattern between the gears. You can grab the ring gear and rotate it back and forth in contact with the pinion where the marking compound has been applied. At times it is help-ful to apply some drag to the pinion with your other hand to make the pattern more pronounced and easier to see. Alternately, you can rotate the pinion and provide a drag on the ring gear that gives you around 40 ft-lbs of torque at the pinion. Again, this is just to make it easier to see the gear pattern in the marking compound.

Next rotate the ring gear until you can see the pattern that has been transferred from the gears in mesh to the ring gear. Now it is time to interpret the pattern and make shim adjustments as required. Keep in mind that the backlash is correct already, so the only adjustment is the pinion mounting distance. Of course, this is the most time-consuming shim to reset. If the pat-tern is incorrect, the entire gear set needs to be removed in order to gain access to the shim that is behind the pinion head bearing. Typically, the pinion head-bearing shim thickness is adjusted in increments of 0.002 to 0.003 inch at a time to achieve the correct pattern, but the adjustment depends on the shims you have available in your shim kit. This can be a very time-consuming process, and the reason most shops charge so much to install gears.

We are looking at the bench con-tact pattern, which is the gear pattern when no load is applied. The pattern changes as the load on the gears increases, and the gears and housing deflect. As the engineers are able to more accurately predict these deflections, they have found that the typical bench pattern rules no longer apply. We are designing tooth pro-files that aren’t as sensitive to position movements from deflections, and therefore the bench contact pat-terns move slightly with position adjustments as compared to traditional gears. This is why some newer axles, typically on vehicles that were built after 2000, cannot be serviced with the traditional procedures. Also, many future axles will no longer need to be serviced; they will be replaced as complete assemblies. This does not pertain to the older Camaro, Chevelle, B-body Mopars, Mustangs, etc., but rather to modern vehicles.


Setting Gear Contact Pattern

Earlier I mentioned that the two most common manufacturing methods are the face-milled and facehobbed processes. As we adjust the gear pat-tern profile, the type of gear dictates the required shim adjustments. Basically, the shimming for face-milled gears is the opposite of the shimming for facehobbed gears. Since the coast side is shorter in contact length, contact pattern shifts are less dramatic, compared to the drive side.

Again, remember that the only two adjustments to make to achieve the correct pattern are pinion mounting distance and ring gear backlash. You typically have a range for ring gear backlash around 0.008 to 0.010 inch. This can vary slightly from axle to axle so make sure to check what is required for your specific application. If you are installing a used gear set, you should concentrate on the coast side because it will have less wear.

You want the ideal contact pat-tern to be centered on the tooth profiles (drive and coast) from heel to toe and root to flank. The ideal pattern ensures a quiet gear set that should last for years.

We typically want to favor the toe of the gear for performance applications. This way, when the gear deflects under high loads from all that power and the tires hook up, the pattern has room to move toward the heel and never runs off the edge of the gear surface. If the pat-tern runs off the edge of the gear, the contact patch is reduced, and the surface pressure (i.e., stress) increases dramatically. Please keep in mind that a toe-favored pattern is typically noisier when compared to a heel-favored pat-tern. That is a tradeoff to be under-stood before you set up the axle. Most aftermarket gear manufacturers use the face milled process.

We can make slight movements in the pattern by varying the backlash within the recommended backlash tolerance. We need to make certain that we stay within the tolerance at all times. If the backlash is too small, we run the risk of the gears running in tight mesh and the tips of the teeth contacting the root of the opposite gears and wearing quickly.

Now let’s discuss how to adjust shims and pattern to correctly set up a face hobbed gearset. Just as with face-milled gears, we have just two parameters to change. They are pin-ion mounting distance and ring gear backlash. Facehobbed gears respond the exact opposite to position changes when compared to the previously discussed face milled gears. This is why it is important to know which manufacturing process was utilized to make the gears. Other-wise, you could spend a lot of time and effort shimming the gears and never get it right.

Now that the pattern is set correctly, you need to install the pinion crush sleeve and seal. It is critical to install the pinion seal at this point in order to obtain the correct torque-to-turn values, since the seal drag will influence the final setting. The crush sleeve actually deforms and accounts for tolerances between the pinion head and tail bearing seat locations in the axle housings. It also acts as a spring in the system to maintain bearing preload over all of the operating modes of the axle. Always use a new crush sleeve; never re-use an old crush sleeve.


 Before discussing pattern positions and adjustments, it is important to understand the regions of the tooth profile. This illustration has all of the areas of interest labeled to help visualize the proper pattern placement. 


 For illustration purposes, to better show both the drive and coast sides of the gears, we have “stretched” this tooth profile, which allows you to see the pattern better.


 This diagram shows a balanced pattern where the contact is equal on both drive and coast sides. The correct pattern is a long and smoothly shaped oval.


This face-milled diagram of the pattern is biased too far toward the heel and top face of the gear drive side; and the opposite on the coast side. To correct this, we need to increase the shim thickness behind the pinion head bearing.


On this face-milled diagram, the pattern is biased too far toward the toe and root on the drive side; and toward the heel on the coast side. To correct this, we need to decrease the shim thickness behind the pinion head bearing.


This face-milled diagram shows the pattern biased toward the heel and the top face on the drive and coast sides. To correct this, we need to decrease the ring gear backlash.


As you can see, this face-milled pattern is biased toward the toe and root on the drive and coast sides. To correct this, we need to Increase the ring gear backlash.


Here is a summary of how ring gear backlash changes for face-milled gears will move the pattern. As backlash decreases, the pattern shifts toward the toe of the gear face and closer to the root on both drive and coast sides. The arrows have differential angles to show how the pattern will move faster on the drive side.


This diagram illustrates how varying the pinion mounting distance for a face-milled gear set moves the contact pattern. As the pinion shim thickness decreases, the pattern shifts closer to the top face on the drive side from toe to heel; on the coast side, from heel to toe. 


This contact pattern diagram for a face-hobbed gear shows the pattern oriented toward the toe and top face on the drive side; it is oriented toward the heel and top face on the coast side. To correct this, we need to increase the amount of pinion shim thickness.


This face-hobbed gear has a contact pattern that is toward the heel and root on the drive side; it is toward the toe and root on the coast side. To correct this, we need to decrease the amount of pinion shim thickness.


This face-hobbed gear features a pattern biased toward the heel on the drive side; toward the toe on the coast side; and toward the top face on both. Decreasing the backlash centers this pattern correctly.


This last scenario for the face-hobbed gear pattern is biased: toward the toe on the drive side; toward the heel on the coast side; and toward the root on both. Increasing the backlash centers this pattern.


As with the face-milled gears, here is a summary of how ring gear backlash changes move the pattern on face-hobbed gears. As backlash decreases, the pattern shifts: toward the root on both drive and coast sides (as with face-milled); toward the toe on the drive side; and toward heel on the coast side. Note that the direction of the arrow on the coast is rotated 90 degrees, compared to face-milled gears.


This diagram summary shows how varying the pinion mounting distance for a face-hobbed gear set moves the contact pattern. As you decrease the pinion shim thickness, the pattern shifts: closer to the top face on both surfaces; toward the toe on the drive side; and toward the heel on the coast side. Note the direction of both arrows are rotated 90 degrees, compared to the face-milled gears.


These new crush sleeves have not been collapsed. When we tighten the pinion nut, it places pressure on the sleeve, which has a slight center bulge to properly deform.


Another common name for the crush sleeve is a collapsible spacer. Not all axles utilize pinion crush sleeves, and some use precision-ground, select-fit solid spacers Dana axles, for example. You can even change over some axles to solid spacers, but there are many opinions regarding the strengths and weaknesses of each method. Some argue that over time, the collapsible spacer arrangement loses preload as the spacer may continue to collapse under extreme loads. Under extremely high torques, the pinion shaft between the two tapered bearings can deflect, and this deflection can cause the collapsible spacer to collapse even further. Typically, the collapsible spacer has about 0.003 to 0.004 inch of spring-back that it can accommodate. If this deflection is exceeded, the load on the pinion nut can decrease and the nut can loosen.

The collapsible spacer can handle a much greater range of manufacturing tolerances, and is relatively easy to assemble the first time, so it is more common. On the other hand, once the correct solid shim is deter-mined, you can just tighten the pinion nut to the recommended torque value and you’re all done. Since you can tighten the pinion nut quite high with the solid spacer design, it is less likely to loosen later. Compared to the collapsible spacer design, you can only tighten the nut until you achieve the correct bearing preload and torque-to-rotate values, then you must stop tightening.

The solid shim arrangement takes more time to properly set up, but it’s a more robust solution in higher-powered applications. Depending on how much power you are actually going to put through the axle, you may want to take the extra time, money, and effort to go with the solid spacer arrangement. The solid pinion shim adds strength and durability to the pinion bearing and stem arrangement while protecting against loss of clamp load when the pinion stem sees high bending loads.

In order to properly install the new crush sleeve, first remove the differential bearing caps and differential. Make certain to keep track of the shims and which side of the axle they came from. Later on, you need to install them correctly. Now the pinion nut can be removed along with the flange and bearing. Remove the pinion from the axle and slide the crush sleeve on the pinion. Now the pinion can be re-installed in the axle housing, followed by the tail bearing and seal. Make certain to apply a small amount of sealant on the outside diameter of the seal, and to lubricate the seal lip with gear oil. Then just install the pinion flange and nut for the final time. Some pin-ion nuts come with sealant and thread locker already applied.

If you are re-using the old nut, make sure to apply thread locker to the threads and some RTV to the flange surface. Gear oil finds its way down the spline and tries to get past the nut. Some folks even apply a small bead of RTV on the splines inside the flange before installation. Some pinion nuts are staked after assembly.

You need to tighten the pinion nut until the entire backlash is taken up. You achieve a torque-to-turn value on the pinion around 20 to 25 in-lbs for new bearings and 10 to 15 in-lbs for used bearings. Of course, these are just typical values and you want to obtain the exact specification for your specific applications.

If the bearing preload is too low, the bearing may go into endplay, which makes the gears noisy and reduces the life of the gears and bearings. At the other extreme, if the bearing preload is too high, the bearings wear out very rapidly. So care needs to be taken when tightening the pinion nut. Some applications may require a torque in excess of 350 ft-lbs to collapse the crush sleeve. Once the preload on the bearings begins to increase, checked via the torque-to-turn method, you want to tighten the pinion nut in very small increments. It doesn’t take much to change the torque-to-turn values.

The easiest way to do this is to hold the pinion flange fixed with a tool. With this tool installed the pin-ion flange can be held stationary while the pinion nut is tightened.


 The sleeve on the left is new; the sleeve on the right is noticeably shorter. The shorter sleeve has been installed and the installation of the bearing preload has produced a certain amount of crush and deformed the spacer.


 These pinion nuts are brand new, and thread locker has been pre-applied to the threads and the nut flange surfaces. This helps ensure a good seal. We want to make sure that the threads and mating flange surface is clean to promote good sealing. 


 A pinion flange tool is used to stop the pinion from rotating while we torque the nut. The pinion socket goes through the hole in the center of the plate.


As discussed in Chapter 4, this simple, homemade tool is extremely beneficial for installing differential case shims. 


The flange tool is bolted to the flange, but we cannot properly hold the flange in place.


This tool just happens to be thicker than the typical variety.


Not all axles use shims for differential preload and ring gear backlash setting. The Ford 9-inch uses adjuster nuts on either side of the differential. These are turned to achieve the correct position of the ring gear and preload to the bearings. Once in the correct location, anti-rotation tabs are bolted in place. Some axles even use a shim on one side and a single adjuster nut on the opposite side.


Without proper break-in of a new gear set or the correct oil, you may end up with a pinion like this. It was removed from an axle that was overheated. Notice that the gear teeth have lost their heat treatment and have the appearance of being torn off.


Remove the tool to check the proper torque-to-rotate value on the pinion. This is time-consuming but necessary. Make certain that you do not over tighten the pinion nut and end up with the torque-to-turn value too high, and subsequent bearing pre-load that is too high. If this happens, replace the crush sleeve with a new one and start the process over again. Do not try to cut corners here. Crush sleeves are relatively inexpensive and, if installed incorrectly, can guarantee early bearing failures. Document the final pinion torque-to-turn value, as you will reference it later, when set-ting the differential bearing preload.

Now that the pinion is installed correctly for the final time, let’s focus on the ring gear assembly. From the previous work, we have already established ring gear position. Now we need to make certain that we have the correct differential case bearing preload. We previously installed the differential case without any preload. It should have been able to be installed without any special tools.

Next we need to add the correct amount of shim thickness on each side to account for the proper preload. Here are some typical specifications for reference (be sure to verify the correct specification for your application): For most Dana axles, use 0.015 inch total (that is 0.0075 per side); for Ford, use 0.012 inch total; and for GM, use 0.010 inch total. We need to be careful here. Just as with the pinion, too much is not a good thing, and not enough is worse. There are special tools available that help tap the shims into place.

It is best to install the differential case with the bearings slightly angled in and then partially slide the shims in place. This is a tricky step and takes some effort. Remember that the complete differential assembly with the bearings and shims is an interference fit and don’t be afraid to apply some force to get everything in place.

In stages, tap the shims and bearings on opposite sides in place. Alternate from one side to another. Some axles actually require installing a case spreader and stretching the axle housing in order to make this step easier. If you have access to a case spreader, you may want to use it, but be careful not to over spread the axle housing and permanently deform it. (I am not going to cover this as it isn’t always required and most people don’t have the tool.) As a last check, to make certain that the differential bearing preload is not too high; you can re-check the pinion torque-to-rotate value with the differential installed. It should be around 8 to 10 in-lbs higher when compared to the pinion-only values.

If you have side-adjuster nuts on the differential case (i.e., Ford 9-inch style), then you don’t need to worry about shim selection. You just need to achieve the proper torque on the adjuster nuts.


Ring and Pinion Break-In Procedure

All new ring and pinion gear sets need to be properly broken in to avoid overheating and overloading. Typically, a new gear set with new bearings can cause an excessive amount of heat, especially if it has a numerically high ratio with a high offset. Make sure that you use the gear manufacturer’s recommended oil type. Also, be very careful to not subject the transmission to full-throttle or aggressive acceleration during the first 500 miles.

Likewise, you should rack up at least 500 miles on the gears and bearings before you head off to the track and see the benefits of the added torque from your newly-installed ratio. The first 100 miles are the most important, and you should therefore run the vehicle at typical street speeds (below 60 mph) for the first 10 to 15 miles. Then, allow the axle to completely cool off for at least 30 minutes, so you don't overheat and damage the internals. Repeat this until you reach the first 100 miles. If you drive too far, there is a chance that the axle and gears will overheat and the gear material will anneal or lose its heat treat. Once that happens, the gear teeth will become too soft and will appear to have melted.

You can take longer trips, but resist the temptation to accelerate hard until you reach 500 miles of use. After 500 miles, you should change the fluid to eliminate any metal debris that may have come from the gears during the break-in process, and the break-in phosphate coating that ended up in the lube. You are now all set and can get to the track and see what your new elapsed times (E.T.) are.

All of this may sound excessive, but really is essential to protect your new investment in your axle upgrade or repair. With patience and good workmanship, you will enjoy many miles of improved driving performance, and the satisfaction of having done the work yourself.


Speedometer Accuracy

Now that you have the new axle ratio installed, you need to perform one last step. If you've installed a different hypoid gear ratio, the speedometer needs to be recalibrated to match the new ratio. Depending on vehicle model and production year, you have either an electrically driven speedometer or a mechanically driven unit.

The electrically driven speedos are relatively straightforward to reprogram with the correct scan tool; the mechanically-driven speedometers are driven from a cable that attaches to the back of the transmission. The cable drive measures the output shaft speed of the transmission. Depending which way you went with your ratio, change the driven speedometer gear accordingly.

To access the driven speedometer gear, remove the speed sensor that is normally located on the driver’s side of the transmission near the tail housing. In order to determine which gear you need, you need to know how many teeth are on the drive gear inside the transmission. The best way to get that information is to do some research on your transmission. A local transmission shop should be able to help you get this information.

The drive gear can be replaced but usually requires removing the transmission and completely disassembling it. Some transmissions even require a new output shaft with a different tooth-count gear because it is machined in place. Others actually have a rear tail that can be removed with the transmission still installed in the vehicle.


Here are some of the speedometer-driven gears available for a common Ford application. Make certain that you get the correct speedometer for your type of transmission.


 This chart of speedometer drive and driven gears for some Ford Mustang transmissions is based on axle ratio.


If you review the chart, you should recognize the following parameters. If the transmission has an eight-tooth drive gear in your transmission and an axle ratio that is 3.55:1 or higher, you can only install the largest tooth combination speedometer driven gear. This is the white 23-tooth driven gear. The teeth on the white 23-tooth gear are very thin and are known to wear out quickly. Also, this is the highest-tooth-count driven gear.

So if you go with a 3.73:1 ratio, your speedometer reads about 5 percent faster than the actual speed. If you use a 3.73:1 ratio, your speedometer reads about 10 percent faster than the actual speed. Also, with the speedometer reading faster, you accumulate more miles than actual. The only way to fix this is to either get a seven-tooth drive gear for your transmission or switch to an aftermarket electrically driven speedometer. However, the entire set-up for the electrically driven speedometer can cost more than the gear installation.

Here are a couple final items to consider about hypoid gears. First, some folks refer to the ring gear as a crown wheel. This comes from the idea that a king wears a crown. Crown wheel is not an extremely common term but you may come across it sometime.

Second is the idea of deburring the top land edges of the gears. Some folks refer to this as the top land radius. Normally, the tooth face surface meets the top land, and there is a sharp corner. This sharp corner is outside of the normal contact patch and not a typical area of concern. This edge can be sharp and also prone to damage by handling the gears. The process of removing this radius is typically an aftermarket manual process but Ford actually has this in production for the 7.5-inch V-6 Mustang axles.


Summary

Although many different methods have been used to make the four required adjustments when hypoid gears are installed, I have found that the following assembly procedure is the best.


 This close-up shows a manually radiused top land gear set. The radiused gear set significantly reduces the chance of creating micro-fractures in the tooth top-land-to-face interface during handling of the gears.


  1. Assemble the gears in the axle with the correct ring gear back-lash. This allows you to check the contact pattern to verify that the pinion depth is correct. Make adjustments as required to obtain the correct pattern with the correct backlash.
  2. Now you can assemble the pinion with the crush sleeve to obtain the correct pinion bearing preload. Remember to always use a new crush sleeve.
  3. Install the differential carrier with ring gear into the axle and adjust to get the correct back-lash with a tight fit but not preloaded.
  4. Add the same amount of shims per side to obtain the correct preload for your application.

That is the final step in setting up the gearset.


Written by Joe Palazzolo and Posted with Permission of CarTechBooks


sa204


GET A DEAL ON THIS BOOK!

If you liked this article you will LOVE the full book. Click the button below and we will send you an exclusive deal on this book. Deal-Button


Older Post Newer Post

Added to cart!
Note our Christmas Delivery Deadlines! You must choose UPS Ground to help ensure your order arrives before Christmas. Our office will be closed to honor Memorial Day on Monday, May 29. We'll be back on Tuesday, May 30! You Have Achieved Free Shipping