
This chapter explains the fundamentals of making a pass down the quarter- or eighth-mile drag strip from the beginning to the end. I then analyze a time slip and explain what it is telling you.
This tech tip is from the full book, HOW TO HOOK AND LAUNCH.
For a comprehensive guide on this entire subject you can visit this link: LEARN MORE ABOUT THIS BOOK HERE
SHARE THIS ARTICLE: Please feel free to share this post on Facebook Groups or Forums/Blogs you read. You can copy and paste the website link: https://www.cartechbooks.com/blogs/techtips/drag-racing-traction-tire-guide
The Burnout
For the bracket racer, burnouts are a method of preparing the tires for maximum traction at the launch. To make a good water burnout, the water sprayed on the track (water box) must be evenly distributed so that both tires have an equal amount of water to spin in, and so both tires exit the water at the same time. Optimally, you have a line lock (an electrical switch spliced into the front brake lines that holds brake pressure to the front tires, effectively locking them in place while the rear tires are free to spin).
There are right ways and wrong ways to accomplish a burnout. Here is the right way:
1. Drive your front tires through the water box.2. When the rear tires first contact the water, rev the engine enough to spin the tires over, being sure the entire rear tire is covered with water.
3. Drive the rear tires into the burnout box until they are at the back edge of the water, closest to the starting line, and stop there.
4. Activate the line lock switch and pump the brakes hard two or three times to build enough pressure so the front brakes do not slip.
5. Shift your transmission into high gear. You can safely do this before the burnout and reduce the engine wear and tear by making the burnout at a much lower engine speed (4,000 to 5,000 rpm).
6. Remove your foot from the brake pedal.
7. At the appropriate time (when the track worker gives you the hand signal), rev up the engine to start the burnout.
To be consistent, burnouts must be identical every time. That means revving the engine to the same RPM for the same length of time on each burnout. It also helps to have a buddy watching you and letting you know when to release the line lock to end the burnout. Depending upon the direction the wind is blowing, it may be difficult for you to tell when the burnout is complete from inside the car. An experienced person outside the car can see the smoke from the tires and can better determine when the burnout is complete.
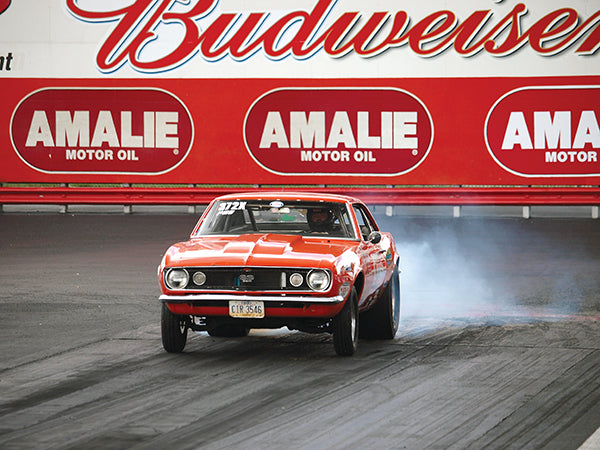
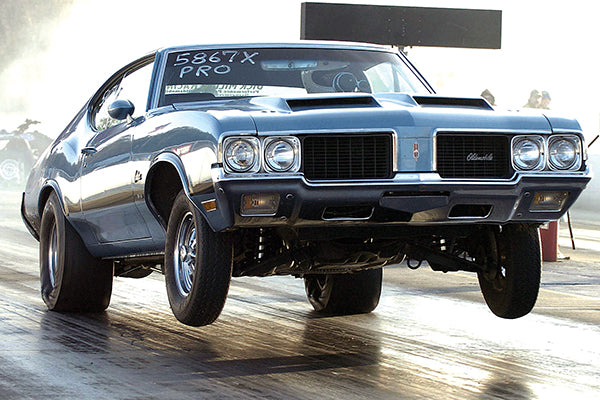
The first thing you need to accomplish to execute a run is to make a burnout, warming up the rear tires.
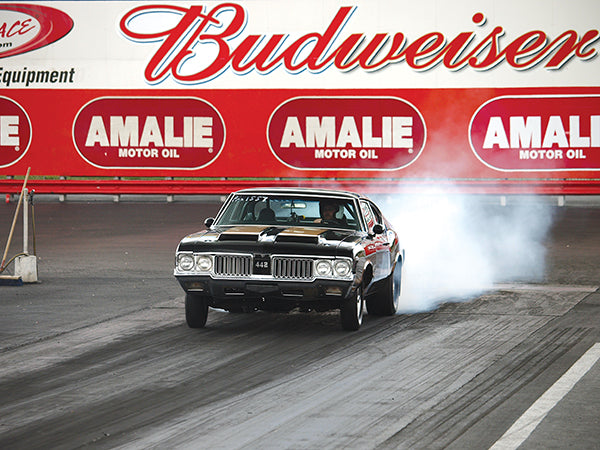
Notice the blue smoke starting to roll out under this car during a burnout.
With the transmission in final gear and the RPM limiter set at 4,000 rpm and hooked to my line lock, floor the engine. Count out about 4 seconds and release the line lock. Before releasing the switch, lift your foot enough that the engine does not rev too high, and lift on the accelerator just as the car starts to move. Do not stop spinning the tires while still in the water or they will cool down again.
Of course, there are variables. The amount of water under the tires greatly affects the burnout. Smoke (steam) appears while spinning the tires. The first smoke is white. As the water disappears, the tires get warmer and the smoke turns to blue. The amount of blue smoke produced is the determining factor as to when the burnout is complete. When both tires are producing steady and equal plumes of blue smoke, the burnout is done. Both tires are clean and equally hot, which is the goal.
That is how to make a good burnout for a Goodyear tire.
However, different manufacturer’s tires require different techniques. Mickey Thompson bias-ply tires require a much shorter burnout—about one half as much. A Mickey Thompson radial tire requires even less. Consult with your tire manufacturer as to the burnout needed for the brand and style of tire you are using. Every car’s needs are different. Just as different cars need different tire pressures each car also has its own needed length of burnout necessary for best results. Experiment! Most drivers stay in the burnout too long probably because its just too much fun.
Once you have completed your burnout, release the line lock while easing up on the accelerator, but do not completely take your foot off the pedal until the car has moved forward enough to be sure you’re not stop-ping on wet pavement. If you do stop in wet pavement or standing water, the tires instantly cool back down, defeating the purpose of the exercise.
Once you have pulled out of the burnout box and away from the water, never perform a dry hop, or short burnout, on the dry pavement. It may seem like fun or a good way to test your traction, but, you will remove the chemicals that the burn-out procedure has brought to the surface of the tire and the car will not hook as good once you reach the starting line. You’ve got one really great launch ready to go right after the burnout, so don’t waste it on a dry hop before the race even begins.
It is possible to overheat the slicks on a burnout. I mentioned that chemicals come to the surface of the tread during the burnout to create a stickier tire. Overheating the tires brings more of those chemicals than necessary to the tire’s surface and wastes them on that run. Tires that have been overheated multiple times may no longer work effectively, even though they feel soft and have sufficient tread left. Spin the tires just long enough for them to generate steady, even plumes of smoke, and then move on. This technique helps get the most life and traction from your expensive drag slicks. Remember to rotate your slicks weekly.
Street Tires
Not everyone drag races on slicks. For DOT-approved tires, the burnout process is a bit different. While you still want to get them nice and warm, you want to move forward more in the burnout box before beginning the burnout. This is because water can get caught in the treads of the tire, and be held there until after the burnout. When you roll forward to the starting line, the water drains to precisely where you don’t want it—underneath your rear tires.
Many savvy racers with treaded tires drive around the burnout box to avoid the water puddles completely, and then back up until the rear tires are on wet pavement. This allows them to accomplish a burnout without picking up water in the tire’s treads, and it’s a good idea if you’re not running slicks.
In addition, not all drag radials require a big smoky burnout to get warm. A smaller burnout works just as well, and five to ten revolutions on the tire is plenty to clean off the debris and get them sufficiently warm. If you’re running drag radials or other DOT-approved treaded tires, experiment with shorter burnouts to find the optimum point for traction.
Remember, the shorter your burnouts are, the longer your tires will last. If there’s no measurable gain from doing a long, smoky burn-out, save your money and just do what’s necessary to achieve maxi-mum traction.
Reaction Time
Leaving the starting line on time is critical to successful drag racing. Of course, you want to leave as soon as the light turns green, but no sooner.
I assume that the track where you are racing is using a .500 tree, and with .500 being a perfect reaction time. A .500 tree has three yellow lights and a green light, all spaced exactly .500 second apart. Red lights (leaving before the green or go light) are .499 or less. In foot-brake racing, a reaction time in the mid .520s wins most races if the car runs on its dial-in. However, a quicker reaction time should give you a little advantage at the finish line in case your car slows down or picks up on that run.
In the classes where transmission brakes are allowed, a mid-to-high .500s light is very common (and even necessary) to go through many rounds. If you are running a class with a .400 “Pro” tree, there is only one yellow light, followed by a green light .400 second later. Every-thing else is identical, except a perfect light is based on .400 second not .500 second.
Cutting consistently good reaction times takes a lot of practice and a lot of testing to see what works best. Of course, your car must be consistent. If your car’s ETs are all over the place there is no way your reaction times at the starting line will be consistent. If you asked another racer what you need to do at the starting line, he would probably tell you, “Pull up to the starting line until you turn on both yellow lights and then leave on the last yellow. If you wait until the green light comes on, you will be too late and lose the race.” While this is true, there are many variables, including staging and track position, that can be adjusted to make your reaction time more consistent.
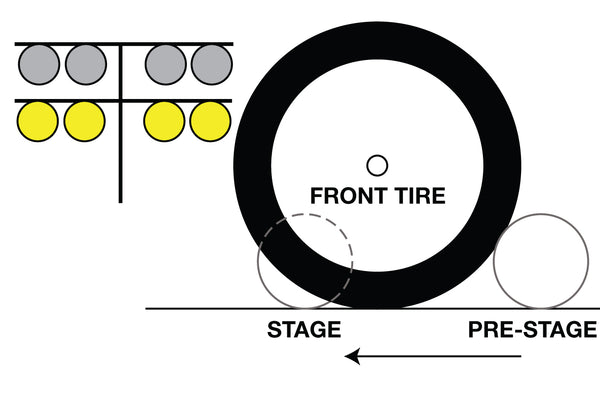
Staging
You may shallow-stage your car, deep-stage your car, or anything in between. At the starting line, there are two or three photocells mounted in the outside retaining walls at ground level. Each has an accompanying reflector in the middle of the track.
Your front tire must break the beam from the photocell going across the track to the reflector in order to turn on the appropriate light on the tree.
This front tire has just broken the pre-staged beam. Wait for your opponent before going any farther.
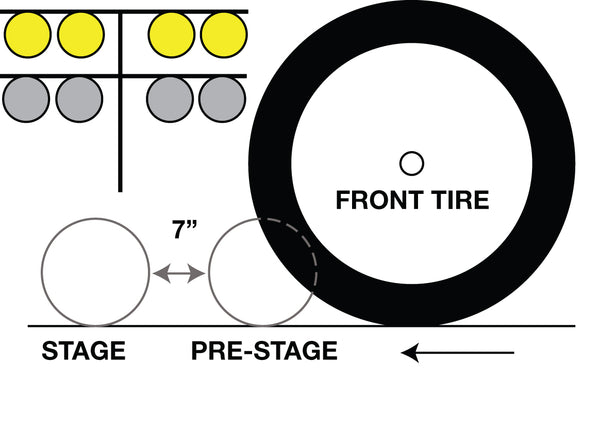
This front tire has now broken the staged beam and is ready to race. The amount you roll through and still have both beams broken helps determine the 60-foot clockings and the reaction time.

This front tire has broken the staged beam and no longer is breaking the pre-staged beam representing a deep stage. You must write “deep stage” on your window by your dial-in for the control tower to see.
This tech tip is from the full book, HOW TO HOOK AND LAUNCH.
For a comprehensive guide on this entire subject you can visit this link: LEARN MORE ABOUT THIS BOOK HERE
SHARE THIS ARTICLE: Please feel free to share this post on Facebook Groups or Forums/Blogs you read. You can copy and paste the website link: https://www.cartechbooks.com/blogs/techtips/drag-racing-traction-tire-guide
Here is a good procedure to follow:
1. Slowly approach the “prestage” (first) beam, riding the brake pedal until you just get the light to illuminate. If you approach the pre-stage beam too quickly, you have no control over where the front tire stops or any idea how much farther it is to the next beam. Most tracks have (and enforce) a “no back up” rule, so if you travel too far past the lights you are not allowed to back up. Even if you could, your opponent is already staged and you would not have enough time before the tree goes to green.
2. Come to a complete stop before moving toward the staged (second) beam. Courtesy says you should be sure your opponent has also turned on his or her pre-stage beam before you continue to the staged beam.
You have exactly 7 inches between the pre-stage beam and the staged beam. If you allow your car to roll forward exactly 7 inches, breaking the staged beam, the next pair of yellow stage lights on your side of the tree light up and you are now staged. If you stay in that location on the track it is referred to as being “shallow staged.” Most drivers stay there so they can consistently be in the same location on the track for each run. If you have a slow-leaving car, you may want to let it move slowly forward until the pre-stage beam is out.
3. If the pre-stage light goes out, your car is now “deep staged.” This also allows the car to be consistently in the same location on the track for each run.
You must have the word “DEEP” written on the glass of your car along with your car number and dial-in-time to deep stage. This tells the person activating the tree that after you have turned on the pre-stage and stage beams, to allow you some time to roll even farther forward until your top pre-stage beam goes out.
It is also important to deep stage slowly so you don’t allow the car to roll too far forward and let the stage beam photocell make contact with its reflector, which gives you a red light.
4. Some tracks have a third photocell and reflector set called the “guard” beam. If you break this beam before the green light, you get a red light.
This beam is exactly 13 inches from the staged beam. It is used to ensure competitors don’t roll forward an unfair amount, which shortens the measured start-to-finish distance and allows an advantage. This guard beam also prevents you from run-ning front tires so tall that they also shorten the measured start-to-finish distance, allowing you to get to the finish line quicker than you should.
Ideally, if you leave when the final yellow light comes on, you should have a .500-second reaction time. Staging shallow or deep as described above may not even get you close to a .500-second light. Every driver and car has different response times, which are combined for the overall reaction time.
Track Position
You need to find the best-possible spot on the track to start the run. When experimenting, you must repeat the run at least two times to be sure you can repeat the data. I continue to assume your car is consistent (see Chapter 12). Staging shallow or deep is the only method that is consistent, but you may stage your car somewhere in between if you are confident you can get back to this exact position repeatedly and you have no more mental, physical, or mechanical adjustments to be made.
Make two runs staged shallow at exactly the same spot while reacting to the tree at exactly the same time. Then, also reacting to the tree exactly the same, make two runs staged deep at exactly the same spot.
The pair of runs should be identical. If not, make three to five runs each instead of two each. Average the first shallow runs, and then average the second deep runs. The difference between the averages is how much your reaction time can be affected by staging “somewhere in between” shallow staging and deep staging.
Once you find your spot, practice until you can get the car in exactly the same spot every time.
Mechanical Snafus
Most mechanical items that can negatively impact reaction times can be improved upon by repeated testing and subsequently finding the best settings for your car.
Tire Sidewall Stiffness
When a tire hooks, it takes time for the sidewall to wrap up (wrinkle) before the car starts moving forward. The heavier the car and the more power it has, the more wrap there is in the tire. Manufacturers make tires with different sidewall stiffnesses. More air pressure also stiffens the sidewall but be careful not to over-inflate the tire and cause the tire to crown. This causes the tire to not have as much tire contact surface touching the ground.
Carburetor
Based on the chassis and carburetor being used, adjustments may help with reaction times. The carburetor linkage may be adjusted at the accelerator or at the carburetor to increase or decrease reaction time. The point where the accelerator cable attaches to the carburetor throttle shaft link-age can be moved, affecting reaction time. Mounting the accelerator cable closer to the pivot center of the throttle shaft yields quicker response times. Likewise, the farther away the accelerator cable is mounted to the pivot center of the throttle shaft, the slower the response time. Similar adjustments may also be made at the accelerator.
Carburetor tuning also affects the launch, so you need to find out the answers to these questions: Are the secondaries coming in too slow? Is the mixture too lean with no power or rich and not clean? Is it the right size (cfm) carburetor? and make the appropriate adjustments.
Suspension Setup
The front and rear suspension setup can greatly affect reaction times. Is the car moving forward upon launch, or wasting time with a huge wheel stand? Any time a car lifts in the front (since it is rotating on the rear tires) it is actually moving the front of the car rearward before it can go for-ward. So, are wheelie bars necessary or (if you have them already) should they be adjusted? Should you launch at a lower RPM to limit the power going to the tires? If the front wheels come off the ground more than about 1 foot, it’s counterproductive.
Dick Miller making another run in the mid 10s with his 3,800-pound Cutlass. Notice how level the front end is with both tires the same level off the ground, planting the rear tires evenly. Just enough weight transfer (pitch rotation) and lift in the rear to push those wrinkle-wall tires into the pavement. The tread is very flat for as much traction as possible. Notice also that both rear tires have the same number of wrinkles.
Torque Converter
How loose or tight the torque converter is affects reaction time. You need to find out the answers to a few questions and make the appropriate adjustments. Is the torque converter matching up to your particular engine needs? Does the converter have to much slip before starting to move the car? Is it out of the maxi-mum power band?
Front Tires
Front tire circumference, as well as tire pressure, greatly affects tire rollout and where you position the car on the track.
Shorter tires give quicker reaction times because a smaller circumference gives less roll out and a slower ET. Taller tires give slower reaction times because a larger circumference gives more roll out and a faster ET.
The same size tire can be made to appear larger or smaller by adjusting the tire pressure. Less air gives the tire more of a flat look, which makes the footprint larger and tricks the photocells into thinking it is much larger than it is. Likewise, more air makes the tire much stiffer making the photocell think the tire is much smaller than it is.
Rear Tires
Rear tire traction doesn’t only affect 60-foot times, but also reaction times. Just because tires have measurable tire tread doesn’t mean they are still good. If your tires are not near new and your 60-foot times and reaction times start to slow down or vary, you probably are in need of new tires no matter how much tread is left.
The First 60 Feet
Are your car’s ETs inconsistent? Take a look at the 60-foot times. There is a photocell and reflector set (just like at the starting line) exactly 60 feet from the starting line. This clocking can tell you a lot about the run. Normally a variation in the 60-foot time creates two to three times as much difference in the over-all ET. Ideally the 60-foot time should be the same from run to run with perhaps .002 to .003 second of variance. Cars varying more than .02 to .03 second have an issue that needs to be addressed.
Many things can affect 60-foot times. The most important is that the clockings are identical from run to run. And even if they are, you may still wonder if they are right.
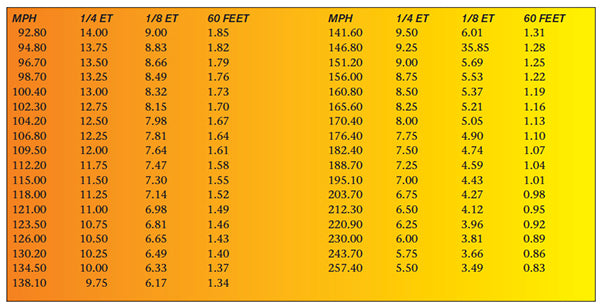
You can use this 60-foot chart as a guide. Take a look at the 1/4-mile ET column (or if you are running 1/8-mile, use the 1/8-mile ET column). Find your typical average ET. Then, look across to the right and find the suggested 60-foot clocking for that ET. If you are way over that 60-foot time, you may need to work on getting the car to move that first 60 feet quicker. You can also look at the MPH column to see if your car is as quick as it should be for the top speed it runs. If not, look again at the 60-foot time and you may see the reason.
For testing, 60-foot times must be compared with runs using exactly the same launch (tire pressure, tire diameter, engine speed, stage at the same spot, etc.). When you leave the starting line in relation to the light has no bearing on the 60-foot clocking. The 60-foot clocking measures only the time from when you left the starting line to when you broke the 60-foot beam.
What can affect 60-foot times? Just about everything! Assuming you have no mismatch of components; enough fuel pres-sure; a good tune on the engine, carburetor, and distributor; a good transmission; and a good rear end (either locked or positraction), your 60-foot times should be very consistent. If not, you need to look at the tires and your burnout methods. If your car’s 60-foot times were consistent when you installed your tires and have since become inconsistent, it may be time to look at new tires.
Written by Dick Miller and posted with permission of CarTech Books
This tech tip is from the full book, HOW TO HOOK AND LAUNCH.
For a comprehensive guide on this entire subject you can visit this link: LEARN MORE ABOUT THIS BOOK HERE
SHARE THIS ARTICLE: Please feel free to share this post on Facebook Groups or Forums/Blogs you read. You can copy and paste the website link: https://www.cartechbooks.com/blogs/techtips/drag-racing-traction-tire-guide