By Travis Thompson
Swapping gears is one of the first performance upgrades recommended for a number of fast (and half-fast) cars, and for good reason—it gives you a great seat-of-the-pants improvement. Nowhere is this more true than in late-model Ford Mustangs, most of which Ford sold with 3.08:1 and 3.27:1 gears. True, 2003–2004 Mach 1s and SVT Cobras did come with 3.55:1s, which is a borderline acceptable performance gear, but with modern overdrive transmissions, there’s really no excuse not to have something more aggressive.
This tech tip is from the full book, FORD DIFFERENTIALS: HOW TO REBUILD THE 8.8 AND 9 INCH.
For a comprehensive guide on this entire subject you can visit this link: LEARN MORE ABOUT THIS BOOK HERE
SHARE THIS ARTICLE: Please feel free to share this post on Facebook Groups or Forums/Blogs you read. You can use the social sharing buttons to the left, or copy and paste the website link: https://www.cartechbooks.com/blogs/techtips/fordgearswap
This is especially true with 1996–1998 Cobras, which don’t tend to be as torquey as some other Mustangs. Since my 1996 Cobra had traveled over 100,000 miles by the time I decided to swap in some new gears, I ended up just having the whole rear end rebuilt. Dan Wolfson of DB Performance swapped in my new gears, rebuilt the Traction-Lok differential, and replaced all the bearings and seals. Dan swapped in a set of Ford Racing 4.10:1 gears, freshened up my Traction-Lok with Ford Racing’s new carbon fiber rebuild kit, and added an aluminum rear-end girdle (rear cover).
If you’re mechanically inclined, or you have a buddy who has done this before, there’s no reason you can’t do a lot of this stuff in your garage. Use the step-by-step instructions below to guide you.
Unfortunately, I can’t tell you if the carbon fiber friction discs were an improvement over the standard discs, as my aged Traction-Lok was completely worn out and thus provided no basis for comparison. I can tell you that having a working Traction-Lok made a world of difference, especially around corners and in the rain. The 4.10s also did their job, giving a huge improvement in get up and go, but making it harder to get out of the hole cleanly. If you’re serious about drag racing, though, you’ll probably have drag radials or slicks to help you launch more effectively.
Around town and on the highway, the 4-valve Cobra engine had no trouble living with the 4.10s. In fact, if I wasn’t planning on making more power in the future, I might even have installed 4.30s. If your 5.0L or 2-valve 4.6L engine makes more torque than top-end power, you might want to go with 3.73:1. The decision is up to you.

The first step is to remove your wheels. Dan pointed out that one slider on my passenger-side caliper had been drilled out, probably because it was stuck in place. Of course that means the grease will dry out and the caliper will soon be locked up again.
Remove the caliper and then the caliper bracket.
It had been awhile since my rotors were off, so they required a little motivation to come loose. The rotors need to come off so you can remove the axles in a few steps.
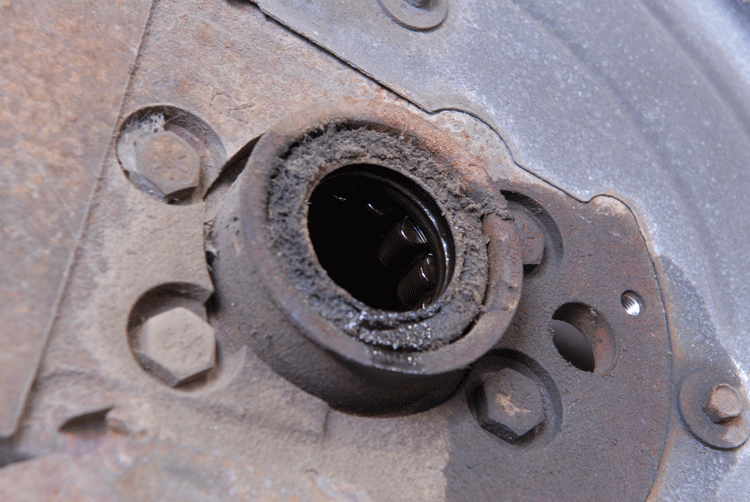
Put drain pain underneath the rear end and remove the rear cover.
Let the dirty old fluid drain into the pan. Dan sprayed the whole thing out with brake cleaner again and again, scraping the runoff out of the bottom of the housing.
Remove the pinion shaft retainer bolt and then the pinion shaft. Pop out the C-clips that hold the axles in place.
Before you slide out the axles, remember to disconnect the ABS sensors and remove them. Dan let me know that these plastic sensors are rather fragile and often break (he got mine out without damage).
Slide the axles out carefully. Dan slid the axles through a towel to keep the dirty fluid off the floor. Despite the miles, my axles were in great shape. Of course I’m not making any power and I’ve only been to the drag strip once!
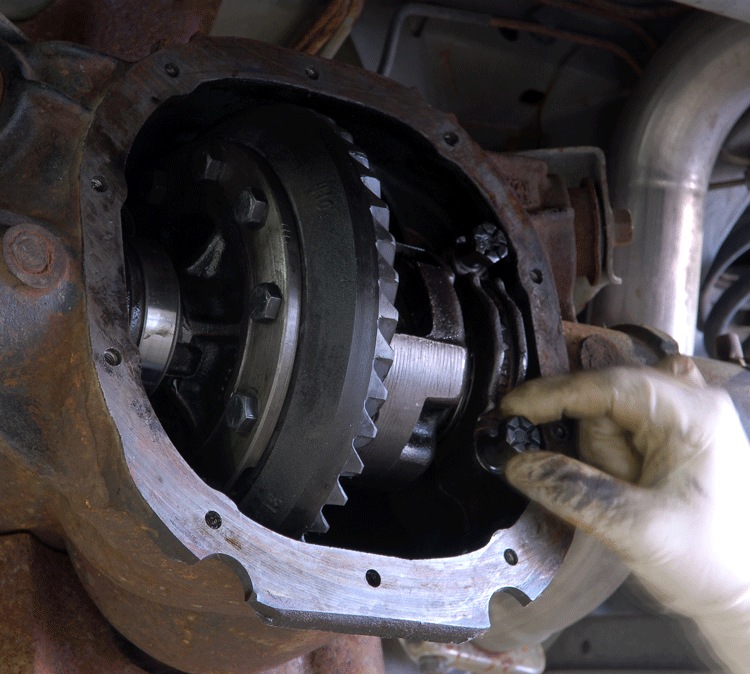
The differential is held in place by two end caps, not unlike the main caps that hold the engine’s crankshaft in the block. An impact wrench is handy in taking these out. Keep the caps and the bolts organized so you can reinstall them in the correct positions.
The differential comes out as a unit; bearings, races, and all. Be careful; it’s dirty, slippery, and heavy.
This is how the races for the carrier bearings sit in the housing. You can see how they’re held in place by the end caps.
Remove the driveshaft to gain access to the pinion nut and flange. Don’t drop it on your head.
Remove the pinion nut.
You’ll need to use a three-jaw puller to remove the pinion flange.
Next you can pull out the pinion gear, complete with the rear pinion bearing. Despite being well used, it was in fine shape.
Here’s a look at the nearly empty rear-end housing. You can see front pinion bearing still located all the way in the front of the housing.
Tap the front pinion bearing out through the back of the housing.
Here’s a look at one of the axle bearings and seals. Mine looked fine, but it makes sense to replace everything while you’ve got it apart.
A slide hammer comes in handy for removing the axle bearings and seals.
With the bearings and seals out of the way, you can clean out the rest of the axle housings. Dan cleaned it out by pulling shop rags through the axle tubes and using a lot of brake cleaner.
If you’ve never seen a dirty axle before—this is what they look like. Notice the splines and the grooves for the C-clips. These are 28-spline axles, but many racers upgrade to 31 or even 33-spline axles for extra strength.
This tech tip is from the full book, FORD DIFFERENTIALS: HOW TO REBUILD THE 8.8 AND 9 INCH.
For a comprehensive guide on this entire subject you can visit this link: LEARN MORE ABOUT THIS BOOK HERE
SHARE THIS ARTICLE: Please feel free to share this post on Facebook Groups or Forums/Blogs you read. You can use the social sharing buttons to the left, or copy and paste the website link: https://www.cartechbooks.com/blogs/techtips/fordgearswap

This is Ford’s complete gear installation kit, complete with all the new bearings, seals, and other miscellaneous parts. You can get less-complete kits for less cash, but it’s a good idea to replace everything you can when you have it all apart.
Start at the axle ends by setting the bearings in place.
Tap the axle bearings into place.
Carefully install the axle seals.
Here’s a look at the empty pinion side of the rear-end housing.
Install the new front bearing cup, bearing, oil slinger, and pinion seal into the housing and tap it securely into place.
Tap the inner pinion bearing cup into the housing.
This Ford tool is used to measure pinion bearing depth. Install the pinion bearing and end caps to test fit the clearances. Add the proper shims between the cylinder and face of the depth measuring tool until the shims just slide in and out with a little drag.
Dan used a press to install the new rear pinion bearing onto the pinion gear.
With the correct shims in place, you can install the pinion gear into the housing.
Reinstall the pinion flange and torque the pinion nut to spec to 20 inch-lbs of rotational drag. This will ensure the correct pinion bearing preload.
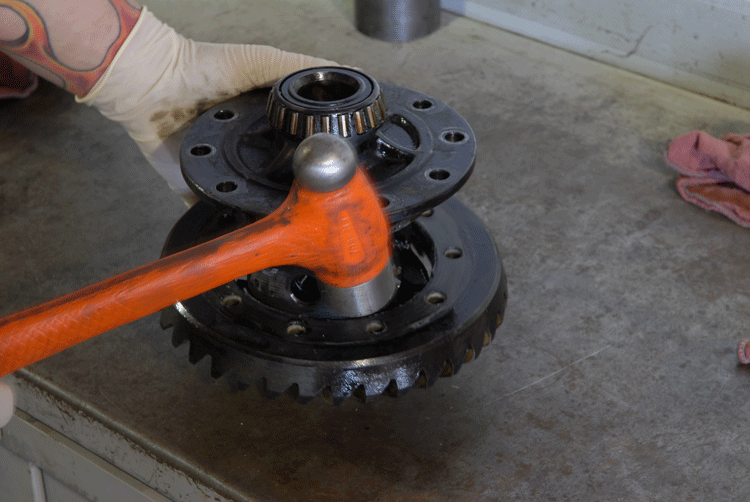
Now on to the differential. Remove all the ring gear bolts and then whack the gear loose (if necessary).
Dan removed the carrier bearings with a two-jaw puller.
It’s time to tear apart the Traction-Lok. Start by prying out the S-spring with a screwdriver. You’ll be replacing the spring, but try not to nick any of the gears.
Now you should be able to just rotate the pinion gears out.
Next remove the side gears, complete with the friction discs, steel reaction plates, and shims.
This is what my steel reaction plates (left) and friction discs (left) looked like after 100,000 miles. Notice the grooves worn in the steel plates and lack of friction material on the friction disc. It’s safe to say the Traction-Look wasn’t doing much good!
This is a new standard friction disc (left) compared to one of Ford Racing’s new carbon-fiber friction discs (right). The standard disc has a consistent texture, like sandpaper, while the carbon disc has a much rougher feel. The guys at Ford Racing claim these new carbon discs are more durable, especially in high-horsepower or racing applications.
This is Ford’s recommended order for the friction and steel plates. For reference, from right to left it goes steel, friction, steel, steel, friction, steel, friction, and shim. Some builders recommend different orders and even extra parts for a tighter differential, but I haven’t heard if these methods work with the new carbon fiber friction plates. Be careful to keep each set of discs, plates, and shims together, as they come measured and matched from Ford.
Soak the friction discs in a combination of Friction Modifier and gear oil for a full 15 minutes as per Ford’s instructions.
While the friction discs were soaking, Dan installed the first of the two carrier bearings.
The second of the carrier bearings is pressed into place.
Install the sets of friction discs, steel reaction plates, and shims onto the side gears. These assemblies are sometimes referred to as the clutch packs. Remember to keep the matched sets together.
Install one of the clutch packs and side gears into each side of the differential.
Rotate the pinion gears into place. They should spin right in.
You can either use a rubber hammer to force the spring into place, or compress it in a vice or pliers and force it in. This completes the Traction-Lok assembly.
Bolt the ring gear back onto the differential. Tighten each bolt to 70 to 85 ft/lbs of torque while using a crisscross pattern. Use a vice to hold the differential steady.
Set the differential back into place, complete with its carrier bearings and races. Reinstall the caps and their bolts back where you got them, and torque the cap bolts to 70 to 85 ft-lbs.
Check the backlash using this dial indicator. Hold the pinion in place and rock the ring gear back and forth and read the measurement. Ford recommends 0.008 to 0.012 inch of backlash. If you have too much backlash, you want to add side carrier shims to the driver’s side and remove them from the passenger side. If you have too little backlash, you want to do the opposite.
Carefully reinstall the axles without damaging those outer seals.
Reinstall the pinion shaft and its retainer bolt.
Ford recommends torquing the new pinion shaft retainer bolt to 23 ft/lbs. Don’t forget to reinstall the C-clips to hold the axles in place.
This is Ford Racing’s aluminum axle girdle/rear-end cover (M-4033-G1). Prep it by sealing the drain and fill plugs with Teflon paste.
Clean off the mounting surface for the rear cover. Dan forgoes the cover gasket in favor of a bead of Permatec.
Carefully install the axle girdle, being mindful not to smear the silicone. Torque the outer bolts to 20 to 25 ft-lbs in a crisscross pattern.
This thick aluminum cover adds strength to the rear-end housing itself, but these special load bolts also support the end caps that hold the differential, which are under serious stress. Torque the load bolts to 5 to 10 ft/lbs, and then torque the jam nuts to 25 to 30 ft/lbs. Be careful not to over-tighten either of these or you could damage the carrier bearings.
Don’t forget to fill’er up before you drive away. Dan filled the rear end with Royal Purple synthetic 75W-140 fluid up to the fill-hole in the front of the case.
Finally, reinstall the driveshaft, rotors, calipers, and wheels. Now you’re done. Some people recommend breaking in your new gears by getting them up to operating temp, letting them cool down completely, and then taking it easy for a couple hundred miles. Others just roll the car onto the trailer and head to the track. I’ll let you decide.
This tech tip is from the full book, FORD DIFFERENTIALS: HOW TO REBUILD THE 8.8 AND 9 INCH.
For a comprehensive guide on this entire subject you can visit this link: LEARN MORE ABOUT THIS BOOK HERE
SHARE THIS ARTICLE: Please feel free to share this post on Facebook Groups or Forums/Blogs you read. You can use the social sharing buttons to the left, or copy and paste the website link: https://www.cartechbooks.com/blogs/techtips/fordgearswap
Sources
DB Performance
(763) 428-9882
www.dbperformancetuning.com
Ford Racing Performance Parts
800-FORD-788 (367-3788)
www.fordracingparts.com