Basic Brake Job
When it’s time to freshen up your brakes, you can do the job in your own garage with two people in just a couple of hours. This job was done on a 1999 2.5RS. Because this is a competition car, we were limited to a set of good Axxis Metal Master pads, a set of Goodridge braided steel brake lines, a set of speed bleeders, and new OEM rotors all around. But the difference in braking performance when we were done was substantial.

This Tech Tip is From the Full Book, BRAKE REPAIR: HOW TO DIAGNOSE, FIX, OR REPLACE YOUR CAR'S BRAKES STEP-BY-STEP.
For a comprehensive guide on this entire subject you can visit this link:
LEARN MORE ABOUT THIS BOOK HERE
SHARE THIS ARTICLE: Please feel free to share this post on Facebook Groups or Forums/Blogs you read. You can use the social sharing buttons to the left, or copy and paste the website link: https://www.cartechbooks.com/blogs/techtips/basicbrake
Before you do anything to your brakes, get an official factory repair manual for your specific model and year and follow all the instructions in that manual. The basic steps in the process are outlined here:
1. Jack the car up and get your good set of jack stands underneath it, then remove the wheels. You can do one side at a time if you like. Arrange all your replacement parts in a place where they’re close by and won’t get dirty. You need an assortment of metric wrenches from 8mm for the bleed nipples to 15mm for some of the hose fittings. You’ll also need some clear rubber tubing, an empty bottle or can, and a fresh can or two of brake fluid.
2. As the legendary auto repair manual author John Muir used to say, consider the picture in front of you. At both the front and the rear, you have a caliper that is bolted to the hub, a captive brake disc, and a flexible line connecting the caliper to the rest of the hydraulic brake system. You can see the suspension and steering and control arms as well.

Look at the situation and identify all the parts and the steps you’re going to take before you get started. The time to identify a potential trouble spot is now, not when the car’s in pieces.
3. Begin by removing the top bolt of the front caliper, and then rotate the caliper out. You can now remove the old brake pads. You can see the caliper pistons.
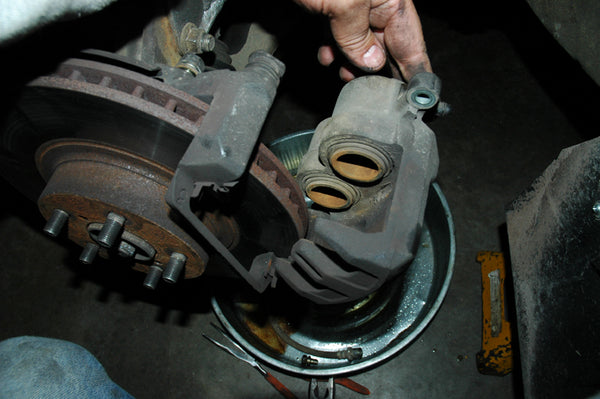
With the top bolt removed, the caliper tilts out and you can remove the old pads.
4. Remove the bottom bolt and disconnect the flexible line from the caliper and remove the caliper entirely from the car. You’ll be replacing the flexible line, and you need to get the whole caliper out of the way to replace the rotor. Have a catch-pan ready for the brake fluid that will drain out of the line and the caliper. This is a good time to remove the old bleed nipple and install your speed bleeder nipple. This is also the time to compress the pistons so your new pads will fit. Use a C-clamp to compress the pistons back into the calipers, and be careful because the calipers will squirt brake fluid as you move the pistons.

5. With the caliper removed, you can simply pull the brake disc off of the lug studs. You might need to tap it a bit with a rubber hammer to encourage it to come loose. When it comes off, you’ll see the bare hub and ABS assembly.

With the caliper out of the way, the rotor slides right off the lug studs. Inspect the condition of the lug studs while you’re in there.

This is the bare hub, ready to be built back up with new parts.
6. Thoroughly clean the new disc with brake cleaner, and slide it onto the lug studs.

The new rotor slides right onto the lug studs. Clean the disc thoroughly with brake cleaner before you install it.
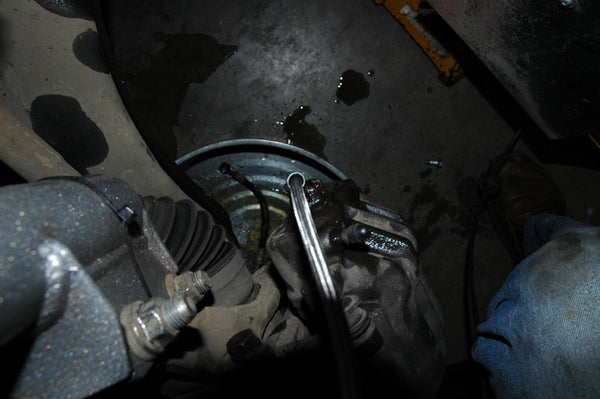
7. Now remove the old flexible line from the hard line on the inner wheel well. A mounting tab and a spring-clip that hold the lines in place, and this tends to get crusty over time—you may have to work it loose. Use two wrenches to loosen the flexible line from its partner—this may be difficult with older cars, as these joints can stick. Be careful and don’t twist or kink the hard line or you’ll be sorry. You may also need to work the flexible line loose from a holder on the strut body. On our example car, we’ve got coil-overs, so the strut holder does not exist. Carefully clean the mounting tab and the end of the hard line. Next, feed the appropriate end of the new brake line into the mounting tab and carefully tighten it to the hard line. These fittings are designed to seal themselves. Replace the spring clip and route the new line through the strut holder, if applicable.

Screw the new brake line onto the hard line at the body end first, and put the retaining clip back in. A good set of lines such as Goodridge will have the proper fitting to mount to your stock setup.
8. Now connect the flexible line to the caliper using the hollow banjo bolt and new copper washers included with the brake line kit. Snug this down as directed in the kit’s instructions, being careful to get the routing and orientation right. If you’re concerned about this, you can mount the caliper on the hub before making this connection. The copper washers only seal perfectly on the first crush.
Looking down from the top of the caliper, you can see a channel in which to route the flexible line. Use the parts provided with the kit to install your lines.
9. Next place the pads in position in the caliper frame, close the caliper, and install the second bolt to fix the caliper in position. The caliper should be a little loose around the pads until you apply brake pressure. Be careful not to get brake fluid on the pad faces or the brake disc. Your results should look similar to this photo, with a nice new disc, new pads in the caliper, and a shiny new brake line.

The completed front caliper. Just three more to go!
10. Repeat the process on the opposite front brake.
11. The procedure for the rear brakes is substantially similar, with the exception that the rear caliper has only one bolt to remove. The other mount is simply a shaft on which the caliper slides. Lubricate that shaft with a little grease or anti-seize while you’ve got it apart—it helps keep it from hanging up your caliper. When you remove the brake disc, you will see a small set of drum brake shoes beneath the “hat” of the disc. These are the parking brake shoes, and they should not impede your progress in removal or installation. If they do, make sure the parking brake is off, and then see step 14 for information on adjusting the parking brake. The mounting tab for the brake system hard line is in a slightly different place from the front end, and it is shown in the next photo.

If you have coil-overs, you might need to find an alternate means of affixing the line to your struts.
12. When you have completed the rear brakes, your results should look similar to this photo:

The completed rear brake—with these lines, new stock rotors, and the Metal Masters pads, this 2.5RS stops better than new.
13. With the speed bleeders installed, getting the air out of your brakes should be an easy job. The one-way valves in the speed bleeders mean you can open them and leave them open, which allows one person to bleed the brakes, but it’s still easier with two. Remember that your brakes operate on two diagonal circuits, so start with the rear wheel farthest from the master cylinder and open the speed bleeder about half a turn. Connect a piece of clear tubing to the bleeder and direct the other end into a waste can. Keep the master cylinder reservoir filled up and slowly pump the brake pedal. When new fluid flows out and no more bubbles come through the line, close the speed bleeder and switch to the diagonally opposite front wheel. Repeat the process for the other circuit, always being careful to keep the reservoir full. If you drink it dry, you get to start all over again.
14. Your new brake system should be ready to test now, although if you think your parking brake is too loose, now is the time to adjust it while you’ve got the wheels off the car. You adjust the parking brake by rotating a “star nut” inside the rear brake hat with a flat screwdriver or a brake adjusting lever made for the purpose. You access the star nut through a hole towards the bottom of the backing plate that usually has a rubber plug in it. With the parking brake off, adjust the star nut until the shoes barely rub on the inside of the hat, then back them off until they do not make contact.
15. With the system closed, step on the brakes a couple times and hold pressure while your friend checks for leaks. If your foot goes slowly to the floor, chances are you’ve got a leak. When you’re satisfied that everything is snug and tight, put the wheels back on and lower the car to the floor. Take a very careful test drive and pay attention to your brakes for the next couple hundred miles to make sure it’s all working correctly.
Written by Jeff Zurschmeide and posted with permission of CarTech Books

If you liked this book, you will LOVE this book!
Get your copy here.