LS Engine Rebuilds: Skills, Techniques and Tools
Now that you have a better idea of what Gen III and IV LS small-blocks are and whether the engine you’re looking to rebuild falls within the family, it’s time to decide whether an engine rebuild is really something that you want, or need, to do. To determine this, you first need to know what, exactly, we mean when we use the term “rebuild.” After this, there are some important questions you’ll want to ask, like: “Is this something I am capable of?” “What tools are needed?” And, “Where can a rebuild be performed?” We’ll try to answer all of these and more in this chapter.
 Find more rebuild tips like this in the book: HOW TO REBUILD GM LS-SERIES ENGINES
Get your copy here!
SHARE THIS ARTICLE: Please feel free to share this article on Facebook, in forums, or with any clubs you participate in. You can copy and paste this link to share: https://www.cartechbooks.com/blogs/techtips/ls-engine-rebuilds-skills-techniques-and-tools
What is a “Rebuild?”
The internal combustion engine in the form we know best today began widespread use in automobiles and other consumer products around the turn of the 20th century. The four-stroke Otto-cycle internal combustion engine variation (as it’s technically known) has been so successful that it is used to power the vast majority of vehicles on U.S. roads, hybrids included. In the decades since these engines’ first use, many advances have been made in engineering, metallurgy, manufacturing, and other fields, and today’s engines are more dependable than ever. But despite all of these innovations, the unfortunate truth continues: all engines eventually wear out.
It’s a cycle analogous to life. Born when assembled, engines wear themselves in during their early months, and perform strongest during their middle years. They begin to perform poorly later in life, and eventually will die—i.e., stop operating completely. Many engines are scrapped before they even get this far.
It’s during these later years that rebuilds (or if you prefer, “overhauls”) become important.
High-performance rebuilds excepted, a full engine overhaul is only required if an engine is suffering from incurable poor performance, or won’t run at all. True, there are lots of stopgap repairs that can be performed to get some engines up and running temporarily, but a complete rebuild is the only way to get any engine to perform reliably for many years to come.
 Worn-out internal engine parts vary in the degree and appearance of their wear (the oil-starved nature of this rod bearing is more obvious than the scratches on this piston skirt), but all ultimately reach a point where they are beyond hope and in need of replacement or complete refurbishment.
In essence, a rebuild involves replacing and refurbishing all worn, corroded, or contaminated parts inside the engine. All engine parts that move against other engine parts slowly lose metal material from their surfaces and eventually lose their functionality, regardless of quality and quantity of lubrication. The major wear components to keep in mind are pistons and piston rings, cylinder walls, and bearings, but there are lots of other surfaces that you probably don’t think about. And metal-to-metal wear isn’t the only thing working against an engine’s immortality, because corrosion, carbon, and sludge buildup in the engine’s oil and cooling systems (and elsewhere) can leave deposits that can’t be completely eliminated via use of an engine “flush,” “cleaning,” or similar technique.
In other words, no amount of rigorous routine maintenance—preventative or otherwise—can stop the ravages of time. Sooner or later, every engine will need to be rebuilt. The only question is, is it “that time” for your LS engine?
Do I Need a Rebuild?
An internal combustion engine is deceptively simple in design, yet many complicated goings-on affect an engine’s performance. This complexity can deceive, however, as the truth is that not all poorly running engines are ripe for an overhaul. It takes some definite know-how to separate those symptoms that indicate a minor or routine problem from those that indicate it’s time for a full rebuild.
We’re not here to provide a full and complete rundown of every possible engine problem and its solution (this is, after all, an engine rebuild book, not an engine repair book). But it’s generally safe to say your LS is due for a rebuild once you start consistently seeing at least a few of the things listed below:
- high odometer miles
- excess metal in engine oil
- excessive oil consumption
- oil gets discolored quickly / foreign substances in oil
- low oil pressure (ex., below minimum 10 psi / 1,000 rpm)
- engine overheating
- excessive coolant consumption / discoloration
- excessive fluid leaks
- engine misfire / hesitation
- engine difficult to crank or start
- abnormal engine noise (clunking, banging, etc.)
- visible, foul-smelling tailpipe emissions (white, bluish, and/or black)
- poor engine compression
- poor idle quality
- poor fuel mileage
- engine backfire
- reduced engine power
- MIL (Malfunction Indicator Lamp) on and scan indicates various DTCs

Not all of the above issues are totally unusual on a near-normally-running engine: some can indicate straightforward problems with items like the ignition, intake, or fuel systems, or even more mundane internal engine problems that simply require minor repair or maintenance (for example, carbon buildup from use of poor-quality fuel). Other more significant issues—for example, a blown head gasket—are also repairable; yet if something like this has gone unchecked long enough, sufficient damage to warrant a rebuild may have occurred. The line between the need for engine repairs and the need for a full overhaul can be a blurry one, and often, it’s the combination of problems that tells you it’s time.
Who Can Perform a Rebuild?
Perhaps you’ve come to the conclusion that a full overhaul is in the cards for your engine. But you’d like to know, “can I really do this?” In short, yes, just about anyone can! All it takes is some basic mechanical know-how, the patience to go through a complex undertaking step-by-step, and the ability to use simple hand tools (along with the fortitude to learn a few more). Simply put, combine this book with some common sense and a couple of other resources, and you can do it!
Well, now you’re probably wondering just what these “other resources” are! Virtually every complicated task in life requires at least a little bit of outside help, and a rebuild is no exception. The main resource you’ll need is an engine machine shop. Such a shop specializes in cleaning, machining, and resurfacing different engine parts—tasks that are impossible to perform properly without expensive, dedicated equipment and a lot of experience and know-how. See Chapter 5 for details on how to select a machine shop and what they’ll do for you. For now, we’ll also note that if in thumbing through this book you feel any part of a rebuild task would be beyond the constraints of your time, patience, or abilities, machine shops can almost always help you out with whatever labor, parts, or advice you need assistance with. Help is out there!

A typical GM service manual set. These manuals are currently published by Helm, and they’re the same ones used by dealership personnel, so the information in them is quite extensive. In fact, many vehicle service manuals comprise 4,000 pages or more! They’re a bit pricey, but the information they provide is official, (usually) very accurate, and far more comprehensive than in some of the cheaper off-brand manuals you can pick up at the local auto parts store. (Please note that some GM service manuals may only be available in electronic form.)
This brings us to the second outside resource—which although not required, is strongly recommended. It’s the GM service manual set for your vehicle! Now, hold on a sec—you may be thinking, “isn’t this book supposed to tell me everything I need to know about rebuilding an LS engine?” The answer is yes… with a small caveat. Since minor variations exist between each and every Gen III and IV engine—even during the same model year—no book can cover them all (heck, even GM Powertrain engineers probably have a hard time keeping track of every nuance!). The GM manual—and specifically, its engine volume—will be your technical resource for those small differences in specifications, and it also makes for a handy thing to point to when you’re at the parts counter of your local dealership ordering up that hard-to-describe engine bolt. The manual set is also a good resource for information on necessary undertakings like engine removal and installation, vehicle-specific procedures that are beyond the scope of this book.
Find more rebuild tips like this in the book: HOW TO REBUILD GM LS-SERIES ENGINES
Get your copy here!
SHARE THIS ARTICLE: Please feel free to share this article on Facebook, in forums, or with any clubs you participate in. You can copy and paste this link to share: https://www.cartechbooks.com/blogs/techtips/ls-engine-rebuilds-skills-techniques-and-tools
Don’t be put off by the need for a little help along the way—an engine rebuild can really be a do-it-yourself undertaking, and this book will be an indispensable resource to help guide you through it!
What Tools are Needed?
We’ve already talked about some of the equipment required to diagnose and determine whether you actually need a rebuild, and now it’s time to discuss the tools needed to perform the actual over-haul process itself. The required set of tools is fairly comprehensive, but the good news is that some of it consists of general hand tools you already own. There are, of course, other items you almost certainly don’t have yet, and some of these must be purchased from special engine build tool suppliers (or borrowed from tool rental outlets).
In the interest of completeness, we’re going to list virtually everything you need to get a hold of for a rebuild project, and we’ll try and help you by breaking these items down into categories. The first involves general tools that are 100 % necessary (or close to it) for any rebuild project. The second category consists both of tools that are strongly recommended and that you probably can’t do without, particularly if you’re rebuilding for high-performance. The final category includes some less vital, yet still suggested, tools that you may only need in certain circumstances or are simply designed to save you time and headache. Please note that we’re only discussing tools here—we’ll talk about any necessary supplies (thread sealant, cleaning solutions, storage bags, assembly lubricant, etc.) in the chapter in which they become important.
Required Tools
All of the following are must-haves for your project, and happily, you probably already have nearly all of them. In no particular order, they are:

Piston ring squaring tool: During ring fitting, proper ring end gap measurement is not possible without one of these. You will also need one even with “drop-in” ring sets (to double-check end gap).

Socket wrenches: You will need a variety of regular and deep socket wrenches, both 12-point and hex, and they’ll need to be metric because that’s what everything on an LS is! You should have standard sockets as well, though, particularly if you’ll be installing any aftermarket parts (which many times use standard bolts and nuts).

Screwdrivers: Truth be told, there are few, if any, screws on an LS engine; but you’ll still need screwdrivers and will be surprised how often they come in handy, especially flatheads.

Feeler gauge: Used primarily during ring fitting, a feeler gauge will also be useful for other measurements, like checking engine cover alignment.

Open- and box-end wrenches / pliers: Open-end and box-end wrenches should also be metric, though standard sizes can be useful too. Have a few adjustable wrenches ready as well. Ratcheting box-end wrenches can be a time saver. Not shown but helpful are pliers, both regular and needle-nose.

Magnets: During disassembly, magnets will be a big timesaver and are particularly helpful at removing slippery, oily items like lifters. You also will need one when you manage to drop a bolt into a hard-to-reach place (notice that is a “when,” not an “if!”).

Piston ring compressor: Don’t just buy any old ring compressor that looks like it should be an oil filter wrench. Tapered, sleeve-style ring compressors are the preferred type as they allow the best chance of your piston rings safely entering the bore without breakage. Some are fixed for a very narrow range of bore sizes (right), while others are adjustable over a small range in bore size (left).

Hex key wrenches: More commonly known as “Allen” wrenches, you will need metric versions of these in certain places on an LS engine, one example being the oil gallery plugs. Some engines have star head (TORX) bolts as well, so have a set of those around too.
Find more rebuild tips like this in the book: HOW TO REBUILD GM LS-SERIES ENGINES
Get your copy here!
SHARE THIS ARTICLE: Please feel free to share this article on Facebook, in forums, or with any clubs you participate in. You can copy and paste this link to share: https://www.cartechbooks.com/blogs/techtips/ls-engine-rebuilds-skills-techniques-and-tools

Torque wrenches: You will need at least two of these: one that works in inch-pound increments, and another for low-to-medium foot-pound readings. You may need a third wrench that is good to high foot-pound readings (75 ft-lbs or more), especially for a high-performance rebuild using aftermarket fasteners. Make sure your torque wrenches are fairly new—these things lose their accuracy over time! If there is any doubt, you may want to take them back for calibration (many tool outlets do this).

Dial caliper: Calipers are convenient for taking measurements of a variety of parts, whether you need to know an item’s diameter, length, or depth. Most calipers have a dial readout, but they are also available with electronic readouts for even better accuracy.

Harmonic damper and gear pullers/installers: As with past small-blocks, the LS’s harmonic damper (or “balancer”) requires a harmonic balancer installation tool (left) to press it onto the snout of the crank. You must ensure, however, that the tool you pick up is compatible with M16 x 2.0 threads and that it has sufficient reach to get at the deep-set threads in an LS’s crank snout. If not, a backup plan is available that will simply involve buying a longer bolt (see Chapter 8 for details). Along similar lines, although the gears of some timing sets slide easily onto the crank snout chances are you will need a crank gear installing sleeve (center) to help the job—though there is a backup plan here, too, that involves using your old crank sprocket to “double up” and press on the new one (see Chapter 8 as well). A 3-jaw puller (right) will assist in removing both of these items during disassembly.

Engine stand and hoist: If you’ve been working on cars and engines for any amount of time, you already have these. You’ll be doing nearly every step of the rebuild on an engine stand, while a hoist will be needed for getting the engine in and out of the vehicle and/or its removable subframe. They don’t have to be shiny and new, so long as they are in good condition and fully functional!

“Cheater” bars/pry bars: These will aid primarily in engine disassembly, but may be helpful during some assembly steps as well. Not pictured but very useful: a 1/2-inch drive breaker bar.

Rubber mallet: Despite what you’re thinking, this is not just for disassembly!A rubber-faced mallet will be used during assembly as well. A standard metal one will be helpful too, though for more limited purposes.

Dial bore gauge: This type of gauge is useful for accurately measuring diameters of cylinders and bearing bores. It primarily will help you in verifying the quality of machine work after it’s been performed.
Recommended Tools
These tools are very strongly suggested, and though you theoretically could put an engine together without them, it would be a very bad idea! Some of them actually are mandatory, but have been placed in this category simply because an alternative tool exists that you may substitute if desired. A select few will likely only be needed in high-performance rebuilds, and these will be noted accordingly. A choice not to invest in nearly all of these would be a grave mistake!

Valve seal puller: To ease the task of removing your valve seals from your cylinder heads (if you’ll be disassembling yourself), a valve seal puller tool is a nice item to have. Its geometry makes providing the correct crush pressure to dislodge the seal from the top of the guide easy.

Micrometers: A set of micrometers is relatively inexpensive, though price rises with dimensional accuracy. Since you really only need a set good enough for double-checking diameters of machined items like journals and piston pins, you should grab a set accurate to a half thousandth of an inch (0.0005).

Degree wheel kit: Normally needed on high-performance applications only, a degree wheel kit allows precise verification and/or adjustment of camshaft timing during pre-assembly. A system for mounting a dial indicator and measuring piston and lifter movement is a required complement to a degree wheel kit, and some kits include it.

Gauging plastic: Whether you want to call it a supply or a disposable tool, this stuff is the easiest and most foolproof way to measure bearing clearances. It’s most commonly known as Plastigage, a trade name used by Sealed Power. The only reason we’re not calling it mandatory is that you theoretically could use a micrometer, a caliper, and a dial bore tool for the same job—but you’d need very accurate versions of these tools to do it properly.

Piston ring filer: This is for use when fitting piston rings to the bores of your Gen III/IV block. A hand-crank version works just fine at setting the end gaps, though electric versions are available that are more accurate and will save some time. The one and only time you will not need one of these is when using a “drop-in” ring set (even so-called gapless rings can require file fitting!).
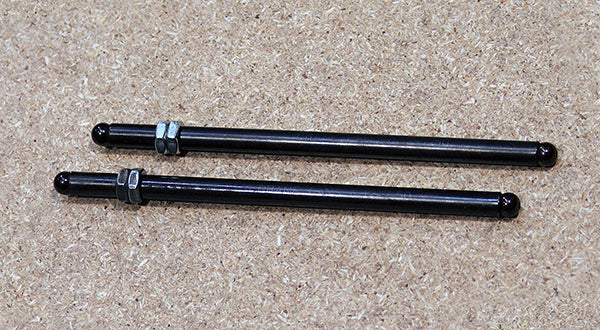
Pushrod length checker: Mandatory for most high-performance applications but also helpful for many stock rebuilds. It’s best to have two checkers (one for each valve of a cylinder), and they’ll need to work within the range of 7.400 inches (all LS engines have a stock pushrod length close to this). The best checkers are those strong enough to withstand the full load of a valve spring, so that you can use them during pre-assembly while turning the engine over and verifying things like rocker geometry.

Connecting rod vise: A standard vise is a bad way to hold rods secure while their bolts are being loosened. Unless you can find some specialized vice inserts that won’t nick your rods, an aluminum rod vise is the best way to go, as they are relatively inexpensive. Steel rod vises with super-smooth clamping surfaces are also available, but can be very pricey.

Valvespring compressor: This tool is used during both disassembly and assembly of cylinder heads, and you’ll need one heavy-duty enough for automotive valvesprings. The only time you won’t need a valvespring compressor tool is if you’re having your machine shop disassemble and assemble your heads for you, or if you’re swapping to a pre-assembled set of high-performance cylinder heads. The best type of tool locks in place when the spring is compressed, as this one from Goodson does.

Dial indicator(s) and fixture(s): A dial indicator is an indispensable tool for measuring precise movement of many engine parts during pre-assembly. The fixture on the left is an adjustable one that will also prove useful for taking measurements like crankshaft endplay and runout, processes that are important on all engines. Try to get one designed for metric thread bolt holes if at all possible. The deck bridge-style fixture on the right is also helpful, but primarily for measuring piston movement and deck clearance. Shown in the bottom right is a TDC stop, helpful during cam degreeing (you’ll need one capable of spanning the wide head bolt spacing of the LS).

Rod bolt stretch gauge: Some high-strength aftermarket connecting rods use a bolt stretch specification for fastener tightening, and a gauge like this will be needed to measure it. If your connecting rod manufacturer doesn’t specify this method, you won’t need one of these.

Valvetrain checker springs: These items are needed for high-performance rebuilds only, and will be used during pre-assembly for proper verification of piston-to-valve clearance. You may want to wait until you have your valvespring retainers in hand to buy these—you’ll need to match the checker springs to their O.D.

Valvespring height gauge: In order to ensure your valvesprings will be at the correct installed height (and thereby provide the right amount of seat pressure), you’ll need a valvespring height gauge. While primarily used during high-performance rebuilds, this item can be useful in stock rebuilds, too. You will need one that will work in the range of your valvespring’s required installed height and will fit the diameter of your valvespring retainers, so you should probably hold off on buying this gauge until you have those items.

Torque angle gauge: Some of GM’s fastener tightening specifications used on the LS involve the torque-plus-angle method (for example, 15 ft-lbs plus 51 degrees—that’s not something you want to “eye up”!). Unless you’re using aftermarket fasteners exclusively, you will need a torque angle gauge.
Suggested Tools
Here are some other tools you may wish to get a hold of, depending on your application. Many of them are designed to help make your life easier by saving you some time and effort, reducing the chance for assembly (or disassembly) error.

Crankshaft rear oil seal installation tool: It is possible to gently tap the rear crank seal into the rear cover, but you can guarantee precise installation and a leak-free seal if you have the right tool. This one is made by famed LS engine specialists Wheel to Wheel Powertrain. While the two black pieces are what actually squeeze the rear seal into place, the aluminum donut also helps prevent the lips of some seals from being damaged as the cover is slid onto the back of the crank.

Engine cover alignment tools: The LS’s front and rear engine covers require precise alignment with the block during installation. You can do this without special tools if you are very careful; however, it is more foolproof if you have the right equipment for the job. Made by SPX Kent-Moore, these are the official GM “J” tools, and they are very expensive, so try to find a tool outlet that will rent them to you!

Flywheel holding tool: There are a few times where you’ll need to hold the crank steady in one position, and the best way to do this is to install your flywheel/flexplate on the back and use a flywheel holding tool (the one pictured is the official GM “J” tool). This item will be particularly useful during checking of rod bearing clearances, where any movement of the crank can destroy a measurement. For other steps, you can just use a suitable pry bar inserted into a flywheel tooth, but this is a little trickier.

Inspection stands: Having your heads lying on the surface of a table makes the processes of disassembly, inspection, and assembly somewhat more time-consuming. Similarly, your cam and crankshaft are bulky items that can be difficult to inspect and clean safely. Save yourself some time and frustration by picking up a set of head stands and a crank/cam inspection stand. Both of these are sold by Goodson and are good buys.

Piston ring expander pliers: These handy items will help you install the compression rings onto your pistons with reduced risk of ring breakage or piston scratching.

Straight edge: A super-flat machinist’s straight edge isn’t necessary because you’ll be having your machine shop check deck flatness for you. However, a run-of-the- mill woodworking or similar straight edge can be helpful to check engine cover alignment.

Crankshaft turning socket: An engine build involves a substantial amount of spinning the crank, whether during disassembly, pre-assembly, or final assembly. For this reason, it makes things easier if you have a dedicated crank socket. LS-specific models are designed to fit onto the oil pump drive gear on the crank snout. Some, like this one made by COMP, even have a provision for installing a degree wheel onto the front. If you don’t feel like spending the money on one of these, it is possible to do the job using an old crank bolt (noting that this will make it extremely difficult to turn the crank counterclockwise).
Where Can a Rebuild be Performed?
You’ve decided you’re going to go ahead with rebuilding your LS engine and are confident that it’s something you have the time and patience to undertake. You’ve also picked out the tools you are going to need. The pieces of the puzzle are all falling together… now, all you need is a place to do it.
Most of us don’t have a dedicated, super-clean engine build room complete with climate control, large work-benches, and excellent lighting. This would certainly be nice to have, but fortunately you can get by with much less. For most do-it-yourselfers, this means a sufficiently large garage that’s relatively clean and is isolated from intruders who might interfere with your work while you’re away (or overly distract you while you’re in the middle of it). Nothing is worse than stopping at a critical point in an engine assembly, only to come back a few hours later and find that someone moved the piston rings you’ve just uniquely file-fit to each cylinder, mixing them up in the process.
You will similarly want to avoid having anyone, for example, perform wood-working or other contaminate-creating tasks in the area while your project is underway (again, we’ll talk more on the importance of cleanliness in Chapter 6). And let’s state the obvious—alcohol and engine building do not mix, nor do distractions like watching a hockey game. An engine rebuild can be a fun project, but it’s also one that requires a lot of care and attention to detail!
Conclusion
Now that you’ve got a better understanding of just what a rebuild is, and are better aware of the resources and tools you need to successfully complete it, you can move on to disassembling your LS engine. We’ll go through this step-by-step in Chapter 3.
Written by Jefferson Bryant and posted with permission of CarTech Books
Find more rebuild tips like this in the book: HOW TO REBUILD GM LS-SERIES ENGINES
Get your copy here!
SHARE THIS ARTICLE: Please feel free to share this article on Facebook, in forums, or with any clubs you participate in. You can copy and paste this link to share: https://www.cartechbooks.com/blogs/techtips/ls-engine-rebuilds-skills-techniques-and-tools